Introduction to Curved Shade Sails
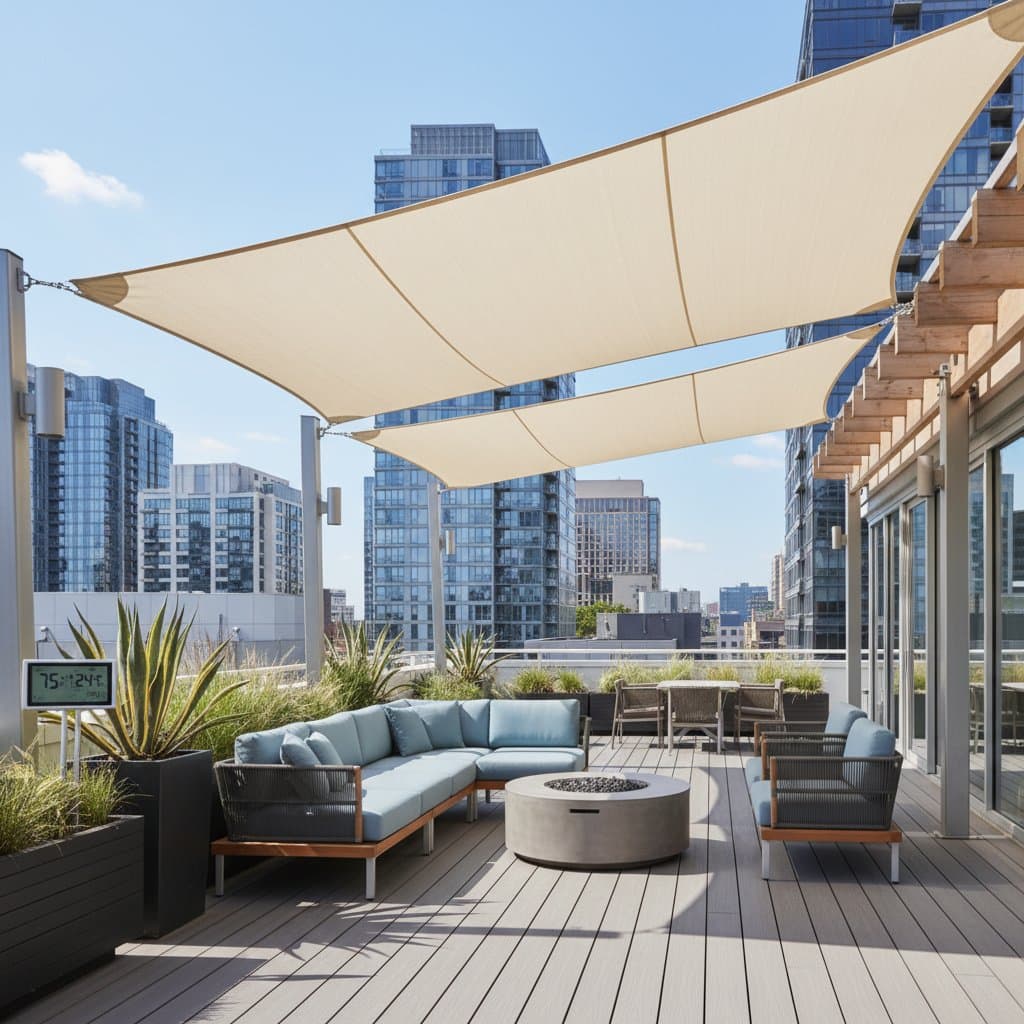
Urban decks often become uncomfortably hot under intense summer sun, limiting their use to early mornings or evenings. Curved shade sails address this issue effectively by creating shaded zones that block direct sunlight and reduce ambient heat. These structures feature a gentle arc that enhances airflow, promotes water runoff, and adds an architectural element to outdoor spaces.
Made from high-density polyethylene or similar UV-resistant fabrics, shade sails withstand harsh weather while maintaining their shape. They differ from flat shades by distributing tension across curved edges, which prevents pooling and ensures even coverage. Homeowners appreciate the blend of functionality and aesthetics, as these sails complement modern patios without overwhelming the landscape.
Benefits for Urban Outdoor Living
One primary advantage lies in temperature regulation. Studies and user reports indicate that properly installed sails can lower surface temperatures on decks by up to 20 degrees Fahrenheit, making bare feet comfortable and furniture less scorching. This cooling effect extends to the surrounding air, fostering a more pleasant environment for gatherings or relaxation.
Beyond cooling, shade sails provide essential UV protection, reducing skin exposure during outdoor activities. The fabric blocks up to 95 percent of harmful rays, which proves invaluable in densely built city settings where shade options remain limited. Additionally, the installation process enhances property value by defining outdoor areas with a professional touch.
Planning Your Shade Sail Installation
Before purchasing, assess your deck's dimensions and sun exposure patterns. Track the sun's path over several days to identify peak heat zones, typically from late morning through afternoon. Select a sail size that covers at least 70 percent of the area without overhanging edges excessively.
Consider anchor points such as existing posts, walls, or new freestanding poles. For urban decks, ensure anchors comply with building codes, especially in windy areas. Opt for fabrics in neutral tones like beige or gray to maximize light reflection and minimize visual clutter against city backdrops.
Step-by-Step Installation Guide
1. Gather Materials and Tools
Acquire a curved shade sail kit that includes the fabric, stainless steel hardware, and turnbuckles. Essential tools comprise a drill with masonry bits for concrete attachments, a level for alignment, and sturdy ladders for safe access. Measure twice to confirm the sail fits your planned span, accounting for the curve that adds depth.
Prepare the site by clearing debris and marking anchor locations with chalk. Space anchors at least 10 feet apart for small sails, ensuring diagonals measure slightly longer than the fabric's specifications to allow for tension.
2. Install Anchors Securely
Secure eye bolts or brackets into walls, posts, or ground sleeves using appropriate fasteners. For concrete decks, embed anchors with epoxy resin to achieve a firm hold capable of supporting 500 pounds of tension per corner. If using freestanding poles, bury them at least three feet deep in reinforced concrete for stability against wind loads.
Verify each anchor's position with a plumb line to maintain even height. This step forms the foundation of the installation, as uneven anchors lead to sagging or stress points in the fabric.
3. Attach Hardware
Connect turnbuckles and snap hooks to each anchor point. These components enable precise tension adjustments, distributing force evenly across the sail. Use corrosion-resistant stainless steel to prevent rust in humid urban environments.
Thread the hardware through the sail's reinforced corners, which often feature D-rings for secure attachment. Test connections by gently pulling to ensure no slippage occurs.
4. Tension the Sail
Hook each corner to the corresponding hardware, starting from the highest points. Gradually tighten the turnbuckles, alternating between corners to achieve uniform tautness. The sail's inherent curve will emerge as tension pulls the fabric into its designed arc, eliminating wrinkles.
Focus on diagonal pulls to center the curve, aiming for a smooth surface with minimal sag. A properly tensioned sail resembles a gentle dome, allowing wind to pass underneath without excessive movement.
5. Check Clearance and Final Adjustments
Examine the perimeter to confirm no part of the sail contacts walls, railings, or vegetation. Maintain at least six inches of clearance to avoid abrasion during breezes. In gusty conditions, the structure should yield slightly rather than strain against fixed points.
Step back to evaluate the overall appearance and shade coverage. Make minor tweaks to tension if shadows fall unevenly, ensuring the deck receives balanced protection.
Safety Considerations
Position sails away from open flames, grills, or heat sources to prevent fire risks from sparks. In regions prone to severe weather, detach the sail during storms exceeding 40 miles per hour to avoid damage or injury. Regular inspections reveal wear early, so examine all components biannually for signs of corrosion, fraying, or loose fittings.
When cleaning, apply mild soap diluted in water with a soft-bristle brush to remove dirt and pollen. Avoid harsh chemicals, bleach, or high-pressure washers, as these degrade the fabric's protective coatings over time.
Maintenance Practices
Extend the lifespan of your shade sail through proper care routines. Store it in a dry location during off-seasons, rolling the fabric loosely to preserve fiber integrity and prevent permanent creases. Many users retain the hardware framework in place, facilitating quick swaps of sails for different seasons or aesthetics.
Choose lighter colors such as sandstone or ivory to reflect sunlight and further reduce heat buildup. Darker shades offer bolder contrast but absorb more warmth, so reserve them for shadier spots. Annual deep cleans maintain vibrancy, ensuring the sail continues to perform effectively year after year.
Cost and Time Estimates
A basic single-sail installation requires about four hours for experienced users, covering planning through tensioning. More complex setups with multiple sails or custom poles extend to a full weekend, including curing times for concrete. Entry-level kits start at affordable prices, while premium options with galvanized steel add durability for long-term investment.
Budget for potential extras like professional consultations if structural modifications prove necessary. Over time, replacing only the fabric every five to seven years proves economical, as the anchor system remains reusable and robust.
Enhancing Your Shaded Deck
Begin transformation by installing a single sail over the hottest section of your deck. Consult sun charts or apps to optimize placement, then select a breathable fabric that suits your climate. After setup, incorporate ambient lighting or vertical greenery to amplify the inviting atmosphere.
This addition not only mitigates midday heat but also elevates the deck's appeal for everyday lounging or entertaining. Residents discover a versatile outdoor extension that supports prolonged comfort, reducing reliance on air-conditioned interiors during peak summer months.