Introduction to Smart Irrigation for Balcony Gardens
Balcony gardening offers urban dwellers a connection to nature, but consistent watering poses challenges, especially for busy schedules or travel. A smart irrigation system addresses this by automating water delivery through app-controlled timers, sensors, and precise emitters. These setups connect to your home Wi-Fi or Bluetooth, allowing remote adjustments to keep plants hydrated without manual intervention.
Such systems promote healthier growth by mimicking natural rainfall patterns and reducing overwatering risks. They also align with sustainable practices by minimizing waste. This guide walks through every step, from assessment to long-term care, enabling you to build a reliable system tailored to your space.
Assessing Your Balcony Setup
Begin by evaluating your balcony's dimensions and plant arrangement. Measure the length, width, and available railing or floor space to determine tubing length needs. Count the number of pots and note their sizes, as larger containers require more emitters.
Observe sunlight exposure and wind patterns, which influence evaporation rates. Test your water source, whether a nearby faucet or reservoir, for pressure and accessibility. Consider your technical comfort level; basic kits suit beginners, while advanced models with soil sensors appeal to those seeking precision data.
Sketch a layout diagram labeling pot positions and proposed tubing routes. This visual aid prevents errors during installation and simplifies future adjustments. Allocate a budget based on scale: entry-level systems start at modest prices, scaling with features like multiple zones.
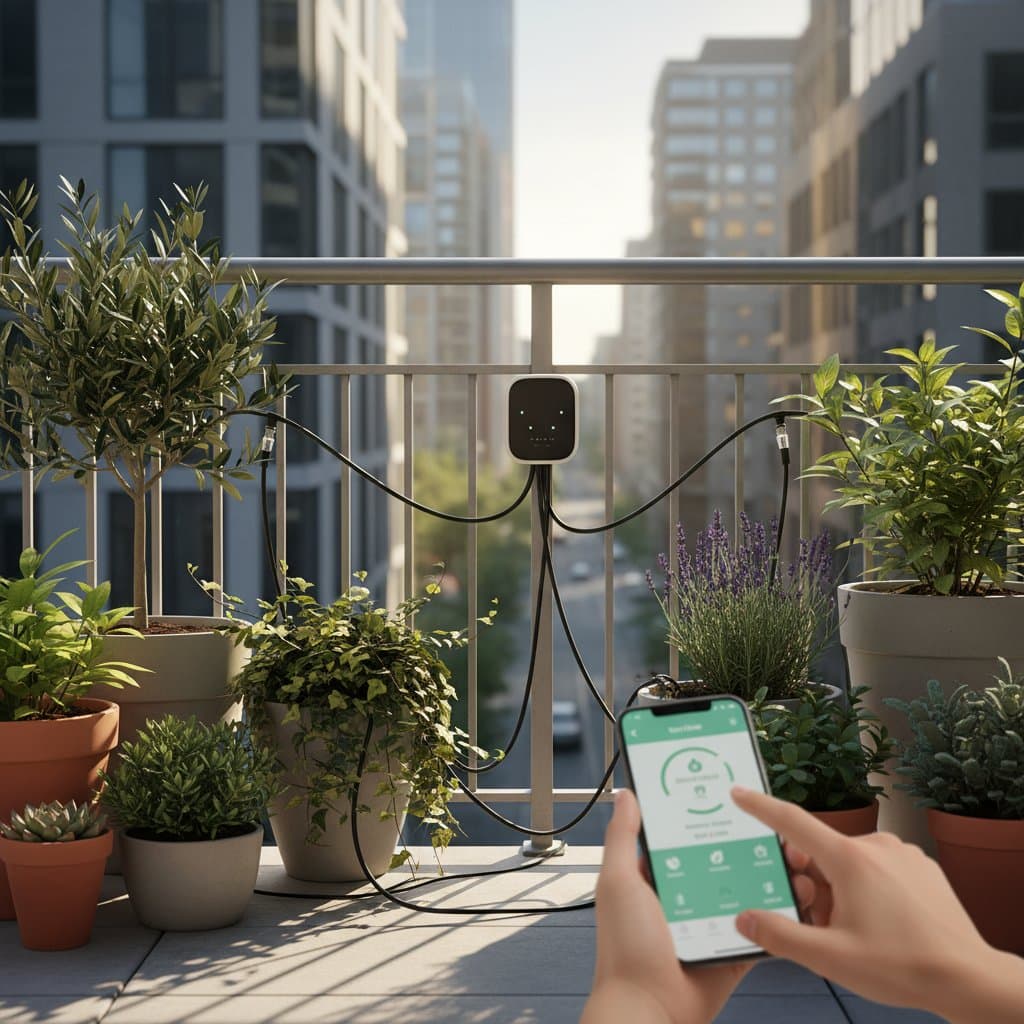
Selecting the Right Smart Irrigation Kit
Choose components based on your balcony's specifics. A basic kit includes a controller, pump, tubing, and drippers, sufficient for up to 10 pots. Look for weather-resistant materials like UV-protected plastic to withstand outdoor exposure.
Opt for Wi-Fi-enabled controllers for remote access via smartphone apps. These allow scheduling, manual overrides, and notifications for issues like low battery. Bluetooth alternatives work well for smaller setups but limit range to about 30 feet.
Incorporate sensors for enhanced efficiency: moisture probes halt watering in wet soil, while rain detectors pause during storms. Brands offering expandable kits provide flexibility as your garden grows. Read user reviews for reliability in urban environments, prioritizing ease of app integration with iOS or Android devices.
Gathering Essential Tools and Materials
Assemble tools before starting: adjustable wrench for fittings, scissors for cutting tubing, and zip ties for securing lines. A drill with bits suits mounting controllers on railings. Include Teflon tape to seal connections and prevent leaks.
Materials extend beyond the kit: purchase extra emitters for varying plant needs, such as higher flow for thirsty species like tomatoes. Select pressure-compensating drippers to ensure even distribution across elevations. If using a reservoir, choose a 5-gallon container with a lid to deter debris.
Verify compatibility with your water supply; adaptors may be necessary for hose threads. Stock spares like filters and batteries to avoid interruptions. Organize everything in a toolkit for quick access during setup.
Step-by-Step Installation Guide
1. Prepare the Water Source
Connect the pump to your faucet or reservoir using a quick-connect adapter. Ensure the inlet filter is clean to avoid clogs. Position the pump on a stable, elevated surface away from direct plant drippage.
2. Lay Out the Main Tubing
Run the primary line along the balcony railing or floor edges, securing with clips every 2 feet. Avoid sharp bends that restrict flow. Cut tubing to fit, leaving slack for adjustments.
3. Install Branch Lines and Emitters
From the main line, attach secondary tubes to individual pots using T-connectors. Place one or two drippers per pot, positioning them near the soil base for root-level absorption. Punch holes in tubing with the provided tool for secure insertion.
4. Mount the Controller
Affix the controller to a dry, sheltered spot like inside a window sill or under an awning. Route cords through weatherproof conduits. Power it via an outdoor-rated extension if needed, ensuring GFCI protection.
5. Connect to Power and Network
Plug in the unit and pair it with your phone app following on-screen prompts. Test connectivity by sending a short watering cycle. Calibrate sensors if included, burying probes 2 inches into soil samples.
6. Test the Full System
Activate a trial run to check flow from each emitter. Inspect for leaks at joints and adjust pressure as necessary. Monitor app readings to confirm accurate timing and coverage.
7. Set Your Schedule
Access the app to define watering intervals. Mornings prove ideal for balcony setups, as lower evaporation preserves moisture. Initiate with sessions of 5 to 10 minutes daily, refining based on plant vitality and soil sensor feedback.
Safety Tips
Position electrical components away from moisture-prone areas to prevent shocks. Form drip loops in cords, allowing water to fall away from plugs rather than toward them.
Route tubing clear of walking paths to minimize trip hazards. Select corrosion-resistant fittings, avoiding untreated metals in humid or coastal conditions. Integrate rain sensors or manually disable the system during downpours to avoid overflow.
Troubleshooting Common Issues
Low Water Pressure at Distant Pots
Shorten tubing lengths or upgrade to a higher-capacity pump. Inspect for blockages, kinks, or loose connections along the line.
Soggy Soil Conditions
Decrease duration or frequency of cycles. Install a moisture sensor to automatically suspend operations when saturation levels rise.
Frequent App Disconnections
Relocate the controller nearer to your Wi-Fi router or add a signal extender. For Bluetooth units, maintain proximity within 30 feet.
Clogged Drippers
Perform monthly flushes by running clear water through the system. Switch to filtered sources if sediment appears in your supply.
Budget and Time Considerations
Entry-level single-zone kits range from 100 dollars, with assembly requiring about one hour. Ongoing expenses remain minimal, as components endure multiple seasons when properly stored.
Advanced configurations with sensors and zoning fall between 200 and 300 dollars, yielding water savings over time. Automation typically reduces hands-on watering by 90 percent, freeing hours weekly.
Ongoing Maintenance Practices
Inspect and clean filters monthly, flushing lines to remove buildup. Dust the controller exterior to protect ventilation ports. Update the app regularly for the latest firmware enhancements.
For reservoir-based systems, drain weekly to inhibit algae. Ahead of winter, detach the pump for indoor storage and coil tubing in a dry container.
Efficient Storage Strategies
Organize connectors, replacement parts, and tools in a marked bin for easy retrieval. Store tubing vertically to prevent creases. Retain your layout sketch for seamless seasonal reassembly.
Professional Assistance Options
For permanent plumbing modifications or rental restrictions, consult a licensed plumber. They can add an outdoor spigot equipped with a backflow preventer to safeguard water quality.
Larger installations spanning over 20 pots or integrating lights benefit from an electrician's expertise in weatherproof outlets and wiring. Professional services generally cost 150 to 300 dollars.
Implementing Your System
A smart irrigation setup shifts balcony maintenance to an effortless routine, with occasional app checks sufficing after initial configuration.
To proceed:
- Assess your space and pot count.
- Select an appropriate kit.
- Follow the installation steps outlined.
Precision replaces uncertainty, ensuring your garden flourishes regardless of daily demands.