Transform Bare Rooftops into Versatile Flex Zones with Smart Pergola Shades
Bare rooftops often remain underutilized due to excessive exposure to sunlight and weather elements. Smart retractable pergola shades address this challenge by converting open spaces into adaptable areas for relaxation and gatherings. These systems enable precise control over light, shade, and airflow, ensuring usability throughout the day and across seasons. This guide outlines the functionality of these installations, associated costs, maintenance requirements, and safe planning strategies.
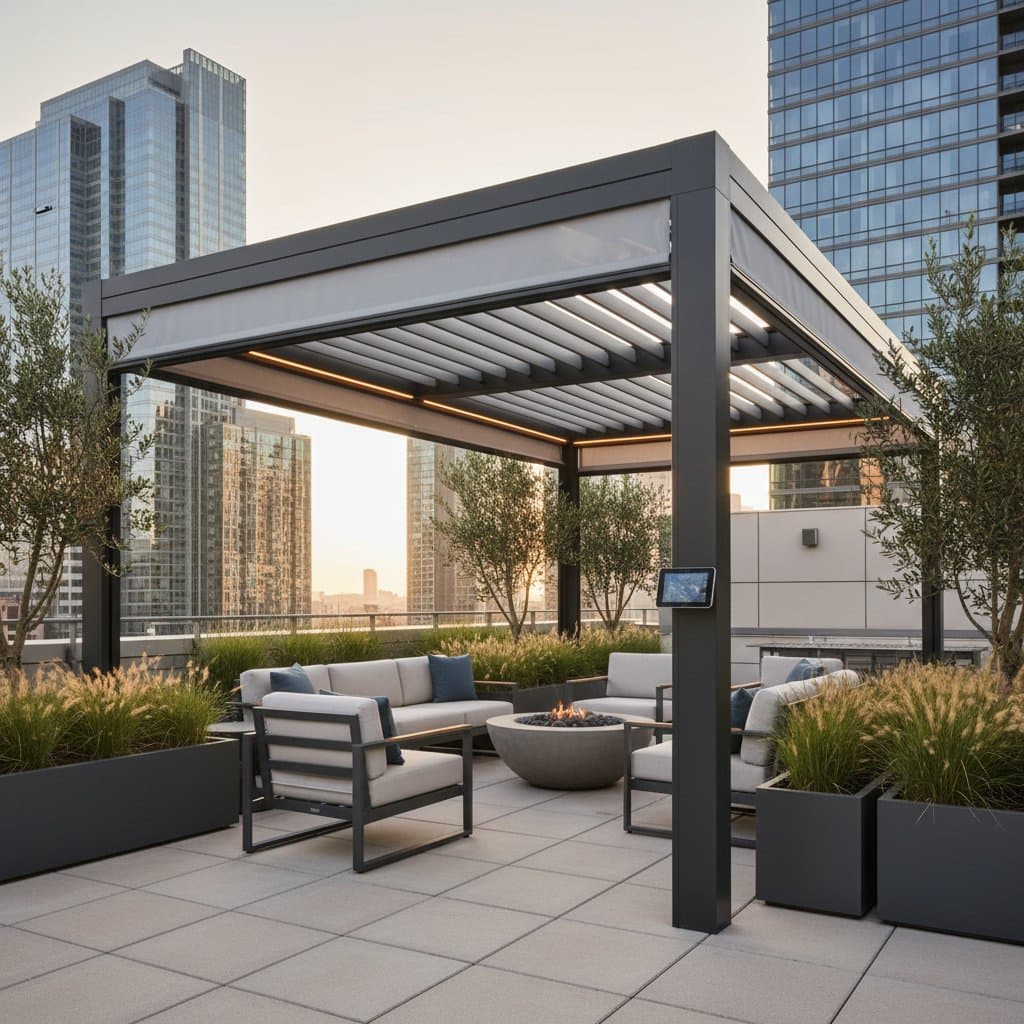
Overview of Smart Retractable Pergola Shades
A smart retractable pergola shade consists of an outdoor framework equipped with motorized louvers or fabric panels that adjust to manage light and environmental exposure. Users can fully open the structure for maximum sunlight, close it for complete shade, or angle the louvers to promote ventilation while reducing glare. Integration with home automation platforms allows remote adjustments via smartphone applications or voice commands.
Rooftops face intense direct sunlight and prevailing winds, which accelerate surface heating, material degradation, and discomfort. Without proper shading, outdoor furniture deteriorates rapidly, and usable time diminishes. Smart pergolas empower users to customize their surroundings, providing shaded lounging areas in summer, protection from light precipitation, and compatibility with heating elements for cooler months.
Essential Tools and Materials
For those considering a partial do-it-yourself approach or seeking insight into professional installations, assemble the following items:
- Measuring tape extending at least 25 feet (7.6 meters) to assess spans accurately
- Level and chalk line for precise marking of anchor locations
- Cordless drill equipped with masonry bits for securing attachments to roof surfaces
- Weatherproof sealant to seal gaps around mounting points and prevent water ingress
- Mounting brackets and stainless steel hardware designed to support outdoor weight loads
- Smart controller hub compatible with existing home network systems
- Louver panels or retractable fabric canopy matched to the rooftop dimensions
Verify the roof's structural capacity prior to proceeding. Pergola frames typically weigh 150 to 400 pounds (68 to 181 kilograms), varying by material and scale.
Installation Steps
1. Measure and Plan the Layout
Begin by diagramming the rooftop layout, accounting for obstructions such as doors, vents, and railings. Maintain a minimum clearance of 24 inches (61 centimeters) from parapet walls to facilitate airflow and access for upkeep. Determine the placement for the motor and control unit, ensuring proximity to a reliable power source.
2. Assess Structural Integrity and Obtain Permits
Evaluate the roof deck's ability to support additional weight before any attachments. Concrete or steel reinforcements provide the strongest foundations, while wooden or composite surfaces might require supplemental bracing. Review local building regulations, as many municipalities mandate permits for elevated rooftop additions exceeding specified dimensions.
3. Secure the Frame
Anchor base plates using corrosion-resistant fasteners sealed against weather. Employ a level to align the frame perpendicularly. Distribute torque on bolts uniformly to minimize strain on connections. For roofs with flexible membranes, install flashing plates beneath mounts to distribute pressure and avoid perforations.
4. Attach Panels or Fabric
In louver-based designs, secure individual panels using hinge pins or brackets in the sequence recommended by the manufacturer. For fabric canopies, insert the material into guide tracks and apply tension evenly. Exercise caution with sharp edges by wearing protective gloves during handling.
5. Wire Power and Integrate Controls
Position the motor within a weather-resistant enclosure. Route electrical cables through sealed conduits to block moisture. Connect the system to the control hub or application as per instructional guidelines. Perform at least three full extension and retraction cycles to verify operational smoothness.
6. Adjust Built-in Sensors
Advanced models feature sensors for light and precipitation detection. Fine-tune these by simulating conditions with natural daylight and a light water spray. Set response thresholds to activate within 10 seconds of environmental shifts, enabling proactive automation that safeguards furnishings from unexpected weather.
Key Safety Considerations
Disconnect power at the main breaker prior to any electrical work on the motor. Refrain from using the pergola frame as a platform during assembly. Secure a safety harness when operating near rooftop perimeters. Apply sealant exclusively to fixed anchor seams, avoiding interference with movable components.
Common Troubleshooting Solutions
Should the mechanism hesitate or operate asymmetrically, inspect tracks for obstructions and louvers for looseness. Remove debris using a soft brush and diluted soap solution. Ensure tension cords on fabric elements remain balanced across both edges. If the motor activates audibly without motion, examine the power supply or initiate a controller reset.
Address delays in smart controls by rebooting the application and network router. Reestablish device connections if latency surpasses five seconds. For leaks through sealed louvers, clear gaskets and drainage paths of any accumulations.
Ongoing Maintenance Practices
Perform cleaning quarterly with warm water and a non-abrasive cloth to preserve surface integrity. Steer clear of abrasive chemicals that erode protective finishes. Apply silicone-based lubricant to pivot points annually. Treat fabric mildew using a solution of one cup white vinegar per gallon (3.8 liters) of water.
During winter, fully retract fabric elements and immobilize them. Isolate electrical components ahead of significant snowfall. For louver configurations, position panels at a slight angle to facilitate natural shedding of snow and rain, thereby reducing accumulated load.
Cost Estimates and Timeline
Systems sized for modest rooftops (approximately 10 by 12 feet, or 3 by 3.6 meters) range from $6,000 to $11,000 when fully installed. Expansive, bespoke aluminum units with comprehensive automation may exceed $20,000. Professional setup usually spans two to three days following material delivery.
Opting for manual canopies upgraded with basic motors halves the expense. Factor in additional charges for electrical integration and waterproofing, which safeguard the overall rooftop integrity.
Indicators for Professional Involvement
Engage a certified electrician for all wiring tasks and a structural specialist for aging or unfortified roofs. Professionals ensure seamless synchronization with broader smart home ecosystems, including lighting and meteorological integrations. Request comprehensive records covering load assessments, sealing verifications, and warranty terms.
Seasonal Maintenance Schedule
- Spring: Examine all joints for wear, secure fasteners, and validate sensor functionality.
- Summer: Clear nearby drains and gutters to avert water accumulation around the structure.
- Fall: Dislodge foliage from guide tracks and inspect motor enclosure seals.
- Winter: Position or retract components to mitigate ice formation.
Consistent attention extends service life and maintains reliable automation.
Implementing Your Rooftop Upgrade
Initiate the project modestly by shading a single rooftop section, allowing evaluation of compatibility with daily routines before broader application. Request material samples to assess aesthetic and thermal properties firsthand.
Smart retractable pergola shades elevate rooftops beyond mere open areas into integral home extensions. These installations support morning routines, alfresco meals, and serene afternoons with effortless environmental control.