Harness Solar Energy with Pergola Shade Sails
Sunny outdoor spaces offer untapped potential for renewable power. Solar pergola shade sails enable relaxation in the shade while supplying electricity to charge devices. These structures combine protective cover with integrated solar technology, reducing dependence on traditional power sources and enhancing sustainability.
This comprehensive guide explains the components of solar shade sails, necessary tools for installation, detailed procedures, safety protocols, common issues with solutions, cost considerations, and upkeep routines. Readers gain practical knowledge to transform a standard pergola into an efficient, self-sustaining outdoor area.
Understanding Solar Pergola Shade Sails
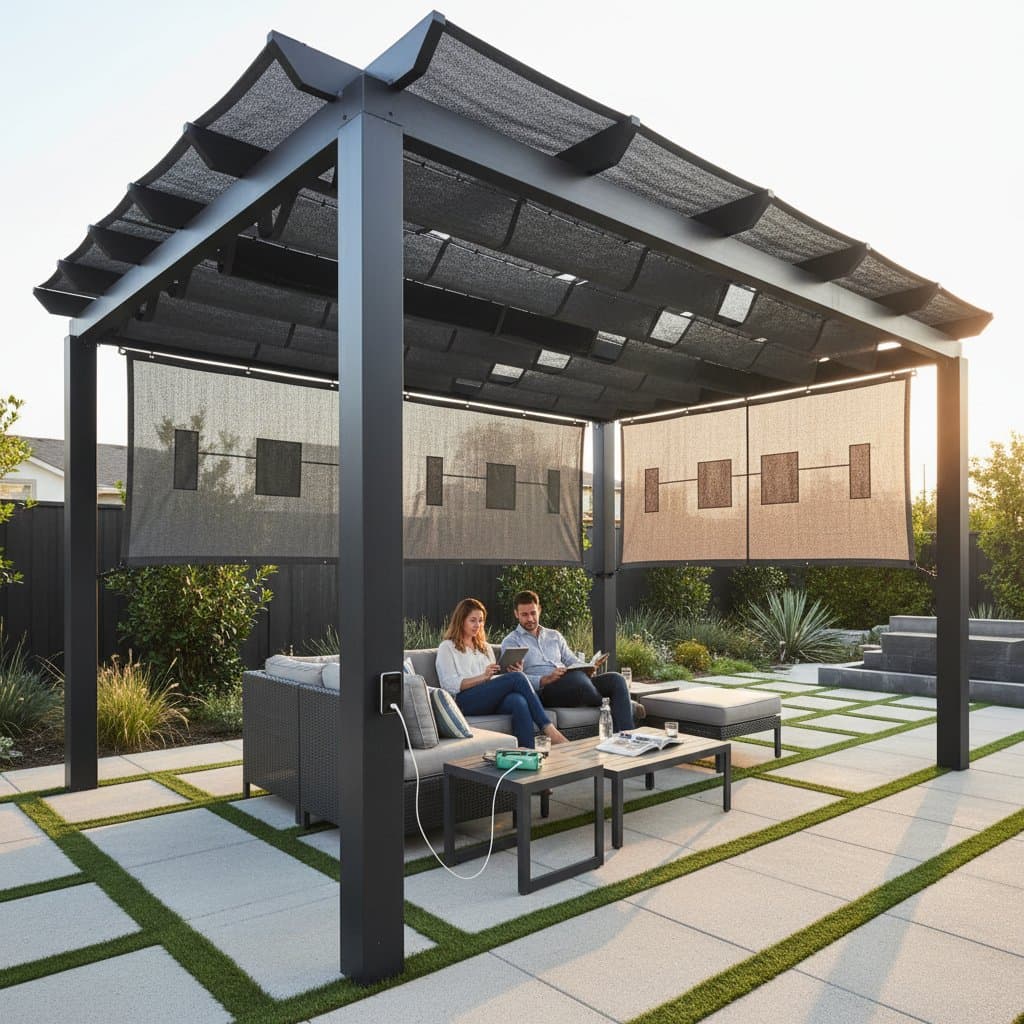
A solar pergola shade sail consists of robust, UV-resistant fabric embedded with flexible photovoltaic panels. This assembly attaches to pergola frameworks, providing dual benefits of sun protection and energy generation. The panels capture sunlight and convert it into usable electricity, which stores in a battery or powers devices via integrated ports.
Typical applications include charging smartphones, laptops, outdoor lighting, or small appliances directly beneath the sail. Energy output varies by panel size and sunlight exposure; a standard setup generates 50 to 150 watts, sufficient for daily device needs. Such systems promote comfort by blocking up to 95 percent of UV rays while fostering an environmentally conscious lifestyle.
Installation suits both new constructions and retrofits on existing pergolas made of wood, metal, or vinyl. Professional assessment ensures structural integrity, as sails add minimal weight yet require secure anchoring to withstand wind loads up to 30 miles per hour.
Essential Tools and Materials
Successful installation demands precise tools and high-quality materials to ensure durability and safety. Assemble the following items before beginning:
- Cordless drill equipped with appropriate bits for drilling into wood, metal, or masonry surfaces.
- Retractable tape measure and level to verify accurate spacing and alignment.
- Sturdy extension ladder that extends beyond the pergola height by at least three feet for safe access.
- Galvanized mounting brackets, turnbuckles, and stainless-steel screws resistant to corrosion.
- Complete solar shade sail kit including fabric, panels, wiring harness, and connectors.
- MPPT charge controller to optimize energy flow and a sealed lead-acid or lithium battery pack rated for outdoor conditions.
- Weatherproof enclosure for USB ports, DC outlets, and any inline fuses.
For a typical 10-by-10-foot pergola, select a sail spanning 8 by 8 feet to allow proper tension. Verify the frame supports an additional 10 to 20 pounds, accounting for fabric, panels, and hardware. Consult kit specifications for compatibility with local climate conditions, such as high humidity or extreme temperatures.
Installation Procedure
Follow these steps methodically to achieve a secure and functional setup. Allocate sufficient time and work in pairs for overhead tasks to enhance safety.
-
Examine and prepare the pergola frame. Inspect for structural weaknesses, remove debris like leaves or spiderwebs, and sand any splintered areas to safeguard the fabric integrity.
-
Determine and mark attachment points. Measure distances between corners to ensure even distribution; aim for 45-degree angles to the ground for optimal tension and drainage.
-
Secure the mounting hardware. Drill pilot holes, then fasten brackets and eye bolts with corrosion-resistant fasteners. Use a level to confirm plumb alignment at each point.
-
Route the electrical connections. Attach solar panel leads to the charge controller per the manufacturer's wiring schematic. Secure cables with UV-rated zip ties or clips along the frame to prevent snags.
-
Install electrical components. Mount the charge controller and outlet box on a vertical post in partial shade, ensuring ventilation slots remain unobstructed to prevent thermal buildup.
-
Suspend and tension the sail. Hook each corner to the anchors, then gradually tighten turnbuckles while checking for wrinkles. The fabric should form a taut, slightly concave shape to shed water effectively.
-
Integrate the battery and test the system. Connect the battery to the controller, monitor initial voltage output with a multimeter, and verify device charging before finalizing connections.
Wear protective gloves during wiring to avoid cuts, and safety goggles when operating power tools at height. If unfamiliar with electrical work, engage a certified electrician for the power integration phase.
Key Safety Considerations
Prioritize safety to prevent accidents and prolong system lifespan. Route all cables away from high-traffic paths and secure them to avoid tripping hazards. Select outdoor-rated extension cords if temporary power is needed during setup, and never substitute indoor varieties.
Disconnect the battery and cover panels before thunderstorms or extended absences to mitigate lightning risks. Perform monthly inspections for wire insulation damage, loose connections, or fabric tears; address issues promptly with replacement parts from reputable suppliers.
Batteries require placement in shaded, well-ventilated spots to dissipate heat. Avoid direct ground contact to prevent moisture ingress, and use fuses rated at 10 amps to protect against overloads. Compliance with local building codes ensures the installation withstands environmental stresses.
Resolving Common Issues
Occasional performance dips occur due to environmental factors or wear. If charging rates decline, first evaluate sunlight exposure; panels perform best with unobstructed southern-facing orientation receiving at least four hours of peak light daily.
Gently clean panel surfaces with a microfiber cloth and mild soap solution to remove accumulations of dirt, bird droppings, or pollen, which can reduce efficiency by 15 to 25 percent. Examine all connectors for tightness and signs of oxidation; apply dielectric grease to terminals in humid areas for added protection.
For controller malfunctions, disconnect power for 30 seconds to reset, then reconnect and observe. Persistent low output below 12 volts at the battery indicates potential cell degradation; use a digital multimeter to diagnose and replace as necessary. Document output logs to identify patterns, such as seasonal variations.
If the sail sags or flaps excessively, re-tension anchors or inspect for frame shifts caused by soil settling. In rare cases of panel delamination, contact the manufacturer for warranty claims, typically covering defects for five to ten years.
Investment and Timeline
A basic solar shade sail kit costs between 300 and 500 dollars, encompassing fabric, 100-watt panels, controller, and battery. Higher wattage or larger coverage increases expenses to 600 dollars or more, while premium fabrics resistant to fading add 100 dollars.
Solo installation requires two to four hours, depending on pergola complexity and experience level. Factor in additional time for electrical testing and adjustments. Opt for marine-grade components to justify the upfront investment through extended durability in variable weather.
Return on investment materializes through energy savings and reduced grid reliance; a well-maintained system offsets costs within three years via free device charging equivalent to 50 dollars annually in electricity.
Ongoing Maintenance Practices
Regular care preserves efficiency and appearance. Every two weeks, wipe panels with a damp, soft cloth to maintain optimal light absorption; steer clear of abrasive materials or chemical solvents that etch the surface.
After heavy rain or pollen events, hose down the fabric gently to remove residues, allowing it to air dry fully. Annually inspect and lubricate turnbuckles with silicone spray to facilitate adjustments and prevent seizing.
In winter, detach the sail if frost is anticipated, storing it rolled in a dry area. Batteries benefit from indoor overwintering; charge them monthly to avoid deep discharge. These routines extend the system's life to 10 years or beyond.
Practical Organization Tips
Organize accessories for effortless access and protection. Store backup cables, fuses, and tools in a lockable, weatherproof container positioned near the pergola base. Clearly label components by function and voltage to streamline seasonal setups.
Encapsulate exposed wiring in split loom tubing along beams, deterring animal damage from rodents or birds. This approach minimizes clutter and supports quick diagnostics during routine checks.
Enhancing Your Setup
Integrate low-voltage LED pathway lights connected to the battery for safe nighttime navigation. Monitor energy production with a simple digital logger to optimize usage and identify peak generation times.
Solar pergola shade sails deliver reliable shade and power, fostering extended outdoor enjoyment with minimal environmental impact. This integration of design and technology creates a versatile space for relaxation and productivity alike.