Mycelium Shade Panels: Biodegradable Canopies for Eco-Friendly Patios
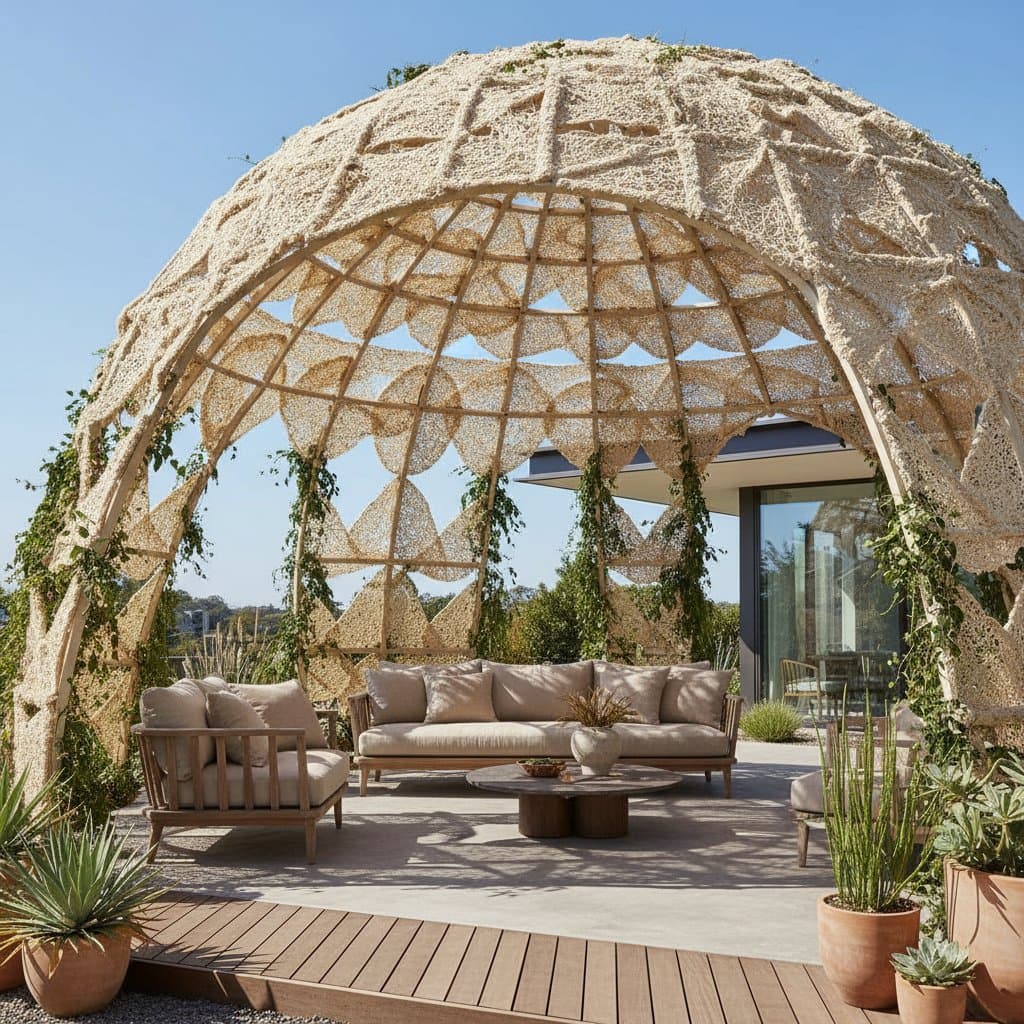
A well-shaded patio transforms casual outdoor areas into inviting retreats. Traditional shade solutions often rely on synthetic materials that harm the environment over time. Mycelium shade panels address this issue by harnessing the root-like structure of fungi to create durable, natural canopies that biodegrade harmlessly at the end of their life cycle.
These panels filter sunlight gently while permitting airflow, which helps regulate temperature beneath the structure. Designers appreciate their versatility for urban settings, where space constraints demand multifunctional elements. This article details the composition of mycelium panels, their fabrication process, environmental advantages, and implementation strategies for residential patios.
Understanding Mycelium Materials
Mycelium consists of the thread-like filaments that form the underground network of mushrooms and other fungi. In material science, it serves as a binder when cultivated on substrates such as agricultural waste, including hemp fibers, straw, or wood chips. The resulting composite material exhibits properties akin to lightweight foam: it insulates, absorbs impact, and resists fire to a degree.
For outdoor applications, mycelium panels integrate with supportive frameworks to form pavilions or pergolas. Each panel measures typically 18 to 24 inches in dimension and one inch in thickness, providing sufficient opacity to reduce solar heat gain by up to 70 percent. Unlike plastic or fabric alternatives, these panels decompose naturally within months in compost conditions, eliminating landfill contributions.
Production scales from DIY kits to commercial manufacturing, with the latter ensuring uniformity for larger installations. Researchers at institutions like Northeastern University have pioneered mycelium composites since the early 2000s, validating their strength for architectural uses. Home builders access starter kits from suppliers specializing in bio-based materials.
Essential Tools and Materials
Assembling a basic mycelium shade pavilion requires accessible items focused on safety and efficiency. Begin with a mycelium inoculation kit, which includes spores and substrate, sufficient for producing panels covering 20 to 30 square feet.
Other necessities include:
- Rigid molds, such as silicone trays or wooden forms, calibrated to panel dimensions
- Non-toxic drying racks lined with mesh fabric to promote even air circulation
- Structural components like untreated cedar lumber for posts or galvanized steel for beams
- Secure attachment hardware, including stainless steel screws and tension cables
- A humidity-controlled growth chamber, improvised from a plastic bin with ventilation holes
- Personal protective equipment, comprising nitrile gloves, N95 respirators, and aprons
Source these from sustainable hardware stores or online bio-material vendors. Initial investment for a 10-by-10-foot setup falls between $250 and $450, factoring in reusable tools.
Fabrication Process
Constructing mycelium panels involves a controlled growth phase followed by assembly. Allocate a dedicated workspace free from contaminants, ideally in a garage or shaded porch.
1. Substrate Preparation
Measure the substrate mix according to package instructions, typically one part mycelium spawn to five parts base material like sawdust. Add distilled water gradually until the blend achieves a consistency similar to moist soil, ensuring no standing liquid forms. Mix thoroughly in a clean bucket to distribute spores uniformly, then rest the batch for 30 minutes to hydrate fully.
2. Mold Filling
Line molds with a thin layer of petroleum-free lubricant to ease demolding. Spoon the prepared mixture into each form, compressing lightly with a tamper to eliminate voids. Aim for even thickness across the surface, tapping sides gently to settle the material.
3. Incubation Phase
Position filled molds in an enclosed space maintained at 70 to 80 degrees Fahrenheit with 80 percent humidity. Darkness encourages mycelium colonization, which binds the substrate over 5 to 7 days. Monitor daily by checking for a white, web-like growth; mist sparingly if the top layer dries.
4. Dehydration and Hardening
Upon full colonization, evidenced by a solid white coating, extract panels from molds. Arrange them on elevated racks in a space with gentle airflow and temperatures around 60 degrees Fahrenheit. Dehydration spans 48 to 72 hours, during which the material hardens and the live fungi deactivate.
5. Framework Construction and Panel Integration
Erect the support structure first: sink four 4-inch diameter posts 24 inches into the ground for stability, then attach horizontal beams at 7 feet height. Mount panels onto the frame using pre-drilled holes and corrosion-resistant fasteners, spacing them 1 to 2 inches apart to facilitate breeze passage and reduce weight.
6. Finishing Touches
Apply a penetrating sealant derived from linseed oil or plant-based resins to enhance durability against rain. Test the installation by simulating wind loads with a fan, adjusting ties as needed for tautness.
Safety Considerations
Handle mycelium spawn with care to prevent allergic reactions or inhalation of particulates. Work in well-ventilated areas and dispose of waste in sealed bags to curb unintended spore spread.
Select frame materials free from chemical preservatives, as these may leach into the organic panels. Secure the entire pavilion with ground anchors or concrete footings in regions prone to gusts exceeding 30 miles per hour. Inspect regularly for pest activity, though mycelium naturally deters many insects.
Common Challenges and Solutions
If panels emerge brittle, extend the drying period by 24 hours in low-humidity conditions. Discoloration signals overwatering; adjust future mixes to drier profiles and use a fan for consistent evaporation.
Cracks during curing often stem from rapid temperature shifts; insulate the drying area to maintain steady conditions. For outdoor fungal resurgence in damp climates, incorporate UV-protective coatings and ensure panels receive at least four hours of daily sun exposure.
Cost Analysis and Timeline
A compact 8-by-8-foot pavilion requires 7 to 10 days total, including growth and assembly. Material expenses range from $300 to $700, with savings possible through salvaged wood or bulk substrate purchases. Commercial panels cost $35 to $50 per square foot, offering convenience for beginners.
Upkeep Practices
Routine care involves weekly dusting with a soft brush to remove pollen or leaves. Refresh the sealant annually in spring, applying two thin coats for optimal protection. Monitor frame integrity biannually, tightening connections and replacing any softened panels via composting and replication.
Professional Assistance Options
For expansive designs exceeding 100 square feet or curved architectures, engage architects versed in biomimicry. They assess site-specific factors like soil type and prevailing winds, recommending hybrid frames that blend mycelium with recycled metals.
Inquire about integrations such as solar-powered LEDs woven through panels or modular expansions for seasonal adjustments. Such expertise ensures compliance with local building codes while maximizing longevity, often extending service life to 5 to 10 years.
Storage and Off-Season Care
Preserve excess substrate in airtight jars refrigerated at 40 degrees Fahrenheit, viable for up to six months. Stack cleaned molds in a sheltered location to prevent deformation from moisture or rodents.
Disassemble the pavilion during winter, leaning panels against a wall in a frost-free enclosure. This prevents warping and allows for minor repairs before reinstallation.
Implementing Your Design
Begin with a prototype panel to gauge material performance in your climate, tracking metrics like shade efficiency and degradation rate over months. Collaborate with local gardening groups for shared resources and expertise.
Consider aesthetic enhancements, such as staining panels in earth tones or pairing with native vines for added insulation. These structures not only shelter but also inspire a deeper connection to sustainable practices in everyday living.