Quiet Balconies: Acoustic Panels Tame Urban Noise
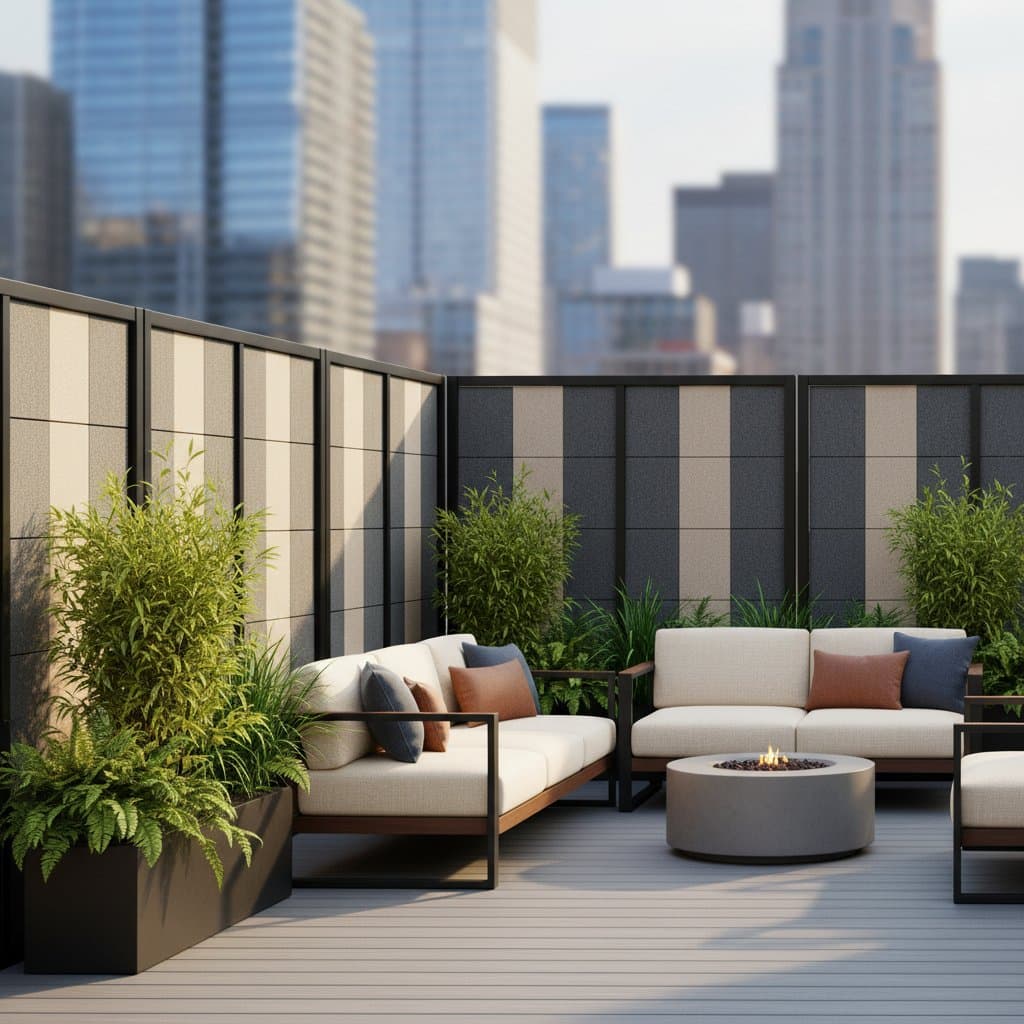
City balconies offer a vital escape from daily hustle, yet persistent sounds from traffic, conversations, and construction often undermine their serenity. Acoustic panels provide an effective solution by absorbing excess noise without enclosing the space. Proper installation transforms these areas into peaceful retreats ideal for reading, relaxing, or gardening.
This guide details the principles of acoustic panels, suitable outdoor materials, and step-by-step installation methods. Readers gain insights into balancing expenses, ensuring safety, and performing upkeep to sustain noise reduction over time.
Overview
Acoustic panels function as specialized surfaces designed to absorb sound waves and minimize echoes. These panels differ from complete soundproofing systems, which aim to block noise transmission; instead, they dissipate sound energy to soften ambient levels. The result includes clearer speech and diminished background disturbances.
Balconies encounter specific noise categories that panels address effectively. Airborne sounds, such as vehicle horns and pedestrian chatter, travel directly through open spaces. Reflected noises amplify off rigid surfaces like concrete walls or metal railings, while vibrations from subways or air conditioning units transmit through structures.
Strategic placement yields significant improvements. Systems configured for balconies typically achieve noise reductions of 40 to 60 percent, converting disruptive clamor into manageable undertones.
Tools and Materials
Installing outdoor acoustic panels requires straightforward equipment and precise preparation. Homeowners manage the process with common household items and basic hardware store purchases.
Tools
- Tape measure, at least 25 feet long
- Spirit level to ensure even alignment
- Power drill equipped with a masonry bit for durable surfaces
- Screwdriver or compatible bit for secure fastening
- Utility knife or heavy-duty shears for trimming
- Sturdy ladder or step stool for safe access
Materials
- Panels certified for exterior conditions, typically 2 inches thick
- Corrosion-resistant mounting brackets or clips
- Clear silicone sealant to guard against moisture
- Stainless steel screws, 1.5 inches in length
- Optional enhancements: UV-protective fabric wraps, supplementary foam cores, or trellis integrations for seamless integration
Select panels constructed from mineral wool, fiberglass, or closed-cell foam, materials proven for durability in outdoor environments. Evaluate options based on their Noise Reduction Coefficient (NRC), a metric indicating absorption efficiency. Prioritize products with NRC ratings from 0.7 to 1.0 for optimal results.
Steps
Step 1: Measure and Plan
Begin by recording the balcony's dimensions, including height and width of target surfaces. Pinpoint primary noise sources, such as railings exposed to street traffic or sidewalls adjacent to busy avenues. Develop a simple diagram outlining panel positions, ensuring 1-inch gaps between units to facilitate air circulation.
Step 2: Prepare the Surface
Remove debris from mounting areas using a solution of mild detergent and water. Allow surfaces to air dry completely to promote strong adhesion. In regions with high humidity, apply a preliminary layer of waterproof primer to enhance longevity.
Step 3: Mount the Panels
Indicate drilling locations at consistent intervals across the surface. Verify horizontality with a level before proceeding. Create pilot holes and install wall anchors where necessary, then secure brackets or clips with screws. Position panels firmly against the structure, applying pressure to edges for a tight fit. Apply silicone along perimeters for additional weather resistance.
Safety Tip: Equip yourself with gloves and safety glasses during drilling on masonry. Maintain a secure stance and avoid extending over balcony edges.
Step 4: Seal and Finish
After securing all panels, caulk joints with silicone to block water intrusion. For sun-exposed installations, encase panels in UV-resistant coverings or marine-grade fabrics. These measures protect against color degradation and swelling from environmental exposure.
Step 5: Test and Adjust
Occupy the balcony to assess acoustic changes. If residual noise persists in certain areas, incorporate additional vertical panels or corner traps. Complement the setup with sound-diffusing elements like area rugs, cushioned seating, or dense plantings.
Safety Tips
- Don a dust mask during any cutting of fibrous materials to avoid inhalation.
- Employ only exterior-grade hardware to prevent corrosion and discoloration.
- Maintain a minimum 2-inch clearance around heat sources such as patio heaters.
- Ensure no obstruction of essential ventilation paths.
Uniform panel distribution maximizes noise attenuation, whereas irregular arrangements may redirect sounds undesirably. Confirm alignments prior to final sealing.
Troubleshooting
Problem: Panels loosen or separate following precipitation.
Fix: Upgrade to stainless steel fasteners and reinforced anchors. Reinforce bracket undersides with extra silicone.
Problem: Growth of mold or mildew on surfaces.
Fix: Detach impacted panels and expose them to direct sunlight for drying. Clean with a diluted vinegar mixture, then reinstall after thorough airing.
Problem: Substantial noise remains despite comprehensive installation.
Fix: Trace vibrational conduits, including railings in contact with building frameworks. Isolate these with rubber gaskets or foam padding.
Problem: Fading or fracturing of panel exteriors.
Fix: Envelop units in stable outdoor textiles or relocate them to shaded positions beneath overhangs.
Maintenance
Panels endure longer through biannual cleaning and evaluation. Employ a soft-bristled brush or low-suction vacuum to dislodge accumulated particles. Inspect fabric enclosures for wear at edges and junctions.
Quick Cleaning Routine
- Remove loose dust and webs on a weekly basis.
- Gently wipe with a moistened cloth monthly.
- Refresh silicone seals annually to sustain waterproofing.
Off-Season Care
In climates prone to severe winters or intense rainfall, dismount removable panels for indoor storage. Position them horizontally in a moisture-free zone. Mark each piece for straightforward reassembly.
Storage
Arrange stored panels in flat stacks, separating layers with corrugated cardboard to avert impressions. Refrain from vertical leaning, as this risks deformation in foam or textile components. Maintain ambient temperatures between 50 and 80 degrees Fahrenheit to preserve integrity.
For communal storage in multi-unit buildings, encase panels in protective sheeting and affix clear identification tags. Ensure complete dryness prior to packaging to eliminate moisture risks.
Budget and Time
Compact balconies generally require 4 to 6 panels, whereas expansive ones demand 8 to 12 units. Budget allocations range from $200 to $600, influenced by material quality and dimensions. Expect 2 to 4 hours for initial assembly.
Optimize expenditures by combining high-performance panels on critical walls with economical alternatives on secondary areas. Integrate natural barriers like foliage or drapery to supplement coverage. Opt for scalable modular designs that allow future expansions.
Investments yield ongoing benefits, including reduced auditory stress and enhanced usability for daily activities.
Seasonal Reminders
Acoustic profiles vary with weather patterns. Summer conditions amplify open-window noises, while winter confines sounds within urban canyons.
- Reposition panels to shield exposed flanks during warmer months.
- Incorporate dual-purpose wind screens with absorptive properties.
- Examine fixings post-storm or thermal fluctuations.
When applying seasonal decorations, secure elements without penetrating or compressing panel structures.
When to Call a Pro
Engage a qualified contractor or acoustics expert under these circumstances:
- Balcony frameworks consist of unyielding concrete lacking suitable attachment points.
- Designs incorporate embedded illumination or custom barriers.
- Adjacent units share walls requiring verified acoustic assessments.
Inquire about specific NRC values, protective finishes, and guarantees during consultations. Professional input ensures compatibility with local conditions and noise profiles.
Key Takeaways
- Correctly placed acoustic panels diminish balcony noise by 40 to 60 percent.
- Exterior-compatible substances such as mineral wool and fiberglass withstand elemental challenges.
- Meticulous sealing and ventilation gaps avert resonances and deterioration.
- Consistent upkeep sustains performance across multiple seasons.
Your Next Steps
- Assess and Quantify: Observe balcony acoustics across various times to identify peak disturbance areas.
- Design and Procure: Outline a configuration and calculate panel quantities. Source from suppliers or request material samples.
- Pilot a Section: Apply panels to one surface initially to evaluate improvements before full implementation.
Initiate with targeted efforts to experience tangible quietude. This approach reclaims the balcony's potential as an urban sanctuary.