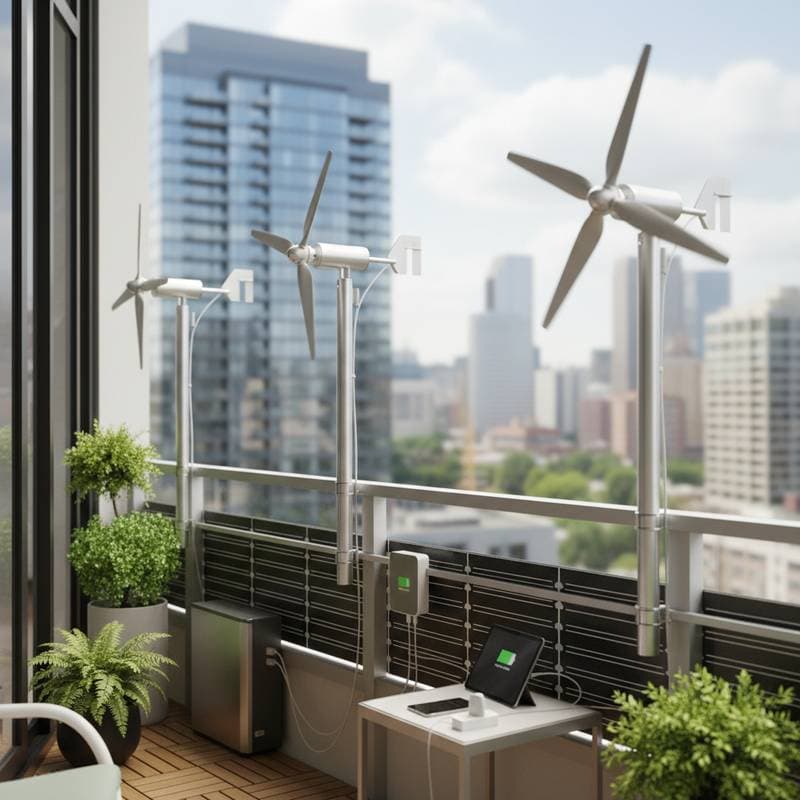
Micro Wind Turbines: Generating Clean Power from Urban Balconies
Urban apartments often lack space for traditional renewable energy installations like rooftop solar arrays or ground-mounted wind generators. However, persistent breezes between high-rises present an untapped resource. Micro wind turbines provide a compact solution that captures these flows to produce electricity for everyday needs, such as powering lights or recharging portable devices.
These systems integrate seamlessly into balcony spaces, offering a quiet alternative to grid dependency. They complement solar panels by operating effectively during low-light conditions. This article details the mechanics of micro wind turbines, installation procedures, cost considerations, and maintenance practices to help urban dwellers achieve greater energy self-sufficiency.
System Fundamentals
Micro wind turbines function as miniature generators that transform kinetic wind energy into electrical current. Typical balcony units generate 50 to 500 watts, sufficient for running LED lights, charging laptops, or operating a compact refrigerator. Wind moves the turbine blades, which rotate a connected rotor to induce electricity via electromagnetic induction. The output charges a battery bank or passes through an inverter for direct use.
In dense urban settings, these turbines excel where solar viability diminishes due to shading or pollution. A single unit occupies minimal space, comparable to a potted plant, yet contributes meaningfully to household energy offsets. Pairing with photovoltaic systems creates a balanced renewable portfolio that performs across varying weather patterns.
Required Tools and Components
Successful installation demands basic tools and durable components to ensure stability and efficiency:
- Micro wind turbine assembly, including blades, rotor, tail fin, and mounting hardware
- Deep-cycle lead-acid or lithium battery matched to the turbine's wattage capacity
- Pure sine wave inverter for converting DC to AC power if needed for standard outlets
- Galvanized steel bolts, U-bolts, and locking nuts for secure railing attachment
- UV-resistant, weatherproof conduit for cable protection
- Adjustable wrench, power drill with bits, and bubble level for precise alignment
- Anti-vibration mounts or rubber isolators to minimize operational noise
- Protective gloves and safety goggles for handling assembly
Position all electrical junctions within one meter of the turbine base to minimize energy loss from resistance and simplify inspections.
Installation Process
Assess Wind Availability
Observe balcony wind patterns over several days. Note how flags, lightweight fabrics, or nearby foliage respond to air movement. Balconies on upper floors or those facing prevailing winds from open avenues typically experience consistent flows. Aim for an average wind speed of 13 to 16 kilometers per hour to justify the investment. Steer clear of obstructed areas shadowed by solid barriers or dense foliage.
Select Optimal Mounting Point
Identify a structural element, such as a railing or vertical post, rated to support at least 18 kilograms. Fasten the mounting bracket using corrosion-resistant hardware and verify stability with a torque wrench. Elevate the turbine hub at least 60 centimeters above the railing to allow unobstructed blade rotation. For lease-restricted properties, opt for non-permanent clamp systems that attach without drilling.
Assemble the Unit
Refer to the manufacturer's blueprint for component integration. Secure blades to the hub in balanced configuration, torquing fasteners incrementally to avoid imbalance. Install the yaw mechanism or tail fin to orient the turbine into the wind. Manually rotate the assembly to confirm smooth, resistance-free operation; address any binding immediately to prevent long-term damage.
Connect Electrical Components
Route the turbine's output wires through a charge controller to regulate voltage and prevent battery overcharge. Extend connections to the storage battery using appropriately gauged, insulated cabling encased in protective sleeving. For grid-tied applications, incorporate an inverter compliant with local electrical standards and include a disconnect switch. Clearly mark polarity on all terminals prior to final securing.
Initial Testing and Fine-Tuning
Expose the system to moderate winds and monitor blade response. The charge controller display should register building voltage within moments of activation. If rotation lags, adjust the mounting angle by 10 to 15 degrees toward dominant wind directions to optimize capture. Record initial output metrics to establish a performance baseline.
Finalize Securing and Noise Mitigation
Fasten wiring along the structure with insulated clips spaced every 15 centimeters to prevent strain. Install vibration-absorbing pads beneath the mount to isolate oscillations. Advanced models operate below 40 decibels, akin to a quiet conversation, yet additional damping preserves neighborly relations in close-quarters living.
Essential Safety Measures
Always don protective gear when working with rotating parts, as blade edges may present hazards. Isolate electrical circuits before any modifications to wiring. Maintain a minimum distance of three meters from overhead power lines during placement. Review condominium bylaws or municipal regulations prior to proceeding with any attachment.
In severe weather, engage the turbine's furling mechanism or manual brake to halt operation. Structural integrity forms the foundation of safe use; inspect railings for corrosion or flex, reinforcing with additional bracing if necessary to withstand dynamic loads.
Common Issues and Resolutions
No Output Despite Rotation
Measure voltage directly at the controller terminals. Zero readings indicate potential loose connections or damaged insulation; reseat terminals and replace compromised wiring as needed.
Excessive Vibration or Audible Operation
Re-torque all fasteners uniformly across the assembly. For persistent imbalance, attach thin balancing weights to the blade tips and retest under load.
Suboptimal Energy Yield
Remove accumulated debris from blades, as contaminants can impair aerodynamics by 15 percent or more. Re-evaluate site wind speeds, accounting for seasonal shifts in urban airflow caused by foliage or construction.
Investment and Timeline Overview
Entry-level kits range from 180 to 600 dollars, scaled to power rating. Budget an additional 100 to 200 dollars for battery and inverter acquisitions if starting from scratch. A solo installer can complete setup in approximately three hours, encompassing assembly, wiring, and verification. Removable clamp designs facilitate quick disassembly in under ten minutes for relocation or storage.
Prioritize marine-grade materials in coastal areas to combat salt exposure. Invest in a robust charge controller to safeguard batteries against voltage spikes, ensuring longevity and consistent performance.
Routine Upkeep Practices
Inspect mechanical elements bimonthly for accumulations of dust, fastener looseness, or oxidative damage. Clean blades using a soft, moistened cloth, avoiding abrasives that could scratch surfaces. Annually apply lubricant to bearings per specifications to reduce friction. Examine cabling post-rainfall for integrity.
Diligent maintenance extends operational life to nearly ten years. If high winds immobilize the unit, isolate power and manually assess bearings for roughness, replacing components exhibiting wear.
Adapting to Seasonal Changes
Spring Preparation
Clear blades of pollen and overwinter debris; scan for avian intrusions or loose attachments.
Summer Checks
Validate battery charge levels and re-secure exposed hardware against thermal expansion.
Fall Inspections
Fortify mounts ahead of gusts; reseal metal surfaces with protective coatings.
Winter Management
Promptly remove snow to avert icing; note that denser cold air may enhance efficiency if kept operational.
Maintain a log of monthly output readings to identify trends and preempt failures.
Optimizing Energy Storage
Excess generation benefits from integration with expandable battery arrays or portable power hubs. House storage in shaded, ventilated enclosures to mitigate heat buildup. Employ color-coded labels for rapid diagnostics. Relocate inverters indoors to shield from elemental exposure.
Hybrid configurations with micro solar panels yield resilient output, with unified controllers distributing inputs seamlessly. This approach ensures power availability regardless of wind or sun conditions.
Professional Assistance Indicators
Engage a certified electrician for integrations into building electrical systems, ensuring adherence to interconnection protocols and proper grounding. Consult structural experts for high-elevation installs or doubtful load-bearing capacities. Professionals verify that mounts endure vibrational stresses and gale-force pressures without compromise.
Implementing Your Balcony Power Solution
Commence with a 100-watt model on a sturdy pole to gauge site potential. Track weekly rotations and charge increments to inform scalability. Inform adjacent residents about the system's subtle operation, framing it as a shared commitment to sustainability.
Micro wind turbines empower city inhabitants to harvest ambient energy, converting limited spaces into efficient generators. With secure foundations, unobstructed winds, and regular oversight, these devices foster grid independence. Each rotation underscores the accessibility of renewables in everyday urban life.