Native Plants: Creating Urban Bee Havens on Small Balconies
Many urban dwellers believe that a tiny balcony offers little opportunity to aid wildlife. However, a selection of native plants can provide essential food and shelter for bees, transforming that space into a functional pollinator hub. This approach supports local ecosystems while requiring minimal effort. Readers gain insights into selecting appropriate plants, establishing the garden, and ensuring its longevity across seasons.
Understanding Native Plants and Their Role
Native plants consist of species that have evolved in a specific region over centuries, adapting to local conditions without human intervention. These plants align seamlessly with the area's soil composition, climate patterns, and native wildlife, resulting in hardy growth and reduced care demands. Bees rely on them for nectar and pollen sources, which in turn enables pollination of nearby crops, flowers, and vegetation in urban settings.
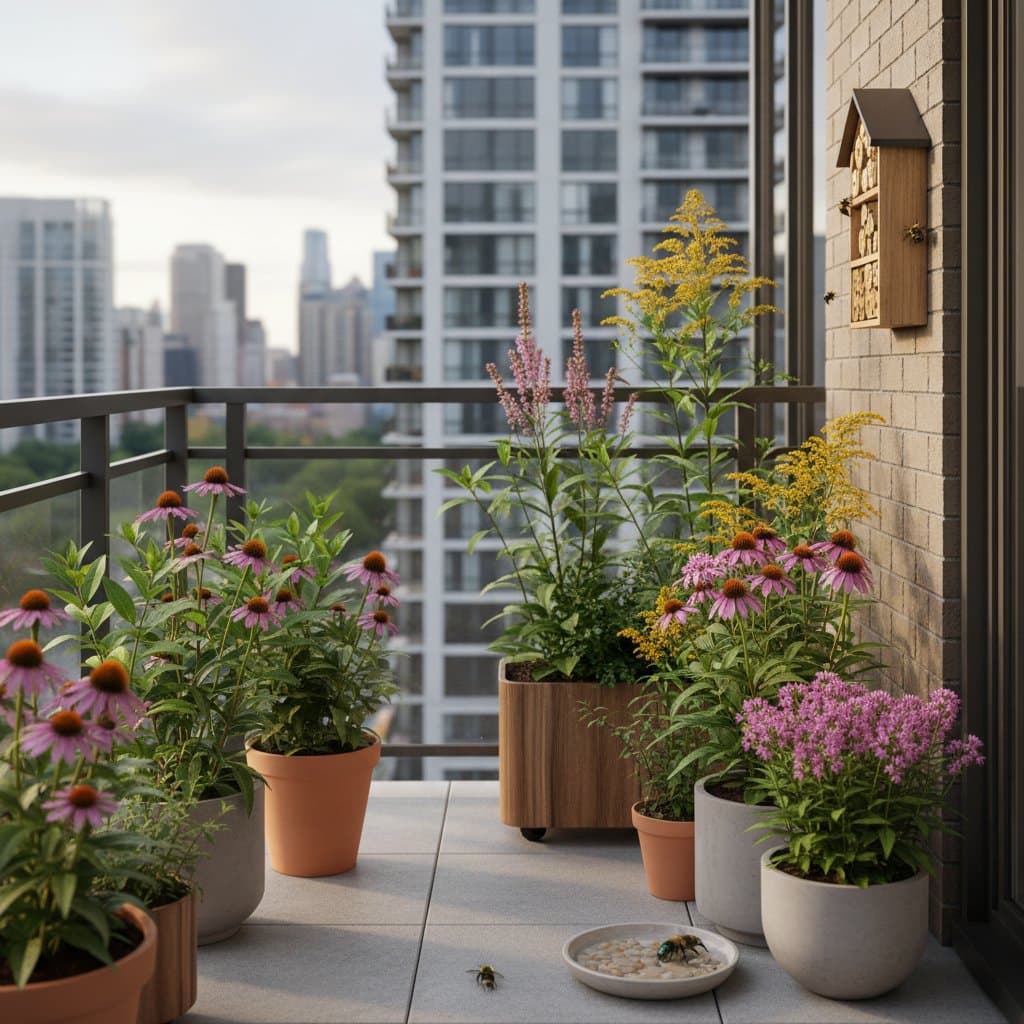
A balcony planted with natives can accommodate numerous bee species, including social varieties like honeybees and solitary ones such as mason bees or leafcutter bees. These solitary bees often seek out small crevices or soil pockets for nesting, making balconies ideal microhabitats. In cities, where green spaces dwindle due to concrete landscapes and pollution, such gardens counteract habitat loss.
The advantages extend beyond ecology. Participants contribute to pollinator conservation, which bolsters food security through enhanced crop yields in community plots and rooftop farms. Additionally, these gardens demand less watering and fertilizing than non-natives, saving time and resources. Visually, they deliver bursts of color, fragrance, and insect activity, enriching the view from indoor spaces and fostering a connection to nature.
Urban challenges like limited sunlight, variable temperatures, and air quality influence plant choices. Selecting species resilient to these factors ensures success. For instance, in regions with hot summers, drought-tolerant natives prevent wilting, while cold-hardy options withstand winter chills. This targeted selection maximizes impact in constrained areas.
Essential Tools and Materials
Starting a balcony bee garden requires basic, accessible supplies. Focus on quality to promote plant health and bee safety.
- Containers: Select four to six pots measuring 10 to 14 inches in diameter, each equipped with drainage holes to prevent root rot.
- Soil: Acquire approximately one cubic foot of potting mix formulated for outdoor containers, enriched with organic matter for nutrient retention.
- Plants: Source five to eight native varieties that offer sequential blooming periods to provide consistent food sources.
- Watering Tools: Employ a watering can or fine-mist spray bottle for precise application.
- Shelter Options: Consider a pre-made bee hotel or prepare untreated wood blocks with drilled holes, 3 to 5 inches deep and 1/8 to 1/2 inch wide, to mimic natural nesting sites.
- Additional Items: Gather gloves, a trowel for planting, and organic compost to amend soil as needed.
Budget-conscious sourcing from local nurseries supports regional economies and ensures plant acclimation to the local climate.
Step-by-Step Guide to Setup
Step 1: Selecting Suitable Plants
Evaluate the balcony's light conditions to match plant requirements, as mismatched exposure leads to poor performance. Full sun areas, receiving six or more hours of direct light daily, suit robust bloomers.
- Purple coneflower (Echinacea purpurea) produces daisy-like purple flowers from summer into fall, attracting a wide range of bees with its abundant nectar.
- Black-eyed Susan (Rudbeckia hirta) offers bright yellow petals with dark centers, blooming mid-summer and tolerating dry spells well.
- Bee balm (Monarda didyma) features vibrant red or pink spikes that draw hummingbirds alongside bees, with aromatic foliage that repels some pests.
Partial shade spots, with two to four hours of sun, benefit from shade-adapted species.
- Wild columbine (Aquilegia canadensis) displays nodding red-and-yellow flowers in spring, providing early-season pollen.
- Blue lobelia (Lobelia siphilitica) yields spikes of blue blooms in late summer, thriving in moist conditions.
- Woodland phlox (Phlox divaricata) forms mats of lavender flowers in spring, supporting ground-nesting bees.
Group plants by similar needs to simplify care. Research regional natives through local extension services for precise recommendations, ensuring compliance with any urban planting guidelines.
Step 2: Preparing the Containers
Proper preparation establishes a stable foundation. Fill each pot with potting mix to within one inch of the rim, allowing space for watering without overflow. If the mix appears too sandy, incorporate a handful of compost per pot to improve water retention and fertility.
Position heavier pots against railings or stable surfaces to distribute weight evenly, adhering to building load limits typically around 50 pounds per square foot. Elevate pots on stands if floor space is premium, promoting air circulation to deter fungal issues.
Step 3: Planting and Initial Watering
Remove plants from nursery containers gently, teasing apart roots if bound. Plant at the same depth as in their original pots to avoid stem rot. Space them according to mature size, usually 6 to 12 inches apart in larger containers.
Water thoroughly immediately after planting, applying until excess drains from the bottom. Maintain even soil moisture for the initial two weeks, checking daily as roots establish. Mulch the surface with bark chips to conserve moisture and suppress weeds.
Step 4: Incorporating Bee Shelters
Enhance the habitat by adding nesting opportunities. Position a bee hotel in a sheltered corner, elevated off the ground to avoid dampness. Alternatively, bundle hollow stems like elderberry or bamboo, securing them in a dry container.
These structures appeal to cavity-nesting bees, which comprise 30 percent of native species. Avoid painting or treating materials, as chemicals deter insects. Monitor for occupancy over time, noting increased bee traffic as a success indicator.
Step 5: Seasonal Maintenance Practices
Sustain blooms by deadheading faded flowers every two to three weeks, pinching just above a leaf node to encourage reblooming. In late summer, retain some seed heads to supply food for birds and shelter for overwintering insects.
Fertilize sparingly with organic options, such as diluted fish emulsion, applied monthly during growth periods. Prune leggy growth to maintain compact shapes suitable for balconies.
Safety Considerations
Protect yourself and the environment during setup. Wear gloves to handle soil and avoid skin irritation from potential allergens. When drilling bee shelter holes, secure the wood firmly and use eye protection.
Steer clear of chemical pesticides and synthetic fertilizers, which poison bees and disrupt ecosystems. Opt for natural alternatives like neem oil for pest control, applied only if infestations threaten plant health. Consult local regulations on balcony modifications to ensure structural integrity.
Common Issues and Solutions
Yellowing leaves often signal drainage problems; repot in fresh mix if water pools. Overwatering suffocates roots, so allow the top inch of soil to dry between sessions.
Premature flower fade may indicate insufficient light; relocate pots to brighter areas or select shade-tolerant replacements. Low bee visitation calls for greater diversity, incorporating tubular or flat-headed flowers to appeal to various species.
Pests like aphids can appear; rinse with water or introduce ladybugs as biological controls. Persistent issues warrant soil testing for pH balance, ideally 6.0 to 7.0 for most natives.
Winter Care and Spring Renewal
As temperatures drop, cluster pots near building walls for insulation. Reduce watering to once monthly, just enough to prevent complete drying. Cover sensitive plants with burlap during extreme cold snaps.
In spring, inspect for winter damage and trim dead material to six inches above soil level. This stimulates fresh growth and reveals emerging bee activity. Reassess light patterns, as seasonal shifts affect exposure.
Cost and Time Investment
Initial outlay ranges from $60 to $100, covering pots, soil, and young plants from nurseries. Setup requires one afternoon of focused effort. Weekly maintenance involves 10 minutes for watering, deadheading, and observation.
Long-term savings arise from natives' resilience, reducing replacement needs. Track progress with a journal to refine the garden annually.
Professional Assistance Options
For ambitious expansions like custom planters or automated watering systems, engage a local landscaper. They assess balcony weight capacities, often 40 to 60 pounds per square foot, and recommend secure installations. Seek advice on integrating with building plumbing to avoid leaks.
Building and Expanding Your Habitat
Begin by acquiring three native plants matched to your balcony's conditions. Assemble containers with optimal drainage and nutrient-rich soil. Monitor visiting bees, noting species and preferences to inform future additions.
Gradually incorporate more elements, such as vertical planters or companion herbs, to amplify benefits. Each addition strengthens urban biodiversity, creating a ripple effect in the neighborhood. This small-scale effort yields substantial rewards in ecological health and personal satisfaction.