Unlock Three Seasons of Deck Enjoyment with Microclimates
Many homeowners cherish their decks yet limit usage to brief summer periods. Chilly springs, scorching afternoons, and crisp fall evenings often leave the space unused. The solution lies in crafting microclimates to extend comfort across three seasons without undertaking large-scale renovations.
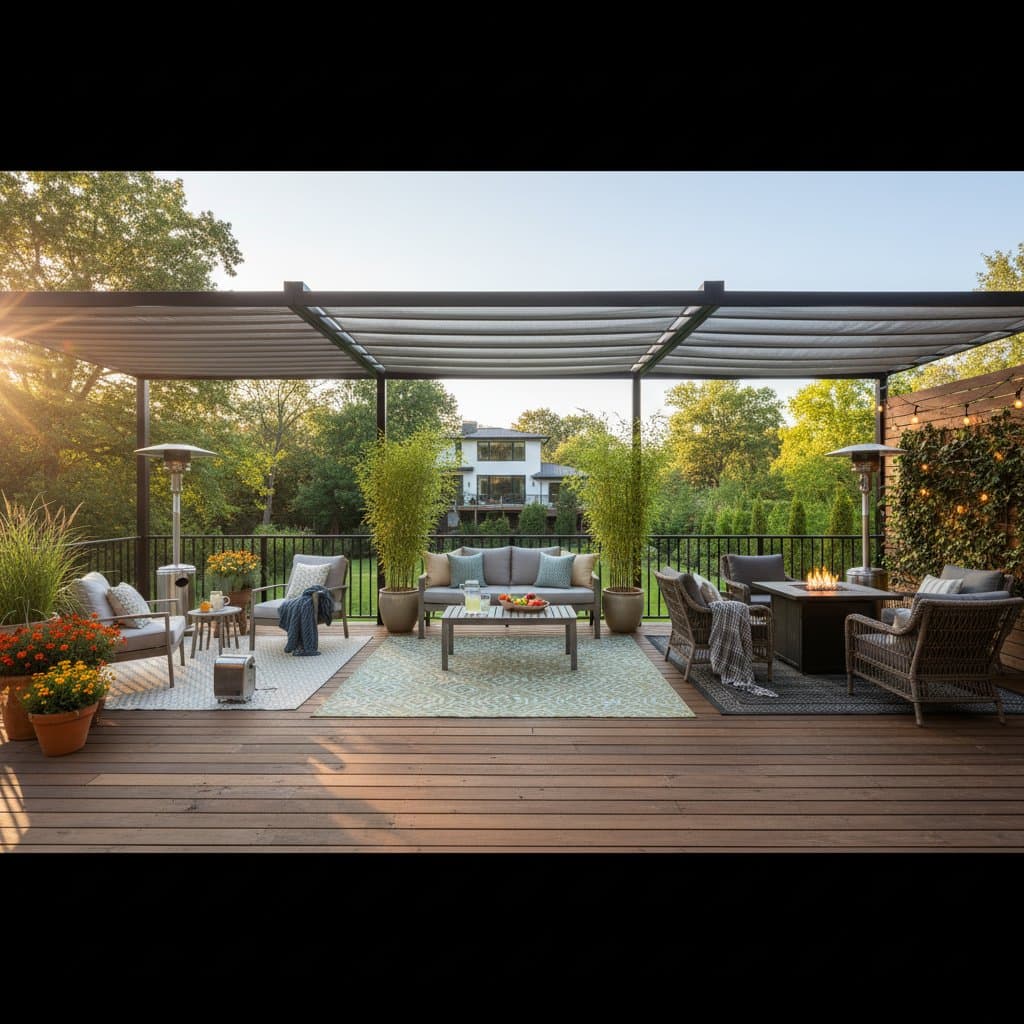
Microclimates refer to localized environmental conditions on your deck that vary in temperature, light, and air movement from the broader surroundings. This approach enables the creation of distinct zones tailored to specific times of day or weather patterns. The following guide explains the concept in detail, highlights its benefits, and provides step-by-step instructions for implementation using accessible materials.
Understanding Microclimates on Decks
A microclimate emerges in a confined area where factors like sunlight exposure, wind patterns, and material properties alter the immediate atmosphere. For instance, a deck corner shielded by a planter might retain evening warmth, while an open edge exposed to afternoon sun could become uncomfortably hot. These variations occur naturally but can be intentionally shaped to enhance usability.
By manipulating these elements, you divide your deck into thermal zones. One area might capture morning sun for a gentle start to the day, another provide respite from midday heat, and a third offer protection from evening chills. The objective is practical enhancement: more opportunities to enjoy the outdoors through subtle, effective adjustments.
Benefits of Microclimate Design
Implementing microclimates yields several advantages:
- Maximizes existing space utilization without expanding the deck's footprint.
- Promotes energy efficiency by leveraging natural solar gain and wind flow rather than relying on artificial climate control.
- Delivers cost-effective improvements through inexpensive additions like fabric screens, area rugs, and potted plants.
These changes foster a more inviting outdoor environment, encouraging frequent use and extending the deck's role in daily life.
Essential Tools and Materials
No advanced tools are required to begin. Assemble a basic kit from household items supplemented by targeted purchases:
- An outdoor thermometer or digital sensor to identify temperature variations across the deck.
- A tape measure for accurately plotting zone boundaries and material placements.
- A portable heating device, such as a propane patio heater or compact fire pit, for cooler periods.
- Shade options including retractable umbrellas or UV-resistant shade sails spanning at least 6 feet in diameter.
- Barriers for wind protection, such as freestanding lattice screens, heavy planters filled with dense foliage, or weatherproof curtains.
- Insulating rugs or mats constructed from weather-resistant materials like polypropylene to trap ground heat.
- LED string lights or solar-powered fixtures certified for outdoor moisture exposure to extend evening usability.
Prioritize safety by positioning all heat sources at least 3 feet from combustible surfaces, including railings and upholstery. Adhere strictly to manufacturer guidelines for clearance and ventilation.
Implementation Steps
Follow these sequential steps to assess, design, and refine your deck's microclimates. Each phase builds on the previous to create a cohesive, functional layout.
Step 1: Assess Current Conditions
Observe your deck during key times: early morning, midday, and late evening. Record sun paths, prevailing wind directions, and notable hot or cool spots using your thermometer. Sketch a simple diagram marking areas of high light, shade, breeze, and stagnation. Such observations reveal even minor discrepancies, like a 5-degree temperature drop near an exposed edge, that influence comfort levels.
Step 2: Develop Warm Retention Areas
Select materials that absorb and radiate heat effectively. Apply dark stains to wooden surfaces or lay stone tiles and outdoor rugs in targeted spots to capture solar warmth during the day and release it slowly at night. Introduce a portable heater or fire pit in these zones for supplemental warmth on cooler evenings. Always place open-flame devices on non-flammable stands, ensuring at least 3 feet of clearance from overhead structures and nearby fabrics.
Step 3: Incorporate Shade Solutions for Peak Heat
Address intense sunlight by installing adjustable shade elements. Opt for umbrellas with tilt mechanisms or fixed awnings covered in breathable fabric. Shade cloths offering 30 to 50 percent coverage filter harsh rays while permitting diffused light to maintain an open feel. Position lounge chairs or dining sets beneath these features during the warmest hours to prevent overheating and glare.
Step 4: Mitigate Wind Exposure
Winds accelerate heat loss, making outdoor spaces feel colder than the actual temperature suggests. Erect barriers on the windward side using tall, filled planters with evergreen shrubs, slatted bamboo fencing, or retractable privacy screens. Design these elements to reach at least 4 feet in height while incorporating 6-inch gaps at the base to allow gentle airflow. This prevents moisture buildup and ensures the deck remains fresh rather than stuffy.
Step 5: Establish Distinct Thermal Zones
Divide the deck into specialized areas to accommodate varying needs:
- A sun-exposed zone for invigorating cool mornings, equipped with cushioned seating to soak in gentle warmth.
- A shaded zone for relaxed hot afternoons, featuring misting fans or cooling gel cushions if desired.
- A sheltered zone for transitional evenings, combining windbreaks with ambient lighting for prolonged comfort.
Use area rugs to delineate boundaries, positioning furniture to link zones visually while preserving a sense of unity across the deck.
Step 6: Evaluate and Refine
Test each zone by spending time there throughout the day under different conditions. Measure temperatures and solicit feedback on perceived comfort from family members. Adjust placements as necessary: shift a screen to redirect breeze or reposition a heater to even out warmth. Iterative tweaks ensure the setup adapts to seasonal shifts, such as stronger fall winds or lingering spring chills.
Essential Safety Considerations
Safety forms the foundation of any outdoor enhancement. Maintain a minimum 3-foot separation between heat sources and vertical surfaces like walls or railings. Anchor shade structures and screens firmly to withstand winds up to 20 miles per hour. Verify that all electrical components, including lights and fans, carry IP65 or higher ratings for water resistance to avoid hazards during rain.
Common Challenges and Solutions
Challenge: Persistent Dampness in a Specific Area
Persistent moisture can chill a zone and promote mold growth.
Resolution: Introduce a low-profile fan for circulation or elevate rugs on spacers to facilitate drying.
Rationale: Circulating air accelerates evaporation, allowing the space to warm more readily.
Follow-Up: Incorporate permeable gravel layers or sloped pavers to enhance natural drainage.
Challenge: Excessive Darkness in Shaded Regions
Overly dense shade can create a cave-like atmosphere, deterring use.
Resolution: Select semi-transparent fabrics or integrate polished metal accents to reflect light.
Rationale: Reflective elements distribute illumination evenly, brightening the area without sacrificing protection.
Follow-Up: Apply light-colored paint to adjacent railings or install subtle accent panels.
Ongoing Care and Seasonal Preparation
Routine maintenance preserves the effectiveness of your microclimates. Wipe down heaters and fixtures monthly to remove debris that could impair function. During off-seasons, store textiles like cushions and shades in a dry indoor space to avert mildew. Reapply protective finishes to wooden elements every two to three years, enhancing their ability to absorb and retain heat.
Investment Overview
Most setups require only a single weekend for initial assembly. A foundational configuration with shade fabric, planters, and basic barriers typically ranges from $150 to $300. Incorporating advanced features like a quality heater or automated screens may increase the total to approximately $500, offering substantial returns in extended usability.
Professional Assistance Indicators
Consider consulting a landscape architect if your deck exceeds 400 square feet, features complex structural elements, or requires integration with electrical systems for automated shading. Professionals ensure compliance with local building codes, particularly for permanent installations like pergolas.
Actionable Starting Points
Begin by surveying your deck to identify prime sunny, windy, and protected locations. Prioritize enhancing one warm zone and one shaded area over the coming weekend. Introduce a single portable element, such as an umbrella or rug, then assess its impact on daily comfort to build momentum for further refinements.