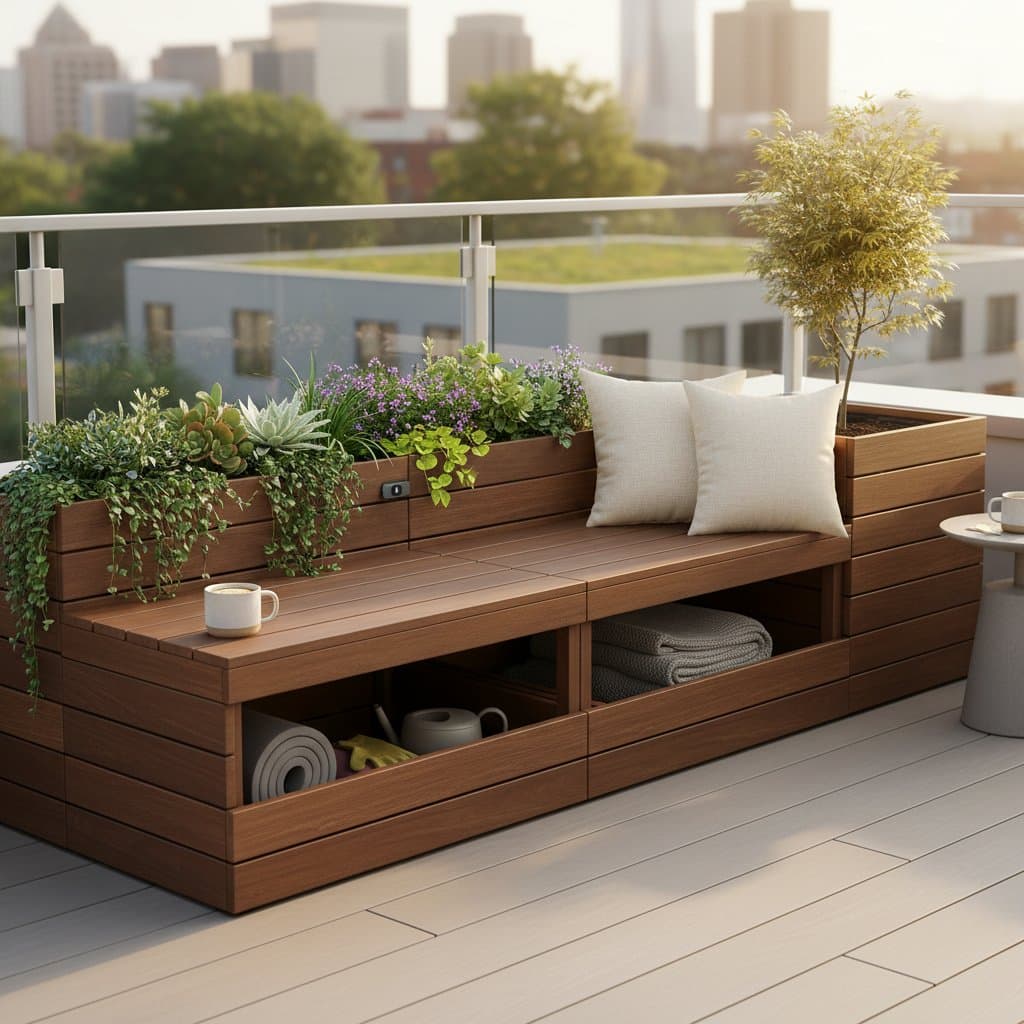
Compact Deck Bench: Planting, Seating, and Storage in One Unit
Small decks present unique challenges for incorporating greenery, relaxation spots, and practical storage. A self-watering storage bench addresses these limitations by integrating all elements into a single, space-efficient unit. This approach delivers a lush aesthetic, reliable seating, and protected storage without overwhelming limited square footage.
This article details the functionality of these benches, highlights their advantages, and provides step-by-step guidance on installation and maintenance for optimal performance.
Understanding Self-Watering Storage Benches
These benches feature a sealed base for dry storage, an upper planter section equipped with a water reservoir and wicking mechanism, and a durable top surface for seating. Plants access water through capillary action, drawing from the reservoir as required, which minimizes evaporation and overwatering risks. The overall design supports weights up to 300 pounds, making it suitable for everyday use on residential decks.
Readers will gain insights into material selection, assembly processes, seasonal care routines, and solutions for common issues to ensure long-term reliability.
Key Advantages
One versatile bench eliminates the need for multiple items, streamlining deck layout. Specific benefits include:
- Space Optimization: Occupies a footprint of 4 to 6 feet in length and 18 to 24 inches in depth, freeing up areas for pathways or additional features.
- Efficient Water Management: Reservoirs hold 1 to 2 gallons, reducing manual watering to once every 5 to 7 days depending on climate and plant types.
- Item Protection: The watertight compartment shields contents from moisture, UV exposure, and pests, extending the life of stored goods.
- Enhanced Usability: Seat height aligns with standard ergonomics at 17 to 19 inches, supporting prolonged sitting or casual gatherings.
- Simplified Upkeep: Automates hydration for plants while organizing accessories, resulting in less time spent on maintenance tasks.
Essential Tools and Materials
Pre-made options simplify acquisition, but custom builds allow personalization. Assemble the following beforehand:
- Structural Base: Cedar, redwood, or recycled plastic composite, sized 4 to 6 feet long by 2 feet wide for stability.
- Planter Reservoir Kit: Includes a 1- to 2-gallon basin, wicking cords, and overflow drain to prevent flooding.
- Soil Medium: 2 cubic feet of soilless potting blend with perlite for drainage, avoiding heavy garden soil that compacts.
- Sealing Agents: Marine-grade epoxy or silicone caulk for joints and liners to block water intrusion.
- Storage Divider: Plastic or metal tray to separate compartments and facilitate easy access.
- Assembly Tools: Power drill with bits, Phillips screwdriver, tape measure, spirit level, and nitrile gloves for handling.
- Comfort Add-Ons: Weather-resistant foam cushions or sling fabric, secured with ties to resist wind.
Assembly Instructions
Assess the Installation Site
Begin by measuring the intended location, ensuring 6 inches of rear clearance for drainage and 12 inches in front for access. Verify deck integrity: boards should be free of rot, and the surface level within 1/4 inch over the bench length. Calculate load capacity; a fully loaded bench weighs 100 to 150 pounds, so reinforce weak spots with additional joists if necessary.
Construct the Base Framework
If building, cut frame pieces to specification and join with galvanized lag screws spaced every 12 inches. For pre-assembled units, inspect for defects and tighten all fasteners. Coat wooden elements with two layers of exterior polyurethane sealant, allowing 24 hours drying time between applications to form a moisture barrier.
Integrate the Irrigation Components
Position the reservoir basin in the planter trough, securing it with adhesive pads. Thread wicking materials through pre-drilled holes, ensuring 4 to 6 inches extend into the soil zone above. Add water to the halfway mark and observe for 30 minutes; address any drips by reapplying sealant around edges. Activate the float indicator to track levels visually.
Populate with Soil and Vegetation
Layer gravel at the reservoir bottom for extra drainage, then add potting mix to within 1 inch of the rim. Select root-shallow varieties like chives, spinach, or petunias that thrive in 6- to 8-inch depths. Plant at twice the root ball width apart to promote circulation, then top-water thoroughly to saturate the wicks and initiate moisture transfer.
Configure the Storage Zone
Install a removable liner or slatted shelf in the base to elevate items off the floor. Place non-porous containers for any liquids, and organize vertically using bins to maximize capacity. Avoid overloading; distribute weight evenly to prevent tipping.
Finalize and Evaluate Stability
Position the bench and test by applying body weight gradually. Shim uneven legs with rubber pads cut to size for a rock-solid base. Top off the reservoir and record initial water usage over 48 hours, adjusting plant density if evaporation exceeds 20 percent daily.
Essential Safety Practices
Collaborate with a partner for lifting and positioning to distribute effort and minimize injury risk. Store no electronics or flammables in the enclosure to eliminate hazards. Regularly inspect hardware for wear, tightening as needed, and wear protective gear during soil work to guard against irritants.
Resolving Common Challenges
Excessive Soil Moisture or Algal Growth
Reduce reservoir fills to one-quarter capacity and incorporate 1 inch of pea gravel beneath the soil. This setup improves aeration and inhibits stagnation. Perform a monthly reservoir flush with diluted hydrogen peroxide during peak growth periods.
Plant Drooping with Adequate Water
Inspect wicks for soil compaction or kinks that impede flow. Flushing with room-temperature water restores function. Replace cords annually if fabric degradation appears.
Odor Development in Storage
Evacuate contents, scrub surfaces with a 1:1 vinegar-water mix, and air-dry with the compartment ajar for 48 hours. This neutralizes microbes effectively. Incorporate moisture absorbers like activated charcoal for ongoing prevention.
Ongoing Care Routines
Monitor and replenish the reservoir weekly during active seasons, scaling back to biweekly in dormancy. Disassemble for wick cleaning every four weeks, using a soft brush to remove debris. Refresh wood finishes biannually with oil-based protectants to combat weathering.
For off-season storage, drain all water, bag the soil for reuse, and elevate the bench on blocks in a sheltered spot. Prop lids open slightly to ventilate and avert mildew.
Cost and Effort Estimates
Ready-to-use models range from $120 to $300, depending on size and material durability. DIY projects total $80 to $180, factoring in hardware store purchases. Expect 2 to 4 hours for complete setup, with advanced woodworking adding time.
Durable composites justify higher initial costs through 10-year lifespans, while treated woods permit economical refinishing every few years.
Professional Assistance Indicators
Seek expert help if deck structural modifications exceed basic reinforcement, such as sistering joists or replacing subflooring. Consult arborists for integrating advanced irrigation or exotic plant selections that demand specialized soil amendments.
Seasonal Care Schedule
Spring Preparation: Flush the system, refresh soil with compost amendments, and seal any winter cracks.
Summer Vigilance: Increase refills to twice weekly in heatwaves, prune for ventilation, and vent storage to curb humidity.
Fall Cleanup: Extract fallen matter, winterize by draining, and inspect for pest entry points.
Winter Protection: Relocate fabrics indoors, cover the unit with permeable fabric, and clear snow accumulations promptly.
Implementing Your Deck Upgrade
Start by mapping your space to select an appropriately scaled bench. Match plants to site exposure, opting for sun-tolerant options like tomatoes in bright areas or hostas in partial shade. Establish a weekly inspection habit to fine-tune watering and sustain vitality throughout the year.