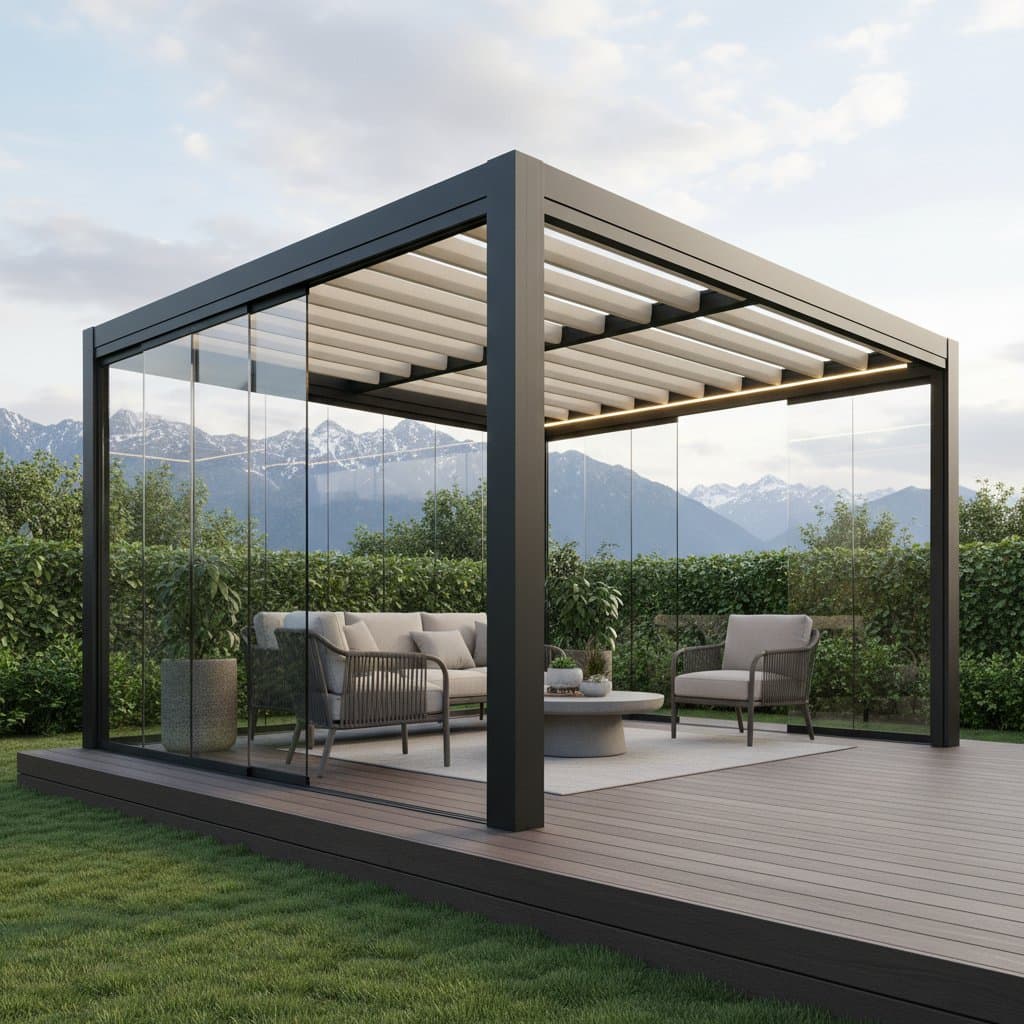
Introduction to Pergola Pods
Pergola pods represent a modern evolution in outdoor architecture, combining the openness of a traditional pergola with enclosed, retractable features for enhanced usability. These structures attach to existing decks, providing customizable coverage against sun, rain, and wind while preserving natural airflow. Homeowners appreciate their ability to extend usable space without the permanence of a full roof.
Selecting the appropriate pergola pod involves assessing deck dimensions, local climate, and desired functionality. Options range from manual fabric canopies to automated glass enclosures, each offering distinct benefits in comfort and aesthetics. Consider integration with deck materials to ensure a cohesive appearance.
Installation Guide
1. Plan Your Design
Begin by measuring the deck area and determining the pergola pod's footprint. Sketch a layout that positions posts at least three feet from edges to avoid obstructing walkways. Factor in overhead clearances for ceiling fans or hanging plants, aiming for a minimum height of eight feet.
Review local building codes for permits, especially if the structure exceeds one hundred square feet. Choose materials like powder-coated aluminum for durability in humid environments. Compile a toolkit including levels, drills, and ladders before proceeding.
2. Install the Posts
Mark post locations using a chalk line for precision alignment. Dig footings at least thirty inches deep in stable soil, or secure to deck joists with lag bolts if surface mounting. Pour concrete around base plates and allow twenty-four hours for curing.
Plumb each post vertically with a level, then brace them temporarily with stakes. Space posts no more than ten feet apart to support the frame evenly. Apply rust-inhibiting primer to metal components before assembly.
3. Frame the Roof
Secure crossbeams between posts using galvanized heavy-duty brackets rated for outdoor use. Ensure beams overlap by at least two inches at joints to distribute weight effectively. For retractable tops, install side rails designed to guide slats or fabric tracks securely.
Incorporate a slight slope of one inch per foot on fixed panels to facilitate water drainage. Apply exterior-grade caulk to all joints, allowing full cure time before exposure to moisture. Verify frame squareness by measuring diagonals, which should match within one-quarter inch.
4. Add the Retractable System
Follow kit instructions to mount retractable panels or slats onto the frame. Manual systems operate via a hand crank mechanism, whereas motorized versions link to a remote control or wall switch for convenient adjustment. Conduct initial tests of movement range prior to attaching final trim elements.
Maintain clearance from moving tracks during operation to avoid injury. Apply a light coat of silicone spray to rails for smooth function and to minimize wear over time.
5. Finish and Furnish
Incorporate side screens or curtains for added privacy and insect protection. Install low-voltage LED strip lights beneath beams to illuminate evening gatherings without excessive glare. Position furniture to allow at least two feet of clearance around posts, ensuring unobstructed access.
Integrate a portable fan or radiant heater to adapt the space for variable temperatures. Select weather-resistant fabrics and cushions that complement the pod's design, enhancing overall coziness.
Essential Safety Measures
Verify that deck framing supports a minimum load of forty pounds per square foot prior to installation. Disconnect power at the main breaker when installing motorized components or electrical features. Route all cords through waterproof conduit to protect against moisture damage.
Avoid standing on roof panels during construction phases. Employ a second person for handling beams exceeding eight feet in length. Consult a licensed contractor if doubts arise regarding structural capacity or electrical work.
Common Troubleshooting Solutions
Water pooling on the roof: Inspect for adequate slope; if panels sit level, reposition brackets to introduce a gentle incline for better runoff.
Panels sticking or moving unevenly: Remove debris from tracks using a soft brush and mild soap solution. Accumulated dirt or pollen often leads to resistance in operation.
Leaks at edges: Reapply outdoor silicone sealant to joints, focusing on areas where flashing connects to posts.
Motor failure to respond: Check power supply and remote batteries first. If connections remain secure, perform a reset as outlined in the manufacturer's manual.
Condensation on enclosed walls: Enhance airflow by partially opening one side or installing a vent strip along the upper beam.
Budget Considerations and Timeline
Entry-level manual pergola pod kits begin at approximately five hundred dollars for basic coverage. Advanced models with motors, side enclosures, and integrated lighting range from five thousand to eight thousand dollars. Professional labor typically adds two to three dollars per square foot.
A straightforward DIY project requires eight to twelve hours, spread across two days. Complex setups involving electrical or drainage modifications may extend to three days. Opt for aluminum framing over wood to reduce costs, and select fabric over glass panels for affordability.
Prioritize quality anchors and sealants to avert future repairs and extend the structure's lifespan.
Ongoing Maintenance Practices
Wash roof panels every two months using mild soap, a soft sponge, and a garden hose rinse. Pressure washers risk dislodging joints, so reserve them for larger deck areas only.
Apply silicone spray to moving parts twice per season. Annually inspect bolts and screws, tightening any that have loosened due to vibration.
For fabric elements, ensure complete drying before retraction following rain to prevent mildew growth. Trim nearby trees or install gutters to divert leaves and debris from drainage routes. Weekly ten-minute sweeps maintain clean surfaces and free-moving panels.
Seasonal Care Guidelines
Spring Preparation
Examine joints for signs of rust or corrosion accumulated over winter months. Thoroughly clean the roof and operate the retractable system to confirm reliability. Reapply sealant to wooden posts if present to restore protective layers.
Summer Optimization
Position roof panels to shield against peak sunlight hours. Install light-colored curtains or shades to lower interior temperatures by up to ten degrees Fahrenheit. Deploy an oscillating fan to circulate air during humid periods.
Fall Maintenance
Remove leaves from roof grooves on a weekly basis. Inspect and clear gutter guards plus downspouts adjacent to the deck. Store removable cushions and fabrics in sealed, dry containers when idle.
Winter Protection
Fully retract fabric components ahead of snowfall or ice accumulation. Gently sweep light snow from solid roofs using a broom or soft brush. Refrain from applying salt near aluminum or composite decking beneath the pod.
Innovative Storage Solutions
The semi-enclosed nature of a pergola pod suits it for seasonal storage needs. Position weatherproof bins beneath built-in benches to hold cushions or gardening tools securely.
Attach hooks to interior beams for suspending hoses or lightweight planters. Incorporate a wall-mounted cabinet or mobile bar cart that serves dual purposes for organization and entertaining.
If electrical outlets are available, charge tools within the pod but disconnect during severe weather. Position a compact fire extinguisher nearby for safety when using heating devices or grills.
Indicators for Professional Assistance
Certain aspects of pergola pod installation demand specialized expertise. Engage a professional for:
- Uncertainty about deck load-bearing limits.
- Electrical wiring or lighting installations.
- Integration with home drainage systems.
- Automated roofs featuring app-based controls.
Inquire about warranty terms covering structural and electronic elements. Professionals can navigate permit requirements for covered outdoor spaces in regulated areas.
Essential Benefits of Pergola Pods
Pergola pods deliver targeted shade, precipitation shielding, and architectural definition to decks while maintaining openness. Retractable mechanisms enable rapid adjustments to light and ventilation conditions.
Secure installation hinges on robust anchoring and thorough load assessments. Consistent cleaning and lubrication ensure quiet, efficient operation.
Seasonal inspections safeguard against moisture intrusion and debris accumulation. These features support extended use for dining, relaxation, or social events regardless of weather fluctuations.
Steps to Launch Your Project
Measure your deck precisely and draft a placement sketch for optimal pod integration. Select a kit aligned with your space dimensions or design a custom frame for expanded protection.
Allocate two days for assembly and enlist a helper for beam handling. Organize tools in advance to streamline the process.
With careful execution, your pergola pod will create a reliable bridge between indoor comfort and outdoor vitality, ready for daily enjoyment.