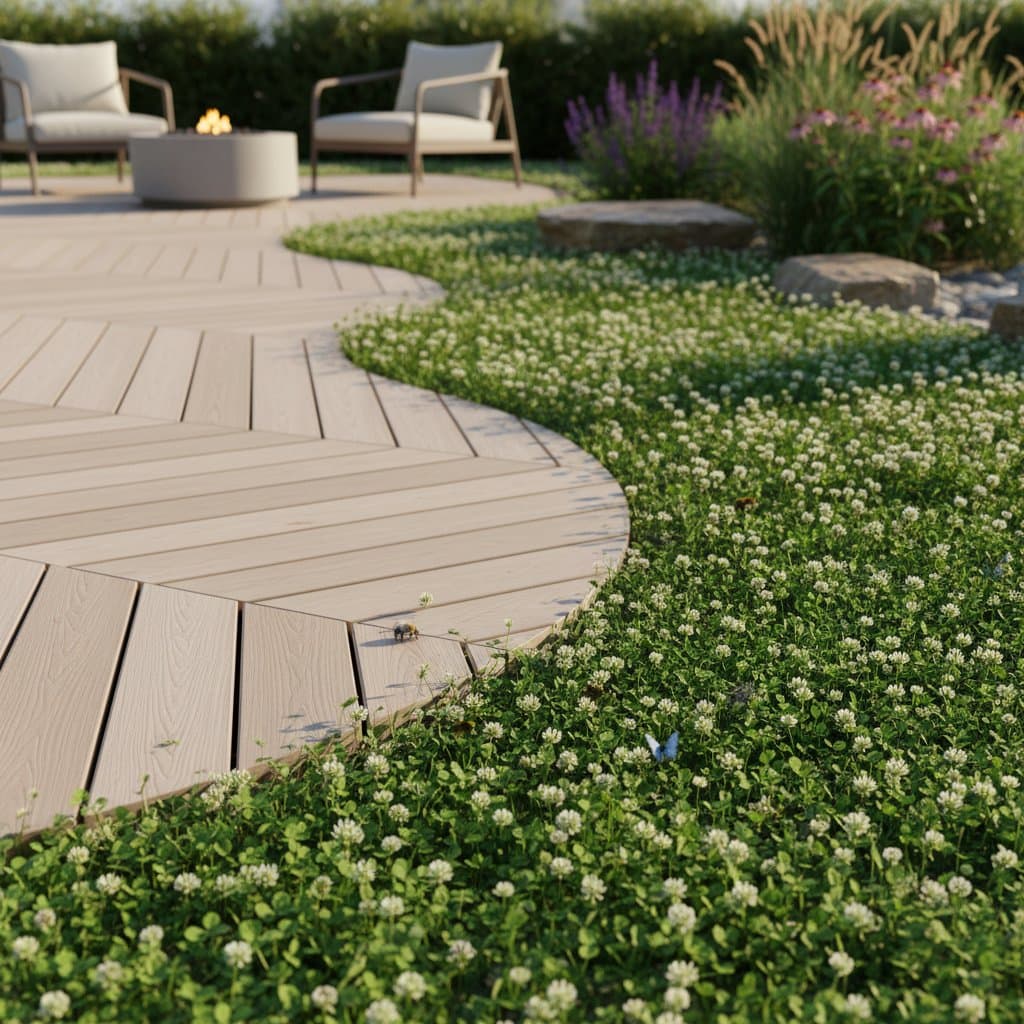
Introduction to Micro-Clover for Deck Edges
Micro-clover offers a practical alternative to traditional grass for areas around decks. This resilient groundcover tolerates partial shade, drought, and foot traffic better than many lawn varieties. Homeowners appreciate its ability to create a soft, green buffer that prevents soil erosion and reduces mud near entry points.
Establishing micro-clover involves straightforward steps that fit into a weekend project. The result provides years of beauty with far less effort than maintaining turf. Follow these guidelines to integrate it seamlessly into your landscape.
Planting Steps
Step 1: Prepare the Soil
Begin by clearing debris, weeds, and old grass from the deck perimeter. Use a garden rake to level the surface and remove rocks or roots that could hinder growth. Aim for a width of 12 to 18 inches along the deck edges to frame the structure effectively.
Test soil drainage by digging a small hole and filling it with water; it should drain within a few hours. Amend heavy clay soils with compost at a rate of one part compost to three parts soil. This improves aeration and nutrient retention without overwhelming the area.
Step 2: Select and Sow Seeds
Choose seeds from a reputable supplier to ensure high germination rates. Micro-clover seeds are tiny, so measure carefully: use about 1 pound per 1,000 square feet for even coverage. Broadcast the seeds uniformly by hand or with a spreader, then lightly rake them into the top quarter-inch of soil.
For best results, sow in early spring or fall when soil temperatures range from 50 to 75 degrees Fahrenheit. Press the soil gently with a roller or board to ensure seed-to-soil contact, which promotes stronger establishment.
Step 3: Initial Covering
Apply a thin layer of straw mulch or peat moss over the seeded area to retain moisture and deter birds from eating the seeds. This covering should be light enough to allow sunlight to reach the soil. Avoid thick layers that could smother emerging sprouts.
Water the area immediately after covering to settle the seeds. Use a gentle mist to prevent displacement. This initial moisture jump-starts the germination process.
Step 4: Water Gently
Employ a fine spray nozzle to avoid washing away the seeds. Maintain the top inch of soil at consistent moisture until sprouts emerge. Water once or twice each day during the first week, then transition to every other day.
Micro-clover typically germinates within 7 to 10 days in moderate conditions. Observe for small, rounded leaves that form a delicate green layer over the soil surface.
Step 5: Protect the Area
Cover the seeded zone with straw or fine mesh if birds frequent your yard. This safeguard remains in place until seedlings achieve 2 inches in height. Remove the covering promptly to prevent overheating or restricted growth.
Restrict pet access during the initial growth phase. Young shoots prove fragile and uproot easily under paw traffic.
Step 6: First Trim and Transition to Low Care
At 4 to 6 weeks, when plants reach 4 inches, trim them to 3 inches using a mower set to a high blade or a string trimmer. This practice stimulates denser foliage and deeper root development.
Mature micro-clover maintains a height of 3 to 5 inches naturally. Mow monthly for a neater appearance if desired, though many opt to forgo mowing once the plants establish fully.
Troubleshooting Common Issues
Simple care minimizes problems, yet occasional challenges arise. Address them promptly with these targeted solutions.
Patchy Growth:
Bare spots after two weeks indicate uneven seeding or poor contact. Reseed affected areas after lightly loosening the soil. Sustain moisture for another week to encourage uniform sprouting.
Yellowing Leaves:
Excessive moisture or compacted soil often causes discoloration. Aerate with a garden fork to enhance drainage, and reduce watering frequency. Micro-clover thrives in well-drained conditions and suffers in soggy environments.
Weeds Appearing:
Established micro-clover outcompetes most weeds through dense growth. In the early stages, remove intruders manually by hand. Steer clear of chemical herbicides, which may damage the clover.
Overgrowth Near Deck Posts:
Monthly trimming prevents accumulation against wooden elements. Maintain a 1-inch gap between plants and vertical surfaces to promote airflow and reduce moisture buildup.
Uneven Color:
Variations in shade or soil quality lead to inconsistent hues. Introduce fresh seed in early spring to blend and refresh the patch.
Ongoing Maintenance
A thriving micro-clover border demands little attention once rooted.
- Watering: Supplement only during extended dry spells. Deliver deep watering weekly if foliage shows wilting.
- Mowing: Trim optionally to 3 inches monthly for precision.
- Fertilizing: Skip applications; the plant fixes its own nitrogen.
- Weeding: Extract stray plants by hand before they spread.
- Fall Raking: Clear debris lightly to ensure sunlight penetration.
Micro-clover retains green coloration through mild winters and rebounds swiftly post-frost. In temperate zones, it remains evergreen year-round.
Seasonal Care Guide
Adapt routines to weather shifts for sustained health.
Early Spring: Inspect for winter damage and rake gently. Overseed thin areas, then water consistently until growth resumes.
Summer: Provide weekly deep watering absent rainfall. Shear edges with hand tools for sharp definition against the deck.
Fall: Remove fallen leaves and apply compost tea sparingly to nourish soil.
Winter: Limit traffic on frozen ground to protect roots. Expect dormancy followed by vigorous spring regrowth.
Consistent practices ensure enduring vibrancy with modest input.
Benefits of Micro-Clover Around Decks
Micro-clover excels in challenging deck-adjacent zones where grass falters. It endures shade beneath overhangs, arid patches by steps, and narrow spaces between stones. The fine foliage delivers subtle texture that complements wood without dominating the view.
Its roots stabilize soil, mitigating erosion from roof runoff. Small blooms attract pollinators subtly, or mow early to suppress flowers if preferred.
This plant requires no synthetic fertilizers, as it captures atmospheric nitrogen via root nodules. This self-sufficiency cuts chemical use and preserves water quality.
A Brooklyn landscape architect notes, Clients like it because it feels natural but requires almost no care. This perspective highlights its alignment with contemporary, effortless landscaping.
Getting Started with Your Project
Dedicate a weekend to planting and reap long-term rewards. Clear and level the soil encircling your deck, incorporate compost, distribute seeds evenly, and initiate gentle watering. Safeguard seedlings until roots anchor securely.
Established micro-clover frees time from lawn chores for outdoor enjoyment. The verdant fringe tempers the deck's lines, moderates soil temperature, and blocks dirt from walkways.
Take these actions now:
- Measure the deck's outline and determine seed quantity.
- Acquire quality micro-clover seeds and compost promptly.
- Reserve a morning for site preparation and sowing.
As the next season unfolds, this investment yields a pristine, undemanding border that thrives independently. Micro-clover frames your deck with serene, vital greenery that demands little in exchange.