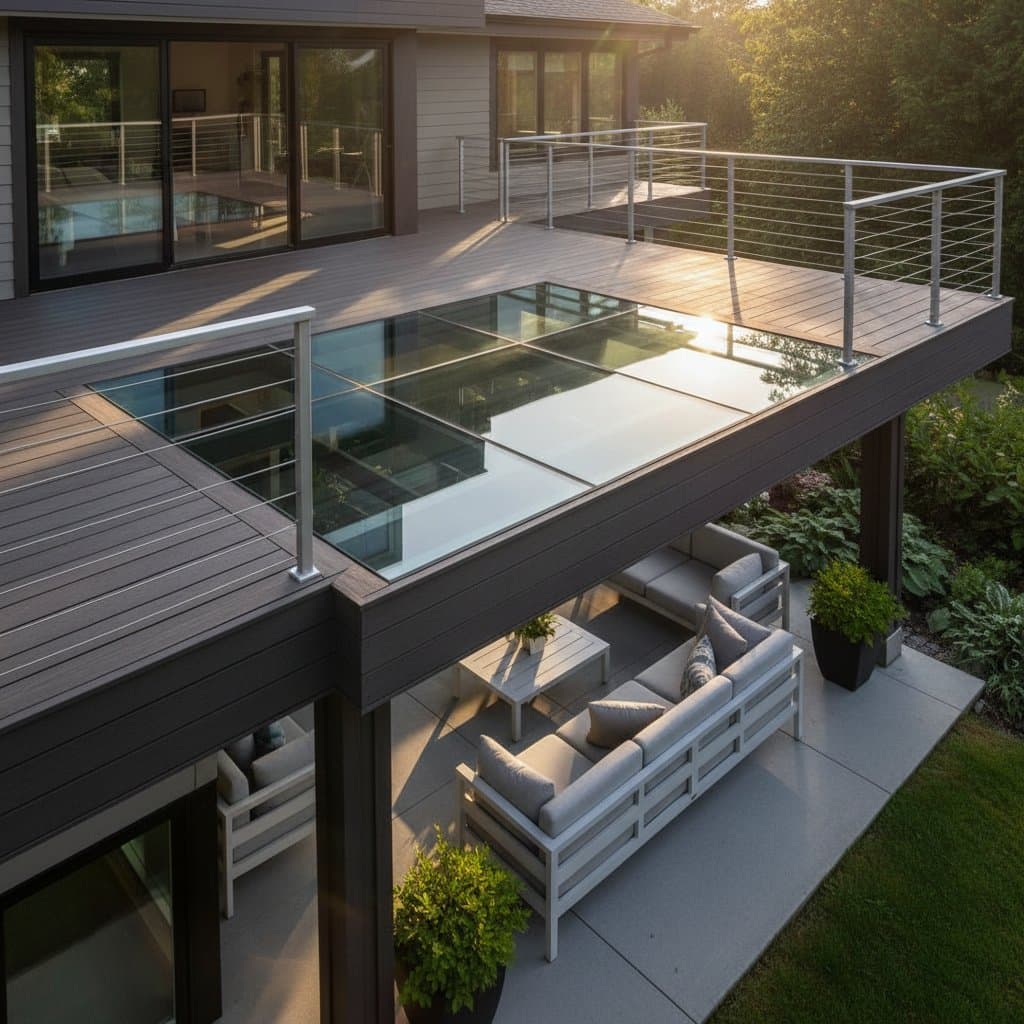
Illuminating Decks: Installing See-Through Glass Floor Panels
Imagine stepping onto a deck where sunlight streams through the flooring, illuminating the area below without the need for additional lighting fixtures. This innovative concept features a see-through glass floor section that transforms one level into a natural skylight for the space beneath. The primary objectives include enhancing natural light, creating an open atmosphere on the deck, and elevating the ambiance in the shaded area below.
This comprehensive guide details the nature of glass deck floors, their advantages, required tools and materials, installation procedures, maintenance practices, and considerations for professional assistance.
Understanding Glass Deck Floors
A glass deck floor consists of a transparent panel system integrated into the deck surface. It substitutes portions of traditional wood or composite decking with sealed glass units designed to allow daylight transmission. These panels typically incorporate a laminated upper layer for durability, a tempered central layer for shatter resistance, and a protective bottom seal to withstand environmental exposure.
The installation yields dual advantages: increased natural illumination for the underlying space and a contemporary aesthetic for the deck itself. Such panels expand the perceived size and brightness of compact decks. They also enable practical use of under-deck areas, such as storage or gardens, by providing consistent daylight. This design fosters a sense of openness while maintaining a connection to the ground.
Essential Tools and Materials
Procure complete kits or custom-fabricated panels from reputable suppliers. For a standard 3-foot by 3-foot installation, gather the following:
- Glass panels, measuring 1 to 1.25 inches in thickness, featuring lamination and tempering for structural integrity
- Aluminum or stainless steel framing, engineered for exterior durability
- UV-resistant silicone sealant to ensure weatherproofing
- Non-slip coating or etched surface treatment to enhance traction
- Rubber gaskets to manage vibrations and prevent moisture ingress
- Personal protective equipment, including gloves, safety glasses, and knee pads
- Power drill equipped with stainless steel screws, sized #10 or larger
- Precision level and measuring tape to maintain uniform alignment
Each panel weighs approximately 60 to 80 pounds, necessitating assistance from a second person or the use of suction lifting devices for safe handling.
Installation Process
Step 1: Planning and Measurement
Identify and mark the deck section designated for the glass insertion. Select a location that receives direct sunlight for a minimum of four hours each day to maximize light benefits. Inspect the underlying joists to confirm they can bear the added weight of the panels. Standard joist spacing of 16 inches accommodates most glass floor systems.
Step 2: Preparing the Opening
Precisely cut away the existing decking boards to create a square aperture. Reinforce the perimeter with pressure-treated lumber or compatible metal trim to comply with local building codes and ensure structural stability. Maintain a 0.25-inch gap surrounding the opening to allow for thermal expansion.
Step 3: Securing the Frame
Fasten the metal support channel into position using corrosion-resistant screws and a layer of sealant. Ensure the channel aligns perfectly level and flush with the adjacent deck surface. Insert gasket tape into all corners to eliminate potential leak points.
Step 4: Positioning the Glass Panel
With assistance, carefully lower the glass panel into the frame. Distribute sealant evenly along the edges and secure the panel with firm pressure. Remove any excess sealant promptly before it hardens. Refrain from applying weight to the panel for at least 24 hours to permit full curing.
Step 5: Verifying Performance
Test the installation by pouring a modest volume of water onto the surface to confirm proper drainage. If the glass proves slippery, apply a non-slip film or etching solution. These measures enhance safety, particularly in wet conditions.
Key Safety Considerations
Lift glass panels using protective gloves and with the support of at least two individuals to prevent accidents. Employ only tempered or laminated structural glass capable of withstanding pedestrian loads; standard window glass poses significant risks. Maintain uninterrupted sealant application to safeguard against water penetration.
Confirm that each panel adheres to a minimum load capacity of 50 pounds per square foot. Regular inspections help identify potential issues before they compromise safety.
Common Issues and Solutions
Condensation forming beneath the panel indicates a sealing failure; address this by reapplying silicone along the edges. Cloudiness on the glass surface requires gentle cleaning with mild soap and a soft cloth, avoiding abrasive materials.
Any visible cracks demand immediate panel replacement, as even minor fractures diminish the unit's strength. Document installation details to facilitate swift repairs.
Ongoing Maintenance Practices
Conduct monthly wiping of the panels to eliminate accumulated dust and pollen, utilizing a soft mop rather than rigid brushes to avoid scratches. Perform seasonal inspections of the sealant for gaps or degradation, reapplying as necessary to preserve integrity.
In winter conditions, steer clear of salt-based deicers that could damage the sealant; opt for sand to provide traction. Store all cleaning agents indoors to shield them from freeze-thaw cycles.
Cost Estimates and Timeline
A single glass panel section ranges from $400 to $900 in material costs, influenced by dimensions and specifications. Professional labor fees typically add $200 to $400 for straightforward installations.
A do-it-yourself project for one panel requires approximately half a day, assuming materials are pre-assembled. Larger or custom configurations extend the timeline accordingly.
Indicators for Professional Involvement
Engage a licensed contractor under these circumstances:
- The deck exceeds 10 feet in height from the ground level
- Structural modifications, such as joist reinforcement, prove necessary
- Integration of advanced features like embedded lighting or custom drainage is desired
Request documentation verifying compliance with ASTM standards for load-bearing and impact resistance. Professionals ensure precise frame alignment and mitigate risks of leaks that could accelerate deck deterioration.
Implementing Glass Floors Effectively
Commence with a modest single-panel installation to evaluate the lighting enhancement. Maintain detailed records of all materials and sealants used for future reference and replacements. Experience the dual perspectives: the expansive view from the deck and the invigorating daylight reaching the space below.