Micro-Climate Pods Unlock Year-Round Balcony Gardens
Cold months often halt balcony gardening. Plants face challenges from frost, dry soil, and diminished vitality in the space. A micro-climate pod addresses these issues effectively. This enclosure converts a compact balcony into a stable, shielded environment where herbs, greens, and flowers flourish throughout every season.
Full-scale greenhouses or extensive renovations prove unnecessary. Select an appropriate pod size, assemble basic tools, and follow a structured plan to maintain a vibrant, productive balcony year-round. This guide details the nature of micro-climate pods, their operational principles, and secure installation methods for home use.
Overview
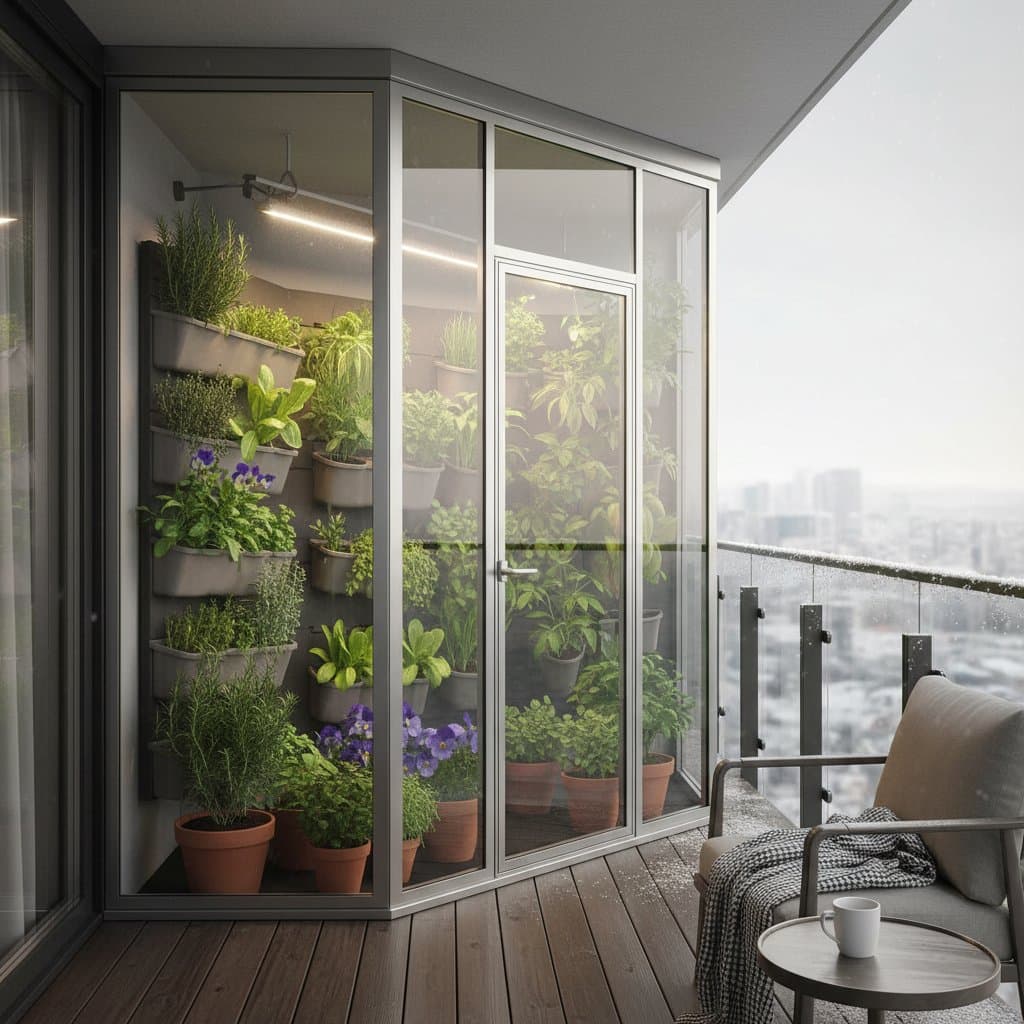
A micro-climate pod consists of a compact enclosure designed to regulate temperature, moisture, and airflow surrounding plants. It functions similarly to a miniature greenhouse. Clear panels capture and retain warmth, vents manage excess humidity, and insulation prevents roots from freezing during winter or overheating in summer.
Compact pods suit balconies as narrow as 3 feet (0.9 meters) wide. Larger versions span entire railings or corners. Modular designs allow for future expansion to accommodate additional growing areas.
The primary advantage lies in precise environmental control. Adjust light, warmth, and air circulation to suit specific plants. Such management prevents basil from wilting in chilly conditions and protects lettuce from desiccation in intense heat. Enclosure also minimizes pest incursions by isolating plants from external threats.
Tools and Materials
Construct a pod from basic components or opt for a pre-fabricated kit. Both approaches require comparable supplies. Assemble all items in advance to prevent interruptions during assembly.
Supplies list:
- Frame material: Aluminum poles or PVC pipes, totaling 12 to 20 feet (3.6 to 6 meters) for a small pod
- Clear panels or film: Polycarbonate sheets or durable greenhouse plastic, cut to match balcony dimensions
- Insulation: Bubble wrap or reflective foam panels, essential for regions with harsh winters
- Fasteners: Zip ties, clips, or weather-resistant tape for secure attachments
- Vent covers: Two adjustable air vents or compact fans to regulate circulation
- Shelving units or plant stands: Metal or pressure-treated wood, limited to 24 inches (61 centimeters) deep for balance
- Thermometer and hygrometer: A combined device positioned at plant level for monitoring
- Water trays or drip system: Essential for uniform soil moisture without overflow risks
Consider optional enhancements such as LED grow lights for shaded areas, solar-powered fans for energy efficiency, and automated mist sprayers for consistent hydration. These additions prove valuable when natural sunlight remains scarce.
Steps
1. Measure and Plan
Begin by measuring the balcony floor area and railing height precisely. Create a detailed sketch illustrating the pod's placement. Allocate at least 6 inches (15 centimeters) of space from the wall to facilitate air circulation. Review local building regulations to verify permissibility of enclosed balcony structures.
Safety consideration: Confirm the railing's capacity to bear additional load. A complete pod, including soil and water, may exceed 100 pounds (45 kilograms) in weight.
2. Build the Frame
Construct the frame on a stable ground surface initially. Join PVC or aluminum poles using corner connectors for rigidity. Elevate the assembled frame into position and verify that doors or railings operate without obstruction.
Safety consideration: On elevated balconies, tether all tools to prevent falls. Avoid leaning beyond the railing edge during installation.
3. Add Panels and Seals
Trim clear panels or plastic sheeting to align with frame dimensions. Secure them firmly using clips or zip ties. Apply weather-resistant tape along joints to eliminate drafts. Designate one panel as removable or hinged to enable straightforward access.
Practical tip: Employ a double layer of plastic film separated by a 1-inch (2.5-centimeter) air gap for enhanced thermal insulation.
4. Install Shelving and Sensors
Position robust shelves within the enclosure to support pots and trays. Mount the thermometer and hygrometer at the height of the plants for reliable data. Connect lights or fans via extension cords rated for outdoor conditions.
Safety consideration: Route electrical cords away from the floor to minimize contact with moisture.
5. Test Airflow and Moisture
Operate the ventilation system for a full day prior to introducing plants. Monitor temperature fluctuations at midday and evening. Modify vent positions to maintain readings between 60 and 80 degrees Fahrenheit (15 to 27 degrees Celsius). Target humidity levels of 50 to 70 percent for optimal conditions.
With stability achieved, introduce plants gradually. Commence with resilient varieties such as thyme and mint to allow further adjustments.
Safety Tips
- Weight distribution: Balconies possess varying load limits. Spread weight uniformly and refrain from concentrating heavy pots in single areas.
- Ventilation requirements: Avoid complete sealing of the pod. Inadequate air exchange fosters mold and fungal growth.
- Fire prevention: Select low-heat LED lighting exclusively. Ensure all electrical components carry outdoor certifications.
- Wind resistance: Fasten the structure to railing posts or floor anchors. Powerful winds may dislodge lightweight frames.
- Drainage management: Place saucers or trays beneath pots to contain excess water and prevent spills over balcony edges.
Troubleshooting
Condensation buildup
Cause: Insufficient airflow or excessive watering.
Solution: Widen vent openings, extend fan operation, and administer water during morning hours.
Yellowing leaves
Cause: Inadequate light or nutrient shortages.
Solution: Supplement with grow lights for 12 hours per day and incorporate compost into the soil.
Mold on soil surface
Cause: Elevated humidity levels.
Solution: Blend coarse sand into the soil for improved drainage and decrease misting intervals.
Excessive internal heat
Cause: Unfiltered direct sunlight.
Solution: Install reflective shade cloth during intense sunlight periods or activate a circulation fan.
Frost damage on plant edges
Cause: Inadequate sealing.
Solution: Apply foam tape to corners and upgrade to thicker panels from thinner plastic.
Budget and Time
A modest DIY pod requires 80 to 150 dollars in materials, varying by selections. Pre-assembled kits commence at approximately 200 dollars, increasing with dimensions and features. Assembly typically spans half a day with materials prepared.
Anticipate ongoing expenses such as soil amendments and replacement fasteners on a monthly basis. LED lights consume minimal energy, comparable to a standard bulb operated briefly each day.
Cost-saving alternative: Repurpose recycled window panels in place of new polycarbonate. Prioritize quality in fasteners and seals to uphold structural integrity and insulation efficacy.
Maintenance
Maintain pod cleanliness to deter pests and mildew accumulation. Clean panels weekly to maximize light transmission. Empty and rinse trays, while inspecting vents for obstructions.
Seasonal tasks encompass:
- Replacing plastic film upon loss of transparency
- Inspecting screws and ties following stormy conditions
- Replenishing soil nutrients biannually
- Dusting fans and lights with a dry cloth
Should algae or unpleasant odors develop, ventilate the pod fully for an entire day to refresh the air.
When to Call a Pro
Engage a contractor or building manager upon detecting balcony floor cracks or unstable railing fixtures. Electricians ensure safe outlet installations for lighting and ventilation. Professional builders customize pods for unconventional balcony configurations or temporary setups suitable for renters.
Request verification of:
- Weight-bearing capacity
- Electrical compliance for outdoor environments
- Frames with quick-release mechanisms for disassembly
Establishing a Thriving Balcony Oasis
Complete construction and initial setup over a weekend to gain access to fresh produce and foliage daily. Success hinges on equilibrium: consistent airflow, balanced temperatures, and nutrient-rich soil. This approach sustains a lively outdoor haven regardless of seasonal shifts.