The Growing Appeal of Acoustic Panels for Deck Noise Reduction
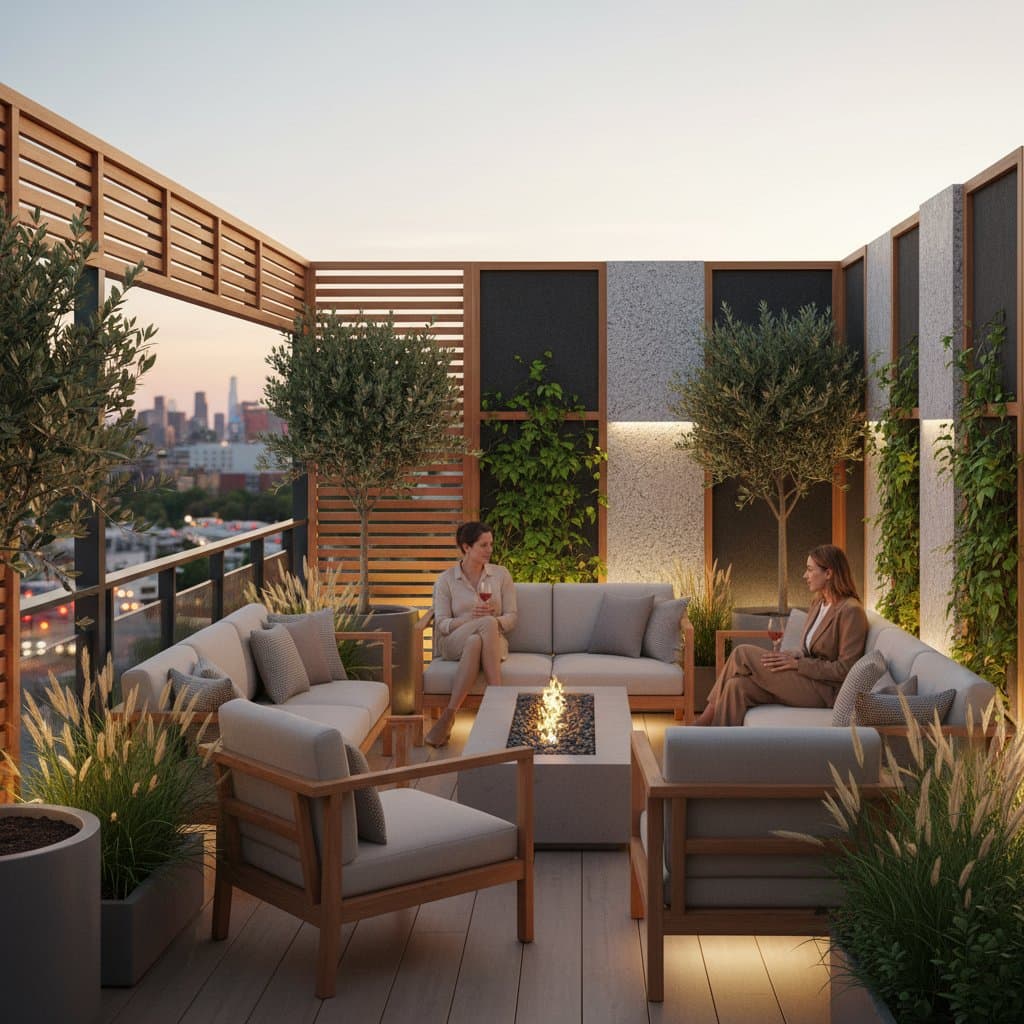
Urban decks often amplify everyday sounds, turning relaxation spots into zones of distraction from traffic or nearby chatter. Acoustic panels offer a straightforward solution by absorbing sound waves and minimizing reflections, all while preserving natural light and ventilation. This approach delivers quieter environments without the need for full enclosures.
This guide covers the essentials of acoustic panels, their mechanics, and selection criteria for outdoor decks. Readers will find guidance on placement strategies, weather-resistant options, and upkeep methods to sustain performance across seasons.
Understanding Acoustic Panels
Acoustic panels consist of dense cores, such as mineral wool, fiberglass, or specialized foam, encased in protective fabric. Designed initially for indoor echo control in recording studios or conference rooms, outdoor variants incorporate enhanced durability features. On decks, these panels intercept sound waves that would otherwise rebound from rigid elements like railings, walls, or flooring.
Key advantages include improved dialogue clarity, diminished urban rumble, and heightened seclusion. Installation requires no structural alterations; typically, eight to ten panels, each at least two inches thick, suffice for modest decks, potentially lowering noise perception by multiple decibels.
Required Tools and Materials
Homeowners with basic skills can install acoustic panels over a single weekend, using minimal equipment.
Tools
- Tape measure
- Drill equipped with bits for wood or masonry
- Level
- Utility knife
- Safety goggles and gloves
Materials
- Exterior-rated acoustic panels
- Mounting brackets or Z-clips, allocating four to six per panel
- Corrosion-resistant screws
- Weatherproof sealant spray
- Optional lattice framing or privacy screens
Select panels engineered for outdoor exposure or high humidity. Indoor models degrade rapidly through sagging, mold growth, or reduced efficacy. Opt for hybrids featuring plastic backing and permeable front layers that repel moisture while maintaining acoustic properties.
Installation Process
1. Measure and Design the Layout
Assess deck dimensions, focusing on walls and railings. Identify primary noise sources: position panels along outer edges for traffic reduction or between seating zones for interpersonal sounds. Incorporate at least one inch of clearance between panels and surfaces to enhance absorption efficiency by up to 25 percent.
2. Surface Preparation
Clear mounting areas of dirt, loose paint, or residue to ensure secure adhesion. For wooden surfaces, drill pilot holes slightly smaller than screw diameters to avoid cracks. Masonry requires compatible anchors tailored to the substrate.
3. Secure Panel Mounting
Position each panel level, mark bracket locations, and drill pilot holes. Fasten brackets firmly, then align and secure panels using clips or screws. Maintain uniform gaps and verify stability; handle fibrous materials with gloves to prevent irritation.
4. Apply Weatherproofing to Edges
Apply a light layer of water-repellent sealant to fabric borders via spray or brush. Steer clear of thick applications that impede airflow and compromise sound capture. For aesthetic enhancement, encase panels in cedar trim, which provides support and natural rot resistance.
5. Evaluate and Refine Placement
Test during peak noise times by observing from seating positions. Identify persistent reflection zones and supplement with additional panels or fabric barriers. A single panel in a corner often eliminates residual echoes effectively.
Essential Safety Considerations
Use sturdy ladders and enlist assistance for handling oversized panels. Don a mask during any cutting of fibrous components to avoid dust inhalation. Position electrical elements distant from damp areas, and ensure panels do not obstruct ventilation sources like deck vents or exhaust outlets, thereby preventing condensation issues.
Effective sound management balances absorption with adequate air circulation to avert mold and sustain comfort.
Versatile Applications for Panels
Acoustic panels serve dual roles as privacy barriers. Integrate vertical installations between posts to shield views without dimming light. On compact decks, incorporate hinges for foldable designs that store neatly when unused.
For removable setups, relocate lightweight panels indoors during severe weather; suspend from garage hooks or stack with separators to inhibit distortion. Fixed installations benefit from seasonal tarpaulin covers ahead of storms.
Cost Estimates and Timeline
Expenses depend on specifications and suppliers. Typical pricing includes:
- Exterior-rated panels: $25 to $60 per 2x4-foot unit
- Hardware and sealants: $40 to $100 overall
- Framing or lattice additions: $50 to $150 based on lumber selection
An eight-panel setup for a small deck ranges from $250 to $600. Allocate four to six hours for planning, installation, and finishing. Professional assistance for mounting adds $200 to $400, offset by self-managed preparation.
Common Issues and Solutions
Sagging or Dampness
Verify airflow and drainage; persistently wet panels diminish performance. Introduce rear gaps or bottom-edge weep holes for moisture escape.
Inconsistent Noise Mitigation
Examine panel seams and adjacent hard surfaces. Incorporate rugs, draperies, or vegetation to disrupt sound trajectories.
Fading or Fabric Degradation
Choose UV-stable fabrics and annual protective sprays. Select subdued colors such as gray, beige, or green for longevity.
Bracket Loosening
Post-storm inspections may reveal needs for tightening or upgraded, longer screws resistant to corrosion.
Ongoing Maintenance Practices
Perform biannual cleanings with a soft brush or vacuum attachment at low pressure. Refrain from direct water exposure; treat stains with diluted soap, followed by thorough air drying. Renew sealant applications annually to preserve resilience.
Routinely check fixings, as seasonal wood movement can slacken hardware. Adjust screws gently to avoid frame harm. For fabric-covered types, rotate panels midway through seasons to distribute solar exposure evenly, prolonging vibrancy.
Seasonal Care Guidelines
- Spring: Examine for cold-weather impacts and remove pollen buildup.
- Summer: Monitor color stability, refresh sealants, and optimize shading.
- Fall: Clear foliage that traps humidity.
- Winter: Shield or relocate non-freeze-rated panels.
Establish seasonal alerts to uphold panel effectiveness and appearance.
Professional Assistance Scenarios
Engage experts for intricate deck structures or masonry attachments to select non-damaging anchors. Seek contractors for panels over four feet tall or exceeding 15 pounds, which demand reinforced supports. Electrical integrations, such as nearby lighting, require licensed handling with fixtures spaced at least three inches from absorptive surfaces.
The Science Behind Acoustic Effectiveness
Sound propagates as waves that rigid materials reflect, amplifying echoes and volume. Panels capture wave energy through dense interiors; a two-inch mineral wool variant absorbs up to 80 percent of mid-frequency sounds, encompassing voices and vehicular tones.
Deck disturbances predominantly occupy this spectrum, explaining the impact of modest arrays. While not eliminating all noise, panels attenuate sharp elements and curb inter-surface reverberations.
Integrating Panels into Broader Noise Strategies
Maximize results through complementary measures:
- Rugs or mats for floor-level absorption.
- Planters or greenery to obstruct direct sound lines.
- Cushions and canopies for incidental capture.
- Foam-backed fencing for intensified seclusion zones.
Combined efforts can halve perceived noise, with optimal gains from addressing both surfaces and exposures.
Implementing Your Deck Upgrade
Initiate with a targeted section: measure one area, acquire two to three panels, and experiment with positions. Minor adjustments, like six-inch shifts, alter acoustics noticeably. Build upon successes by extending to additional walls or incorporating screens for comprehensive tranquility.