Transform Shaded Balconies into Profitable Mushroom Farms
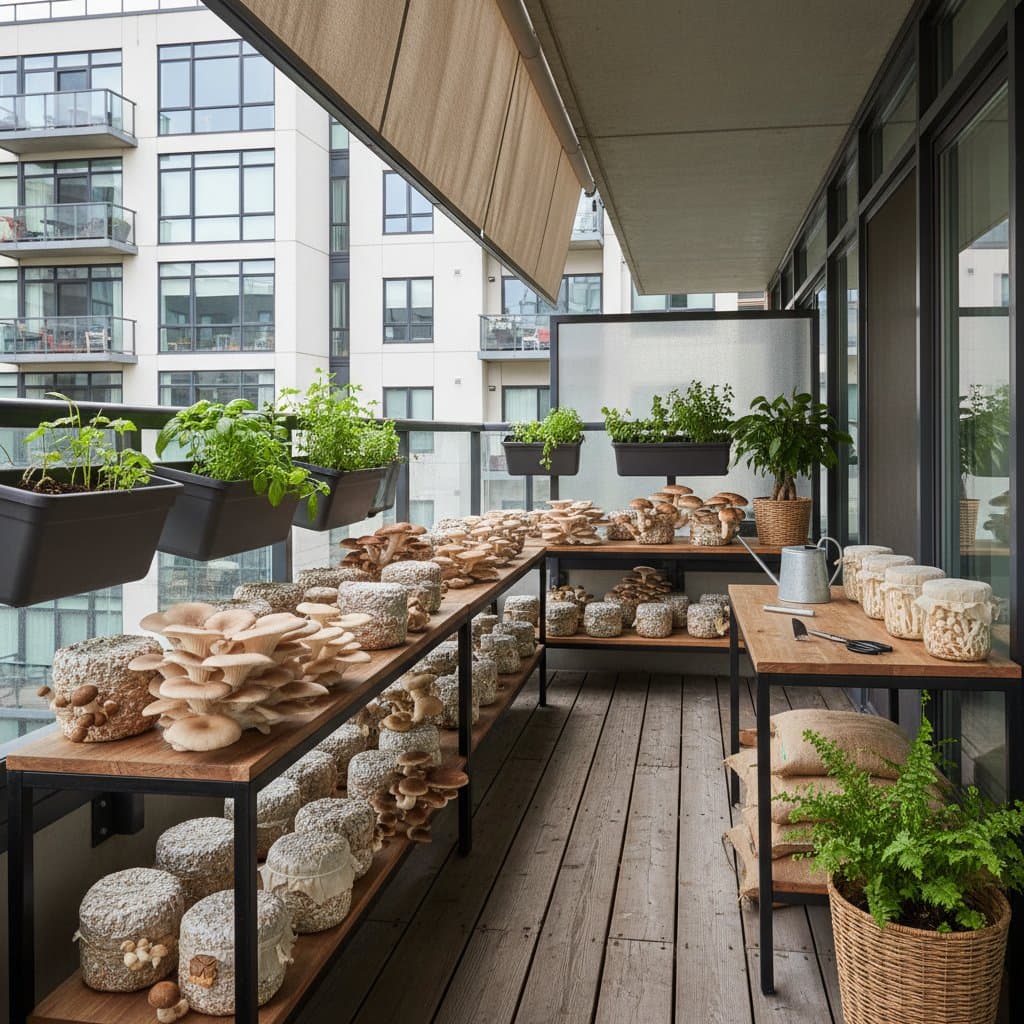
Shaded balconies in urban settings offer ideal conditions for mushroom cultivation. These fungi thrive in low-light environments with moderate humidity and steady airflow, unlike sun-dependent plants. You require no soil or elaborate equipment, just basic containers and a systematic approach.
This guide outlines how to establish a compact mushroom farm on your balcony. The setup pays for itself through multiple harvests, providing fresh gourmet produce for personal use or sale. Expect yields that support local markets or direct sales to restaurants.
Overview
A balcony mushroom farm relies on controlled conditions to cultivate edible fungi in small-scale containers. Mushrooms derive nutrients from organic substrates rather than sunlight, making them suitable for dim, enclosed spaces. The system emphasizes safety, repeatability, and adaptation to limited urban areas.
You will acquire essential materials, prepare a sterile growing zone, and manage the growth cycle. Initial setup demands approximately three hours, followed by one hour weekly for monitoring and care. This low-commitment method suits busy city dwellers seeking supplemental income.
Tools and Materials
Source supplies from local garden stores or online retailers to streamline preparation. Focus on durable, food-safe items to ensure long-term viability.
- Growing containers: Three to five 5-gallon plastic buckets or specialized mushroom grow bags
- Mushroom spawn: One pound each of oyster, lion's mane, and shiitake strains for diverse yields
- Substrate: 15 pounds of pasteurized straw, hardwood sawdust, or spent coffee grounds
- Spray bottle: For precise misting to maintain humidity
- Thermometer and hygrometer: Compact digital models to monitor environmental conditions
- Drill with 1/4-inch bit: For creating ventilation holes in containers
- Gloves and alcohol wipes: To maintain sterility during handling
- Plastic tray or tarp: To shield the balcony floor from moisture
- Light mesh or shade cloth: To block pests and excessive wind
Prioritize cleanliness throughout. Contamination from unclean tools often leads to crop failure, so sanitize all surfaces before use.
Steps
Step 1: Prepare the Substrate
Select straw, sawdust, or coffee grounds as the nutrient base. Pasteurize by submerging in water heated to 160°F (71°C) for one hour, which eliminates competing bacteria and molds. Drain thoroughly to achieve a damp consistency, then allow full cooling to room temperature.
Wear gloves during this process to avoid introducing contaminants. A properly prepared substrate supports robust mycelium development and higher yields.
Step 2: Mix and Fill
Blend five pounds of cooled substrate with one-third pound of spawn in a clean bucket. Mix thoroughly by hand until the spawn distributes evenly, resembling fine threads throughout the material. Pack the mixture into containers, filling to three-fourths capacity.
Drill 10 evenly spaced 1/4-inch holes around the lower sides of each bucket for gas exchange. Secure a breathable lid, such as punctured plastic wrap, over the top to balance moisture retention and aeration.
Step 3: Incubate
Position containers in a shaded balcony corner or against an indoor wall for darkness. Maintain temperatures from 65°F to 75°F (18°C to 24°C) and humidity at 80 percent. Inspect daily for signs of progress, adjusting placement if needed.
Mycelium appears as white, web-like growth within 10 to 14 days. This indicates successful colonization, distinct from harmful mold due to its uniform, cottony texture.
Step 4: Initiate Fruiting
Shift containers to areas with indirect light once the substrate surface colonizes fully. Mist surfaces lightly three times daily to sustain humidity without soaking. Pins, or tiny mushroom primordia, emerge within five to seven days.
Ensure gentle airflow to prevent stagnation, but shield from strong winds that could desiccate developing fruits. Consistent conditions accelerate maturation.
Step 5: Harvest
Harvest when mushroom caps flatten and edges curl slightly upward, signaling peak ripeness. Use a sterilized knife to cut stems at the base, preserving the substrate for subsequent flushes. Each container typically produces two to three flushes, separated by 10 days.
After the final flush, discard spent substrate into compost. This cycle repeats every four to six weeks, depending on strain and conditions.
Safety Tips
Maintain rigorous hygiene by washing hands and tools before each session. Disinfect work surfaces with 70 percent alcohol to minimize contamination risks.
Position electrical devices away from misting zones to avoid hazards. Consume only mushrooms with firm texture, earthy aroma, and no discoloration; discard any suspect batches immediately.
Wear protective gloves when handling substrates to guard against skin irritation from organic materials.
Troubleshooting
Mold or green patches on substrate:
This stems from inadequate pasteurization or unclean equipment. Discard affected batches entirely and sterilize containers with a 10 percent bleach solution before reuse.
Drying or stalled growth:
Insufficient humidity or drafts cause this issue. Increase misting frequency, introduce a small humidifier, or position a damp cloth nearby to stabilize moisture levels.
Leggy, thin mushrooms:
Limited fresh air exchange or light contributes to weak forms. Enlarge ventilation holes slightly and relocate containers to brighter indirect light, avoiding direct sun exposure.
Budget and Time Commitment
Initial investment ranges from $60 to $80, covering spawn, containers, and monitoring tools. Subsequent cycles reduce costs, as you reuse most equipment.
A single setup yields about two pounds per flush, valued at $10 to $15 per pound through local sales. Steady production from three to five containers generates $60 to $100 monthly after the first month.
Daily tasks involve 10 minutes for checks and misting. Harvesting requires 30 minutes for cutting, cleaning, and packaging, keeping overall effort manageable.
Maintenance Practices
Clean containers with hot soapy water after each cycle, then air-dry fully to prevent bacterial buildup. Inspect and repair ventilation holes or covers as needed.
Store spare spawn in a refrigerator at 40°F (4°C) for up to three months. Regularly sweep the balcony to eliminate debris and standing water, which foster pests.
Run a low-speed fan intermittently to circulate air and deter gnats or mites. Monitor for infestations and apply organic neem oil if detected early.
Calibrate your hygrometer quarterly. If humidity dips below 70 percent, place a water-filled tray under containers or employ a compact ultrasonic humidifier for consistent levels.
Harvest Storage Strategies
Store fresh mushrooms in breathable paper bags within the refrigerator, consuming within five days to preserve quality. For extended shelf life, dehydrate at 110°F (43°C) for six hours using a food dehydrator, then store in sealed glass jars.
Dried varieties retain potent flavors and appeal to bulk buyers like home chefs. Label all containers by mushroom type and inoculation date to optimize rotation and track performance.
Experiment with strains to identify those best suited to your balcony's microclimate, refining future batches for maximum output.
Seeking Professional Guidance
Persistent contamination or low yields warrant expert input. Consult local urban agriculture extensions or mycology specialists for on-site evaluations.
They provide substrate testing and setup audits at minimal cost. Engage professionals for expansions beyond 10 containers, where advanced climate control proves essential.
Seasonal Adjustments
During warmer periods, monitor for rapid evaporation; increase misting and apply shade cloth to containers. In cooler weather, insulate with bubble wrap to sustain temperatures above 60°F (15°C), blocking chilling drafts.
Rainy seasons naturally boost humidity, so reduce artificial misting and ensure proper drainage to avoid waterlogging. These tweaks maintain productivity year-round with minimal disruption.
Pro Tips for Optimal Results
Begin with oyster mushrooms for their rapid growth and tolerance to minor errors. Progress to lion's mane or shiitake once established, as they command premium prices.
Maintain a log recording daily temperature, humidity, and harvest weights. Analyze entries to fine-tune conditions and boost efficiency over time.
Distribute fresh harvests within 24 hours to restaurants or farmers' markets for top value. Repurpose exhausted substrate as fertilizer in balcony gardens, enhancing soil fertility.
Launch Your Balcony Mushroom Venture
Establishing a mushroom farm on your balcony unlocks sustainable income from overlooked space. Follow these steps to cultivate, harvest, and monetize with confidence. Consistent care yields not only profits but also fresh, nutritious produce tailored to urban life.