Achieving Perfect Watering for Deck Gardens with AI Drip Systems
Deck gardens often suffer from inconsistent moisture levels, with potted plants drying out faster than raised beds. Manual watering proves unreliable, leading to overwatering in some areas and drought in others. AI-powered drip irrigation addresses these challenges by delivering precise, automated hydration. This approach results in healthier plants, reduced water consumption, and more leisure time for gardeners. The following guide details how to implement and maintain such a system for optimal results.
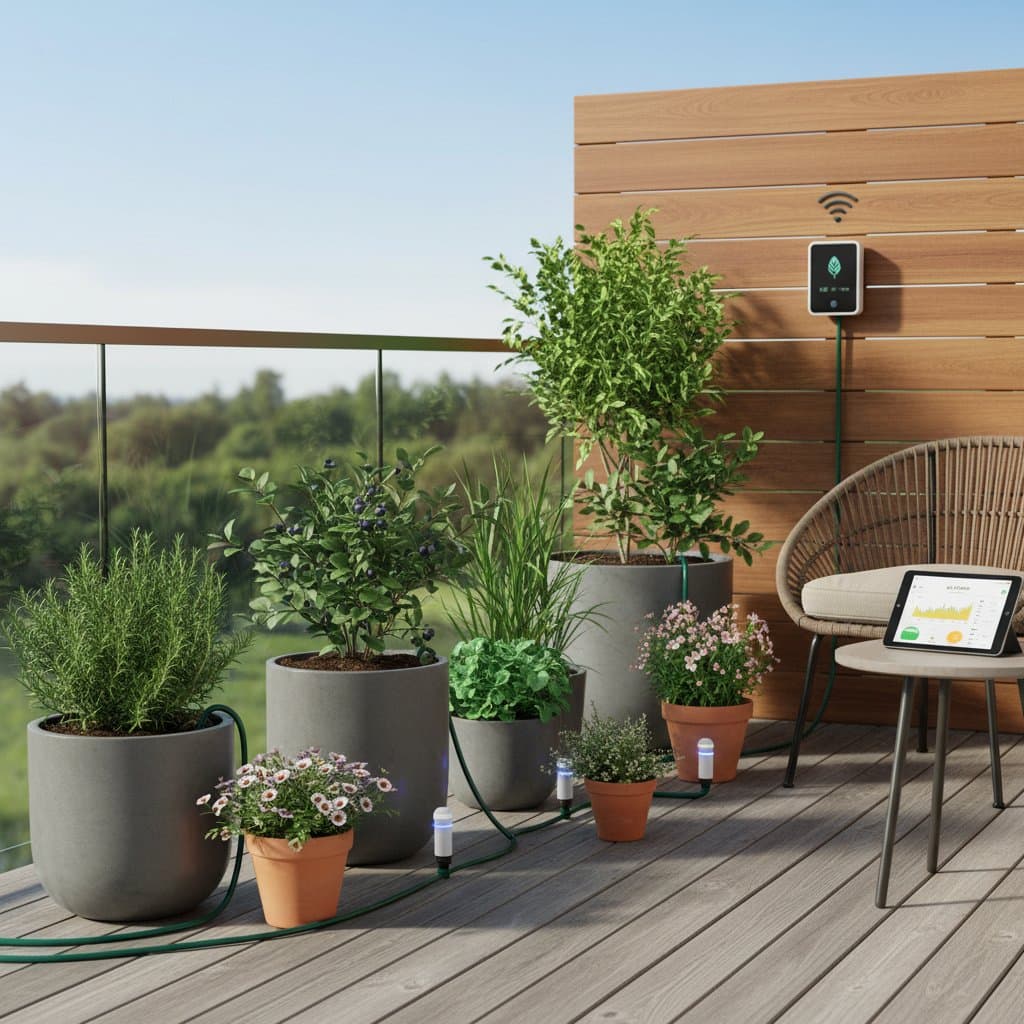
System Overview
AI drip irrigation integrates sensors, timers, and intelligent controllers to monitor and regulate water delivery. These components track soil moisture, ambient temperature, and sunlight exposure to determine ideal watering schedules and volumes. Users connect the system via a compact controller or mobile application, allowing customization based on local weather forecasts and specific plant requirements. For urban deck setups, this technology ensures uniform hydration across varied containers, minimizing evaporation and runoff. The outcome is vibrant foliage and soil that remains consistently moist without constant intervention.
Essential Tools and Materials
Begin with core components and scale up as needed. The following list covers the fundamentals for a typical deck garden:
- A smart drip controller featuring Wi-Fi or Bluetooth connectivity for remote access
- Moisture and temperature sensors, with a minimum of two units per eight square feet of garden space
- Drip tubing and emitters, allocating one emitter per individual pot or plant cluster
- A backflow preventer and inline filter to protect against contaminants and clogs
- Mounting clips or zip ties for securing tubing along railings and deck surfaces
- A compatible smartphone or tablet for initial configuration and ongoing oversight
Consider enhancements such as a rain sensor to pause operations during precipitation, a solar-powered controller for energy efficiency, or a flow meter to monitor overall usage and detect leaks.
Installation Steps
1. Design the Layout
Sketch the positions of all pots, planters, and garden beds on your deck. Group vegetation by hydration demands, such as drought-tolerant succulents versus water-loving herbs. Select a central hub near the nearest outdoor water source to minimize tubing length. Limit each line to under 25 feet to preserve adequate pressure throughout the network.
2. Assemble the Tubing Network
Secure the backflow preventer and filter directly to the faucet outlet. Attach the primary drip line and route it systematically across the deck. Fasten the tubing with clips positioned every two feet for stability. Branch off shorter lines to individual containers and install emitters aimed at the plant bases. Verify that the setup avoids low-hanging or obstructive placements.
3. Position the Sensors
Embed moisture sensors midway between the pot rim and the estimated root zone for precise readings. In larger planters, distribute sensors at the corners and center to capture variations. Orient them vertically and press firmly into the soil to ensure consistent contact. This placement allows the system to detect subtle changes in hydration levels accurately.
4. Integrate the Smart Controller
Use the accompanying application to connect the controller to your home Wi-Fi network. Sync the sensors and designate zones for different garden sections. Input details on plant varieties, such as tomatoes, basil, or ornamental flowers, to inform the AI algorithms. Over the initial days, the system analyzes patterns and refines its operations autonomously.
5. Test and Adjust the System
Initiate a manual watering cycle lasting 10 minutes to evaluate performance. Observe each emitter for uniform output, ideally one drop per second. Clear any blockages and replace faulty units as necessary. Allow two full automated cycles for data collection before transitioning to hands-off mode, monitoring for any initial discrepancies.
Safety Considerations
Position all electrical components in shaded, dry locations to prevent moisture damage. Employ waterproof seals on sensor wiring and connections. Anchor tubing securely to avoid tripping hazards over high-traffic deck areas. Always shut off the water supply prior to modifying fittings, thereby avoiding sudden pressure releases or spills.
Common Troubleshooting Solutions
Excessive soil wetness signals overwatering; decrease the frequency via the app or reposition sensors deeper in drier zones. Persistent dryness in pots may require an additional emitter or inspection for tubing obstructions. Wi-Fi interruptions call for relocating the controller nearer to the router or installing a signal extender.
Frequent cycling often indicates a need for recalibration. Activate the AI reset function in the app and permit fresh data accumulation over several days. Regularly review logs to identify trends, such as seasonal adjustments for humidity shifts.
Cost and Time Investment
A standard setup for a medium-sized deck typically ranges from $120 to $250. The controller and sensors account for the majority of expenses, while tubing and emitters remain affordable at under $40. Initial installation requires approximately three hours, depending on deck complexity. Ongoing maintenance involves brief checks, ensuring long-term efficiency with minimal effort.
Ongoing Maintenance Practices
Inspect and clean the filter biweekly to maintain flow rates. Flush the main line monthly to remove sediment buildup. Promptly replace any emitters showing irregular drips. Verify sensor depths remain unchanged after rain or disturbances. Apply firmware updates as prompted by the app to incorporate performance improvements and security enhancements. These routines sustain the system's precision and reliability.
Efficient Storage and Organization
Keep reserve fittings, tubing segments, and basic tools like a small wrench in a sealed, weatherproof container adjacent to the deck. Tag all zone wires and sensor leads with adhesive labels for quick identification. Record the app login credentials in a secure household log to facilitate access during updates or recoveries.
Professional Assistance Options
For installations exceeding five zones or involving extensive raised beds, consult a specialist to optimize pressure distribution. Request a detailed schematic of the layout and a walkthrough of app features to build confidence in management.
Advancing Your Deck Garden
Commence with a single controller and select sensors to establish baseline stability. Monitor moisture metrics weekly and tweak emitter outputs for refinement. Gradually incorporate additional zones as the system proves effective. This progression eliminates the clutter of traditional hoses, fostering a serene, low-maintenance outdoor retreat where plants flourish independently.