Upgrade Decks with Smart Solar Retractable Shades
Direct sunlight, glare, and excessive heat often deter individuals from fully enjoying their decks. A smart solar retractable shade addresses these challenges by providing precise control over light and temperature, all while minimizing energy consumption. Users can extend the shade to create a shaded oasis or retract it to allow natural light with a simple remote command.
This comprehensive guide details the functionality of smart solar retractable shades, their advantages, and the process for seamless integration into deck designs. Readers will gain insights into components, required tools, installation procedures, ongoing maintenance, and practical considerations for long-term enjoyment.
Overview
A smart solar retractable shade functions as a motorized canopy that deploys or retracts using energy harvested from integrated solar panels. This system protects decks from intense sunlight and light precipitation, while allowing customization of shade coverage via remote control or smartphone application.
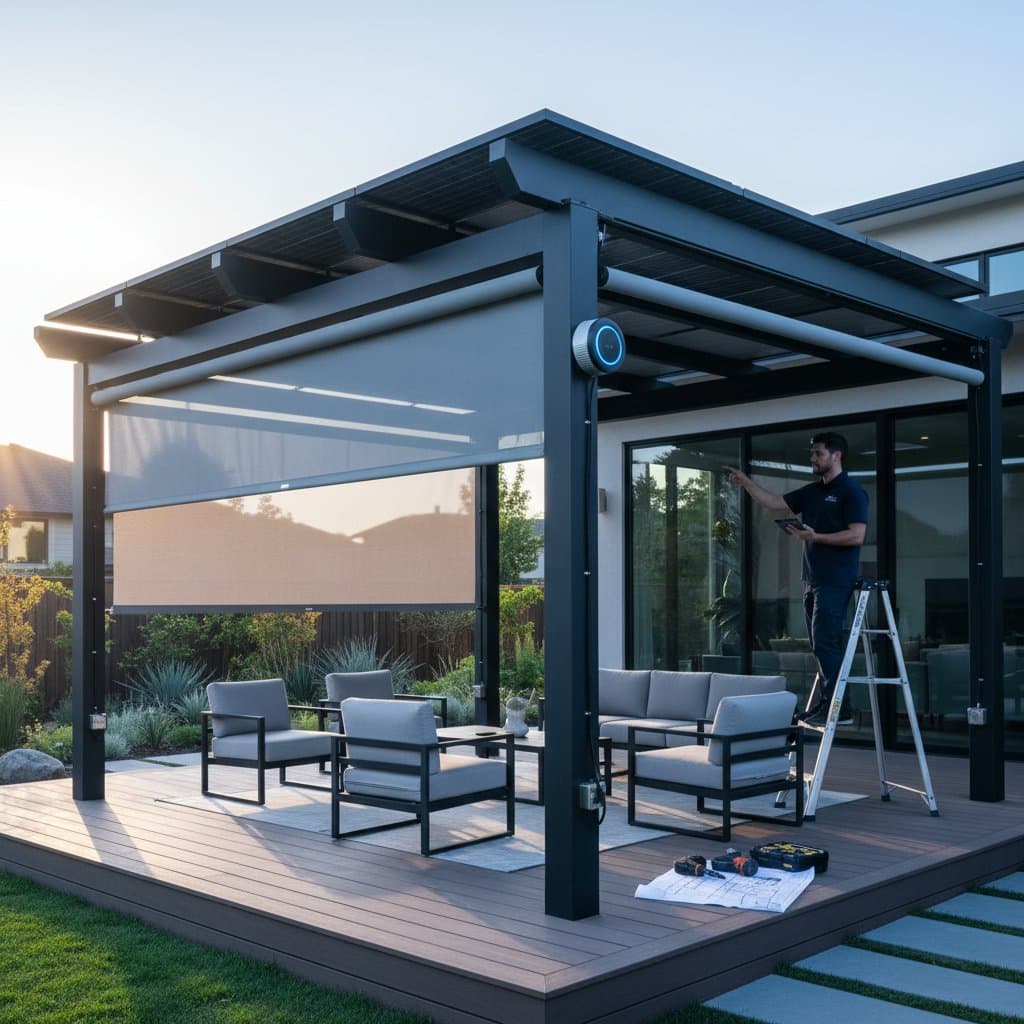
These shades integrate effectively with pergolas, open-air decks, and patio structures. The attached solar panel recharges a compact battery that powers the motor, eliminating the necessity for connection to household electricity.
Primary Advantages
- Energy Efficiency: Solar energy ensures operational costs remain minimal.
- Enhanced Comfort: Rapid adjustments to shade and ventilation improve outdoor usability.
- Protective Features: Safeguards deck furniture, surfaces, and materials against UV-induced fading.
- Integrated Automation: Compatibility with sensors and voice-activated systems enables hands-free operation.
- Simplified Installation: Absence of wiring suits decks lacking accessible power sources.
Installation of such a system transforms an outdoor space into a versatile extension of the home. The retractable design serves as an adaptable overhead barrier, delivering shade on demand without permanently obstructing views or airflow.
Required Tools and Materials
Most solar retractable shade installations require standard household tools. Consult the manufacturer's specifications for precise dimensions and mounting requirements to ensure compatibility.
Essential Tools:
- Cordless drill equipped with various screwdriver bits
- Tape measure extending at least 25 feet (7.6 meters)
- 24-inch (61-centimeter) level for alignment verification
- Stable ladder or elevated platform
- Adjustable wrench for securing fasteners
- Safety glasses and protective gloves
Necessary Materials:
- Complete smart solar shade kit, including motor, fabric panel, and solar collector
- Mounting brackets paired with bolts appropriate for deck structural elements
- Weather-resistant sealant for sealing penetration points
- Cable management clips or protective conduit for solar wiring
- Silicone lubricant spray for rail and pivot mechanisms
Solar panels typically measure approximately 12 by 18 inches (30 by 45 centimeters). A single panel suffices for shades up to 16 feet (4.9 meters) in width with one motor.
Installation Procedures
Adhere to these sequential steps to achieve a secure and efficient installation of a smart solar retractable shade.
Step 1: Precise Measurement and Positioning
Determine the deck's exact width and the optimal mounting height for the shade. Identify and mark attachment locations on the supporting wall or pergola beam. Position the shade assembly at a minimum height of 8 feet (2.4 meters) above the deck surface to accommodate comfortable passage.
Safety Consideration: Collaborate with an assistant to stabilize the shade cassette during the marking phase.
Step 2: Secure Mounting Brackets
Drill pilot holes at the marked positions. Fasten brackets using lag bolts that penetrate at least 2 inches (5 centimeters) into the underlying framework. Verify the levelness of each bracket to prevent misalignment.
For masonry installations, employ anchors designed to support substantial structural loads.
Step 3: Affix the Shade Cassette
Elevate the cassette assembly and align it with the installed brackets. Engage all securing mechanisms and tighten screws firmly. Confirm the cassette's level orientation to facilitate uniform fabric deployment.
Step 4: Position the Solar Panel
Select a mounting location for the solar panel that receives unobstructed sunlight throughout the day. Orient the panel at an angle of 30 to 45 degrees to maximize energy capture. Route the connecting cable along the framework using clips or conduit, then attach it to the battery compartment or control unit on the shade.
Step 5: System Activation and Verification
Power on the unit and operate the remote or application to fully extend and retract the shade. Monitor for consistent motor performance without unusual noises. Fine-tune tension adjustments if the fabric exhibits sagging or rapid retraction.
Step 6: Weatherproofing and Finalization
Apply sealant to all bolt and screw entry points to prevent moisture ingress. Remove excess material promptly. Lubricate track channels and joint pivots with silicone spray to ensure smooth operation.
Step 7: Configure Automation Features
Connect the shade to a compatible mobile application or home automation hub. Program automated functions, such as timed operations, solar intensity detection, or wind response mechanisms, for effortless daily management.
Essential Safety Guidelines
- Maintain a clear area around the operating shade during initial motor tests to protect children and pets.
- Avoid installation procedures during periods of high winds or precipitation.
- Deactivate the motor prior to any fabric cleaning activities.
- Utilize a reliable ladder and maintain three points of contact when performing elevated tasks.
Should the deck's structural elements appear compromised or irregular, address repairs prior to attaching any components.
Common Troubleshooting Solutions
Shade Fails to Operate: Verify the integrity of the solar panel connection and inspect the battery indicator for sufficient charge. Clean or reposition a panel obstructed by shadows or debris.
Uneven Fabric Deployment: Adjust side tension mechanisms and realign the cassette for level positioning. Cycle the shade through full extension and retraction twice to recalibrate.
Intermittent Motor Shutdown: Low battery levels or activation of the wind safety feature may cause pauses. Allow a brief recovery period before attempting operation again.
Remote Connectivity Issues: Initiate a reset by holding the controller's programming button for five seconds, then follow application prompts to reestablish the connection.
Ongoing Maintenance Practices
Regular upkeep ensures the longevity and performance of a solar retractable shade system.
- Gently clean the fabric surface every few months using a solution of mild soap and water; allow complete drying before retraction.
- Remove accumulated dust and pollen from solar panels with a soft, damp cloth.
- Apply silicone lubricant to mechanical joints one to two times per season.
- Conduct annual inspections of mounting hardware, tightening any loosened fasteners.
In areas prone to heavy snowfall, fully retract the shade and engage locking mechanisms prior to winter onset.
Storage Recommendations
Store the remote control and ancillary components in a waterproof container within the home during periods of non-use. For seasonal removal, place the shade in a well-ventilated, dry environment. Avoid compacting damp fabric, as this promotes mold growth within days.
Cost and Timeline Considerations
Entry-level smart solar retractable shade kits range from $900 to $2,500, influenced by factors such as span width, motor specifications, and fabric resilience. Custom configurations for larger areas may exceed $4,000.
A two-person team can complete installation in 3 to 5 hours using basic tools. Professional services incur additional fees but provide expertise in secure anchoring and code compliance, particularly for intricate setups.
Indicators for Professional Assistance
Engage a certified professional for scenarios involving:
- Advanced electrical synchronization with broader smart home ecosystems.
- Evaluations of deck or pergola structural capacity.
- Specialized anchoring on masonry or textured surfaces.
Prior to commitment, inquire about warranty details, motor reliability, and fabric's ultraviolet resistance ratings. Professionals ensure adherence to local regulations.
Seasonal Care Protocols
- Early spring: Thoroughly clean solar panels and verify motor functionality ahead of regular use.
- Summer months: Monthly inspections of fabric tension, as elevated temperatures may affect material tautness.
- Late autumn: Retract and secure the shade in anticipation of gusty conditions.
- Routine: Clean the cassette's lower surface to eliminate debris that retains moisture.
Essential Insights
Smart solar retractable shades offer a sustainable solution for enhancing deck comfort without ongoing energy expenses. Their ease of installation and automation features make them accessible for most homeowners. Proper maintenance extends their durability, providing years of reliable performance.
Action Plan for Implementation
- Assess Deck Dimensions: Accurately measure width and mounting elevation to select an appropriate shade model.
- Evaluate Product Options: Review at least three kits, focusing on fabric strength, motor power, and coverage warranties.
- Schedule Installation: Choose a day with favorable weather and secure assistance for the process.