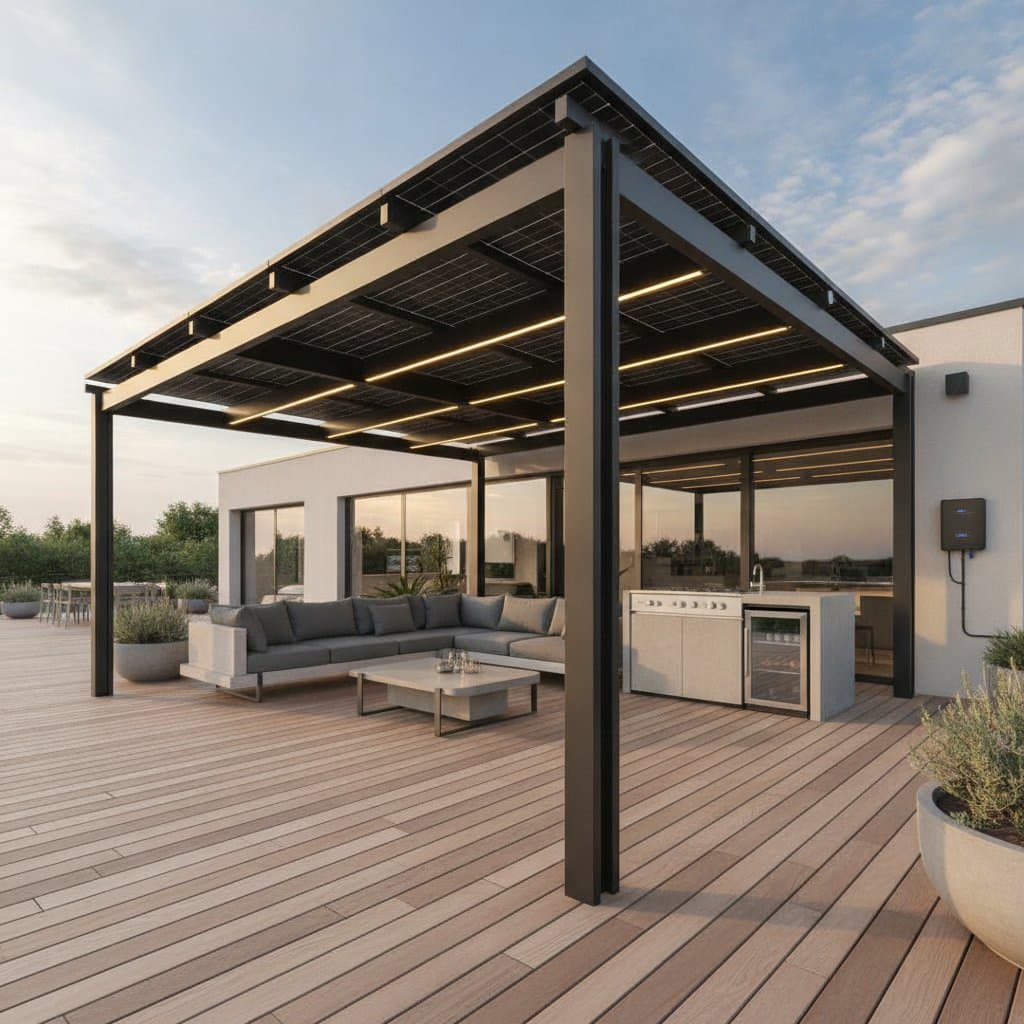
Solar Pergolas Power Decks With Energy-Generating Shade
Your deck should serve as a comfortable retreat rather than a sun-baked surface. A solar pergola addresses both comfort and utility by providing shade while generating electricity for household use. Homeowners can enjoy filtered light during daily activities as the overhead panels contribute to overall energy needs.
The project integrates structure, comfort, and renewable power generation. The following sections cover planning, construction, and ongoing care for a functional installation.
Overview
A solar pergola consists of a freestanding or attached frame topped with solar panels. These panels replace traditional slats to create shaded space that feeds electricity into the home system or a battery storage unit.
This design suits urban decks, rooftop patios, and small yards where roof space remains limited. It delivers covered seating alongside power production without restricting access to other areas.
Tools and Materials
Basic construction requires standard lumber and solar components. Collect these items before starting:
- Pressure-treated posts measuring at least 4 by 4 inches
- Crossbeams and rafters sized to the deck dimensions
- Galvanized brackets, bolts, and screws
- Concrete mix for securing post bases
- Level, drill, saw, and ladder
- Solar panels rated for outdoor use, typically six to ten units
- Inverter, charge controller, and optional battery storage
- Outdoor wiring and conduit
- Grounding rod and clamps
Allow two weekends for assembly when a solid deck base already exists.
Steps
1. Measure and Mark
Determine the shaded area needed. A frame measuring 10 by 12 feet covers a typical dining setup. Mark post positions at corners and along edges spaced six feet apart to support even panel alignment.
2. Set the Posts
Dig holes two feet deep and add four inches of gravel for drainage. Place posts in concrete and verify plumb alignment. Allow at least 24 hours for curing before attaching beams.
3. Add Beams and Rafters
Secure horizontal beams with brackets and bolts. Install rafters across the top with consistent spacing for airflow and panel mounting. Maintain a pitch of five to ten degrees to promote water runoff.
4. Mount Solar Panels
Follow manufacturer guidelines for clip placement and connections. Route wiring through conduit to protect against moisture. Engage a licensed electrician for final integration with the inverter or grid.
5. Test and Seal
Activate the system and verify voltage output. Apply exterior sealant to all wood joints. Add trim or finish as preferred for appearance.
Safety Tips
- Wear gloves and safety glasses during cutting or drilling tasks.
- Disconnect power sources before handling any wiring.
- Install ground fault protection to reduce shock risk.
- Anchor posts firmly to resist wind loads.
- Stabilize ladders and avoid solo work at heights.
Secure construction extends service life and safeguards users.
Troubleshooting
Low power output often results from surface buildup. Clean panels with mild soap and water to restore efficiency.
Water accumulation requires adjustment of the frame pitch or addition of a drip edge. Standing moisture places stress on panel surfaces.
Loose connections appear as flickering lights on the inverter. Inspect and replace corroded fittings as needed.
Frame movement calls for diagonal braces or steel angles at corners.
Budget and Time
Total costs range from 3000 to 10000 dollars based on size and component quality. Professional electrical work increases expenses.
Cost reduction options include recycled or composite materials, phased panel additions, and deferred battery storage. Maintain quality on wiring and hardware to meet code standards.
Maintenance
Routine care involves semiannual inspections. Wipe panels to remove accumulated dirt. Examine sealant and repaint exposed wood. Tighten all fasteners and clear debris from rafters.
Post-storm checks prevent damage from lodged objects. Panels typically operate for more than twenty years with basic attention.
Seasonal Adjustments
Warm periods benefit from open furniture arrangements and airflow-friendly plants. Cooler months allow addition of side curtains or portable heating to prolong use.
Remove snow accumulation with a soft brush rather than metal implements. One inch of coverage can halt power generation entirely.
Low-voltage lighting powered by the system provides evening illumination.
Storage Practices
Keep accessories in a weather-rated deck box. Organize cords on wall hooks and maintain a labeled container for spare parts and cleaning supplies. An indoor monitor tracks output across multiple circuits and highlights performance changes.
Professional Assistance
A licensed electrician handles ties to the main service panel and confirms local permit requirements. Structural engineering review applies to rooftop installations or heavy beam selections. Systems exceeding two kilowatts gain proper grounding and warranty protection through professional installation.
Project Execution
A solar pergola converts deck space into a shaded energy source. Careful planning and regular attention deliver lasting returns. Begin with core framing and seating, then incorporate powered lighting for extended enjoyment.