The Future of Balconies: Self-Watering Automation
Balcony plants often suffer from inconsistent moisture during long workdays or trips away from home. Urban residents seek vibrant, serene outdoor areas, yet maintaining plant vitality can resemble an additional responsibility. The objective remains straightforward: consistent hydration, reduced anxiety, and greater leisure to appreciate the surroundings. Self-watering automation achieves this balance effectively.
This guide delineates the essentials of automated balcony watering, its significance for confined city environments, installation procedures, and strategies for sustained operation. Readers gain understanding of how sensors, pumps, and timers collaborate to sustain plant hydration with minimal intervention.
Overview
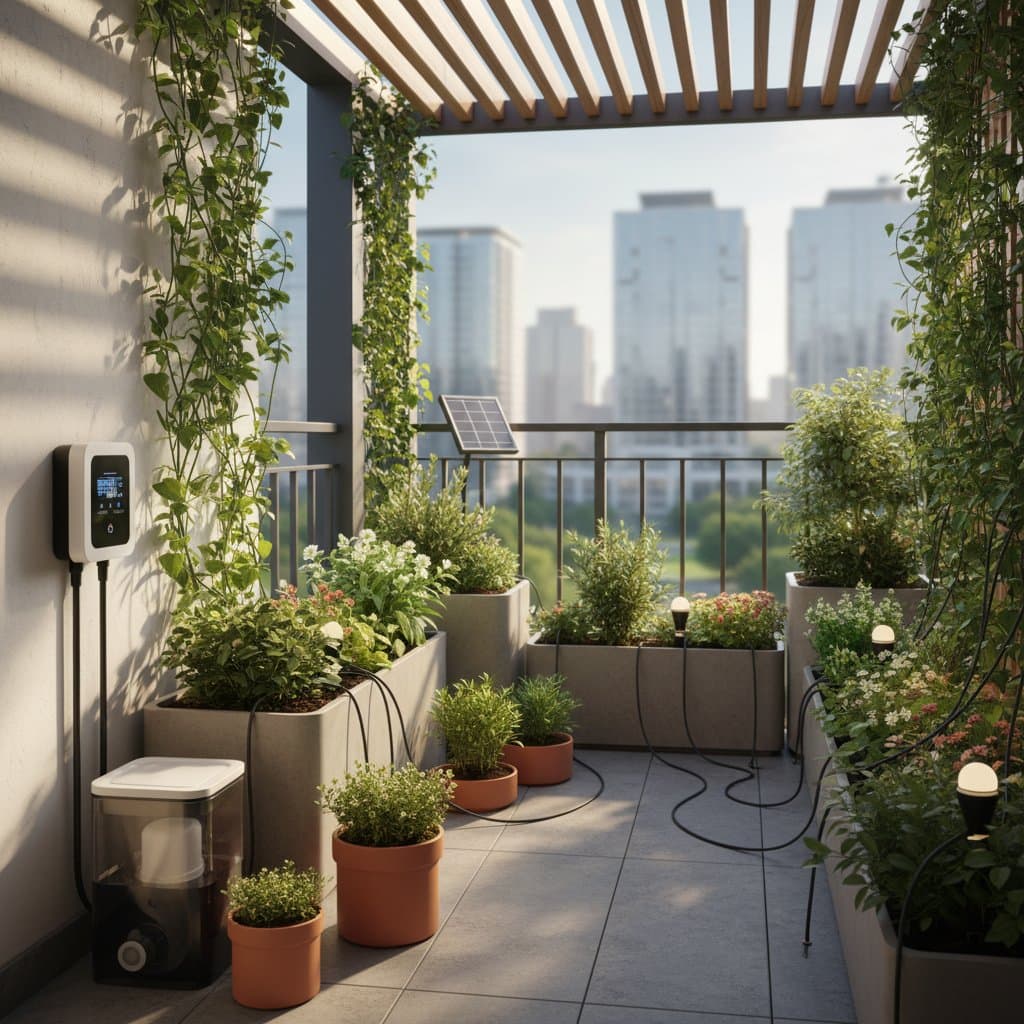
A self-watering automated system constitutes an arrangement that supplies optimal water volumes to balcony plants without manual intervention from faucets or watering cans. It incorporates moisture sensors, compact pumps, and a central control unit to assess soil aridity and dispense water precisely when required.
The primary advantage lies in reliable plant vitality. Such systems avert drought-induced stress and excess saturation, prevalent challenges in balcony cultivation. Moreover, they promote water conservation, frequently reducing consumption by up to 50 percent relative to manual methods.
For metropolitan inhabitants, automation converts a balcony into an effortlessly maintained verdant area. Individuals with extended work schedules or travel plans return to flourishing greenery. Consequently, routine maintenance diminishes, while plant development stabilizes.
Why It Matters
Balconies in urban settings endure severe elements. Intense sunlight, gusty winds, and restricted container sizes accelerate soil desiccation. Manual irrigation proves susceptible to oversight or excess application. Self-watering systems eliminate uncertainty by adapting to soil conditions instantaneously.
Intelligent irrigation further bolsters environmental responsibility. Precise regulation of volume and schedule minimizes runoff and inefficiency. This approach yields lower utility expenses and a reduced ecological impact.
Tools and Materials
Assembling a balcony watering system requires select essential components, obtainable in scaled kits or individual units.
Basic materials:
- Water reservoir: Capacity of 3 to 5 gallons (11 to 19 liters) suffices for typical balconies.
- Submersible pump: Select models with low-pressure ratings, approximately 30 psi or below.
- Moisture sensors: Allocate one per container or about one per 2 square feet (0.2 square meters) of planting area.
- Tubing: Employ flexible 1/4-inch (6 mm) drip lines.
- Emitters or drippers: Choose adjustable variants delivering 0.5 to 2 gallons (1.9 to 7.6 liters) hourly.
- Smart controller: Opt for Wi-Fi-enabled devices that interpret sensor inputs and activate cycles.
- Power source: Utilize a compact plug-in adapter or solar panel compatible with pump and controller demands.
Position a small plastic tub or waterproof tray beneath the reservoir to safeguard the balcony surface against potential spills.
Steps
Step 1: Plan the Layout
Measure each planting container and identify locations for power access or solar exposure. Limit tubing lengths to under 10 feet (3 meters) to ensure uniform distribution.
Step 2: Position the Reservoir
Locate the reservoir in a shaded area to inhibit algal proliferation. Elevate it marginally above planters to facilitate gravity-aided flow if desired.
Step 3: Install the Pump
Submerge the pump within the reservoir. Secure the primary 1/4-inch tubing to its outlet. Route the tubing along balcony perimeters or railing foundations for neatness, fastening with clips or zip ties.
Step 4: Attach Drippers
Integrate emitters into the tubing adjacent to plants. Embed dripper stakes into soil to a depth of 2 inches (5 cm). Assign one dripper per modest pot or two for expansive troughs.
Step 5: Integrate Moisture Sensors
Position sensors midway between plant stems and container rims. Insert them to half their length into the soil. Link each to the controller via supplied cables or wireless connections.
Step 6: Configure the Controller
Utilize the accompanying app or interface to establish Wi-Fi linkage. Define initial parameters, such as activation at 30 percent soil moisture. Refine schedules and volumes following several days of monitoring.
Step 7: Conduct Testing
Initiate a manual cycle to verify water delivery to all emitters. Inspect for obstructions or seepage in tubing lines. Secure fittings as necessary.
Step 8: Observe and Refine
Monitor soil conditions via app displays or status indicators. Modify emitter outputs upon plant maturation or with seasonal shifts.
Safety Tips
- Electrical Precautions: Employ waterproof junctions for pumps and sensors. Shield outlets with covers rated for exterior use.
- Overflow Prevention: Validate that drainage trays accommodate a complete cycle's volume.
- Load Assessment: Balconies possess structural limits. A filled 5-gallon reservoir contributes roughly 42 pounds (19 kg); verify overall capacity prior to setup.
Troubleshooting
Uneven Water Distribution
Examine for air pockets or blocked emitters. Clear lines by detaching the terminal cap and operating the pump momentarily.
Pump Failure to Operate
Verify power connections and controller pairings. For solar units, ensure panels receive unobstructed sunlight for adequate daily duration.
Persistent Soil Saturation
Lower emitter rates or elevate moisture activation thresholds in controller options. Incorporate perlite into soil compositions to enhance drainage.
App Connectivity Issues
Reinitialize the controller and reestablish Wi-Fi. Maintain proximity under 30 feet (9 meters) from the router for reliable performance.
Maintenance
Consistent upkeep ensures system dependability.
- Biweekly Tasks: Inspect and replenish reservoir levels.
- Monthly Routines: Clean sensors and reservoir interiors to deter algae. Submerge emitters in vinegar solution for 10 minutes to dissolve mineral deposits.
- Seasonal Inspections: Evaluate tubing for fractures or degradation; replace compromised sections.
- Winter Preparation: Evacuate water from reservoir and lines to avoid freeze damage. Relocate pump indoors for storage.
Storage
Organize reserve tubing, emitters, and fittings in a designated container. Preserve sensors in arid conditions to shield metallic probes. Coil lines gently to avoid bends. A compact plastic container in a utility area proves ideal.
Budget and Time
Cost Estimate: Basic configurations range from 80 to 200 dollars, influenced by scale and component sophistication.
Installation Duration: Allocate 2 to 3 hours, encompassing trials and calibrations.
Ongoing Upkeep: Requires under 10 minutes weekly post-setup.
Seasonal savings in water and effort typically recoup initial investments within the inaugural year.
Seasonal Adjustments
Summer Conditions: Augment cycle frequency amid heat spells. Shade the reservoir consistently.
Autumn and Winter: Diminish water quantities; plants often demand half the summer allocation as temperatures decline.
Pre-Frost Measures: Disconnect and purge all conduits. Indoor storage protects pumps and sensors.
Spring Activation: Restore reservoir fill, execute test runs, and substitute deteriorated tubing before new plantings.
Professional Assistance
Complex balcony configurations or absent power sources may necessitate expertise. For elevated installations surpassing water origins or integrations with building systems, consult licensed plumbers or irrigation specialists.
Inquire regarding:
- Backflow prevention mechanisms
- Compliant waterproof electrical installations
- Evaluations of load capacities and drainage for sizable containers
Professionals can synchronize balcony setups with broader property irrigation for unified management.
Essential Outcomes
Automated balcony watering streamlines a demanding chore into an efficient process. Plants sustain health, water conservation occurs, and daily obligations lessen.
Immediate Actions for Success:
- Initiate with a Single Container. Deploy a basic self-watering kit to observe sensor responses to specific soil varieties.
- Log Observations Over Seven Days. Record moisture fluctuations and plant reactions to inform adjustments.
- Scale Up Methodically. Integrate additional containers upon system familiarity, optimizing schedules progressively.
Compact irrigation technology extends beyond expansive landscapes. Through efficient pumps and responsive sensors, balconies flourish independently. Residents secure reliable foliage, liberated schedules, and meaningful contributions to sustainable urban life.