
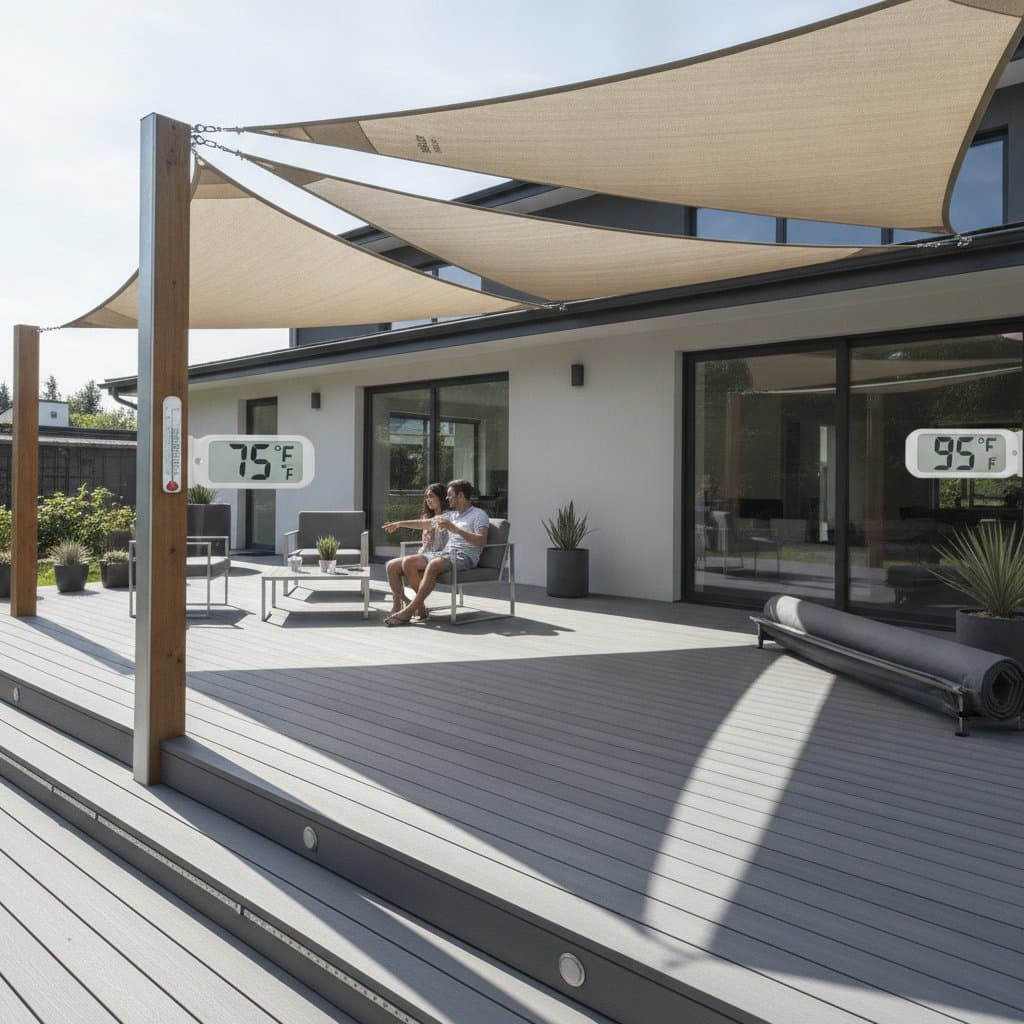
Solar Shade Sails Can Drop Deck Temperatures by 20 Degrees
A sunny deck can become too hot for bare feet, outdoor meals, or relaxed family time. A well planned solar shade sail can lower the surface temperature by as much as 20 degrees Fahrenheit, or about 11 degrees Celsius, when it blocks direct sunlight and allows air to move around the deck.
The goal is simple. Create a cooler, safer outdoor room without sealing the deck under a heavy roof. This guide explains how shade sails work, how to choose the right fabric and layout, how to install them safely, and when retractable awnings make a better choice.
Overview
A solar shade sail is a tensioned fabric panel attached between strong anchor points. The fabric blocks or filters sunlight above a deck, patio, balcony, or courtyard. Unlike a solid canopy, a breathable shade sail lets some heat and wind pass through the material.
The cooling result depends on several factors. A dark composite deck exposed to direct sun can become much hotter than the surrounding air. A shade sail blocks radiant heat before it reaches the boards, furniture, and people below. Light colored fabric often reflects more sunlight, while breathable fabric reduces the trapped air that can form beneath solid covers.
A 20 degree reduction is possible under strong sun, but it is not guaranteed in every setting. The best results come from covering the deck during its hottest exposure, leaving space for airflow, and selecting fabric made for ultraviolet protection.
Smart Shade Planning
Start by tracking the areas that become uncomfortable. Stand on the deck during the hottest part of the day and mark where sunlight lands on the seating area, grill, stairs, and walking path. A shade sail works best when its coverage matches the sun angle, not just the outline of the deck.
Measure the deck length and width. Add at least 12 inches, or 30 centimeters, of clearance from walls, railings, and tree branches. A 12 foot by 16 foot deck, about 3.7 meters by 4.9 meters, may need a sail around 10 feet by 14 feet, or 3 meters by 4.3 meters, to leave room for angled tension and drainage.
Use these planning checks:
- Cover the seating zone first.
- Keep grills and heat producing equipment outside the fabric shadow when possible.
- Leave at least 8 feet, or 2.4 meters, of head clearance over walking areas.
- Angle one corner lower than the opposite corner to help rainwater drain.
- Plan for a 5 to 10 percent fabric slope across the panel.
- Keep the sail away from electrical wires, chimneys, and unstable branches.
A triangle sail can fit a small urban deck and create a lighter visual effect. A rectangle or square sail provides more coverage but places greater force on each anchor. Two smaller sails can offer better airflow and simpler tension than one oversized panel.
Tools and Materials
Gather the complete kit before drilling or climbing. Most residential shade sail installations need:
- One ultraviolet resistant shade sail, usually priced from $80 to $350.
- Four stainless steel turnbuckles, rated for outdoor structural use.
- Four attachment points, such as heavy eye bolts or wall plates.
- Four lengths of stainless steel cable or chain, each 2 to 4 feet long.
- A tape measure and pencil.
- A stud finder for wood framed walls.
- A drill and exterior rated drill bits.
- A socket set or adjustable wrench.
- A ladder rated for your weight.
- Exterior sealant for wall penetrations.
- A level and a long straightedge.
- A helper for lifting and tensioning the fabric.
Do not attach a sail to vinyl siding, thin trim, a decorative railing, or a fence post set in shallow soil. These surfaces may look solid but can pull loose under wind load. Use structural framing, masonry, or professionally installed posts.
Steps
1. Mark the anchor points
Transfer your measured layout to the wall, posts, or beams. Mark each point where the fabric corner will connect. Keep the points at different heights when possible, with one corner about 12 to 24 inches, or 30 to 60 centimeters, lower than another.
2. Check the structure
Inspect posts for rot, cracks, loosened hardware, and movement. A freestanding post should be set in a properly sized concrete footing. The required footing depends on soil, sail size, local wind, and local building rules.
3. Install the hardware
Drill pilot holes that match the hardware instructions. Install eye bolts through structural wood with washers and nuts. For masonry, use anchors rated for the wall material, not generic plastic plugs. Seal exterior wall penetrations to limit water entry.
4. Connect the sail
Attach a short cable, chain, or rated strap to each corner. Connect the turnbuckles between the attachment hardware and the sail. Keep every connection straight. A twisted corner can place uneven force on the fabric seam.
5. Tension the fabric
Tighten each turnbuckle in small, even adjustments. Move from corner to corner instead of fully tightening one side. The fabric should look smooth, with no deep pockets or loose scallops.
Leave modest flexibility in the system. Over tightening can pull hardware from the structure or stretch the fabric. A properly tensioned sail stays firm while retaining enough movement to handle normal air movement.
6. Test the shade
Stand under the sail and observe the shaded area. Check the deck surface, seating, steps, and door threshold. Move chairs if needed. A shade sail that misses the main seating zone may look attractive but provide little comfort.
Test drainage with a hose, using a gentle flow. Watch for water pooling. Never stand under the sail during a storm test or strong wind.
Safety Tips
Shade sails need routine inspection because wind, rain, and ultraviolet exposure stress fabric and hardware. Check each corner, seam, turnbuckle, and anchor at least once each month during the outdoor season.
Take the sail down when strong wind, severe rain, or snow is expected. A removable sail often lasts longer than one left exposed through every weather event. Follow the manufacturer care instructions, since some fabrics can be machine washed while others need gentle hand cleaning.
Keep the fabric at least 3 feet, or 0.9 meters, from hot flues and heat sources. Never place it above an open fire pit. Keep children away from dangling cables and turnbuckles. Cover sharp hardware ends with protective caps.
Troubleshooting
The deck still feels hot. Check whether the sail blocks the sun during the hottest exposure. A panel placed too high may miss low angled sunlight. Add a second smaller sail or lower one corner if clearance remains safe.
The fabric sags after rain. Improve the slope and retension the corners after the fabric dries. Persistent sagging may mean the sail is too large for the anchor layout.
The wall hardware moves. Stop using the sail and inspect the attachment. The anchor may have missed structural framing, or the wall may need a larger plate. Do not solve movement by simply tightening the turnbuckle.
Water enters near a wall anchor. Remove tension, inspect the seal, and repair the penetration with exterior sealant suited to the wall material. Serious rot or masonry damage needs professional repair.
The sail flaps loudly. Check each corner and edge. Loose fabric, unequal tension, or an oversized panel can create noise. Small, even adjustments often solve the problem.
Retractable Awnings and Other Options
A retractable awning suits a deck attached directly to a home. It can extend when you need shade and retract when you want sunlight. Quality retractable awnings often cost $600 to $3,000, depending on width, projection, fabric, motorization, and installation.
Choose a retractable awning when:
- You want shade close to a door or window.
- You need to retract the cover during wind.
- You prefer a clean attachment to the house.
- You want optional motor control or a sun sensor.
Choose a shade sail when:
- You want lower upfront cost.
- You need coverage across a freestanding deck.
- You prefer a light, open structure.
- You can install strong posts or use existing beams.
A retractable awning should never be treated as a storm shelter. Retract it before strong wind. A shade sail should also be removed or loosened according to its product instructions when severe weather approaches.
Budget and Time
A basic shade sail project can cost $180 to $700 for fabric, hardware, sealant, and small tools. Professional installation may add $300 to $1,200, especially when new posts, concrete footings, masonry anchors, or electrical work are involved.
Plan two to four hours for a simple installation with existing structural points. A post based system may require several days because concrete needs time to cure before full tension is applied.
Save money on decorative accessories, not structural hardware. Stainless steel turnbuckles, rated anchors, and strong posts protect the deck and the people below. If the hardware package has no load rating, choose a different product.
Maintenance
Rinse the sail with clean water every few weeks when dust and pollen collect on the fabric. Use mild soap and a soft brush for stains. Avoid bleach, abrasive pads, and pressure washers unless the manufacturer permits them.
Next Steps
Measure your deck during peak sun hours. Identify the seating and activity zones that need protection. Select a sail size that allows proper tension and drainage. Gather the required hardware and plan your anchor points. Install the system methodically, checking each connection before applying full tension. Test the coverage and drainage before relying on the shade for daily use.