Introduction to Smart Irrigation Loops
Urban living presents unique challenges for plant care, particularly on balconies where space is limited and schedules are demanding. Smart irrigation loops address these issues by automating the watering process with small-scale drip systems connected to timers or app-controlled devices. These systems ensure plants receive exact amounts of water at optimal times, promoting healthy growth without constant human intervention.
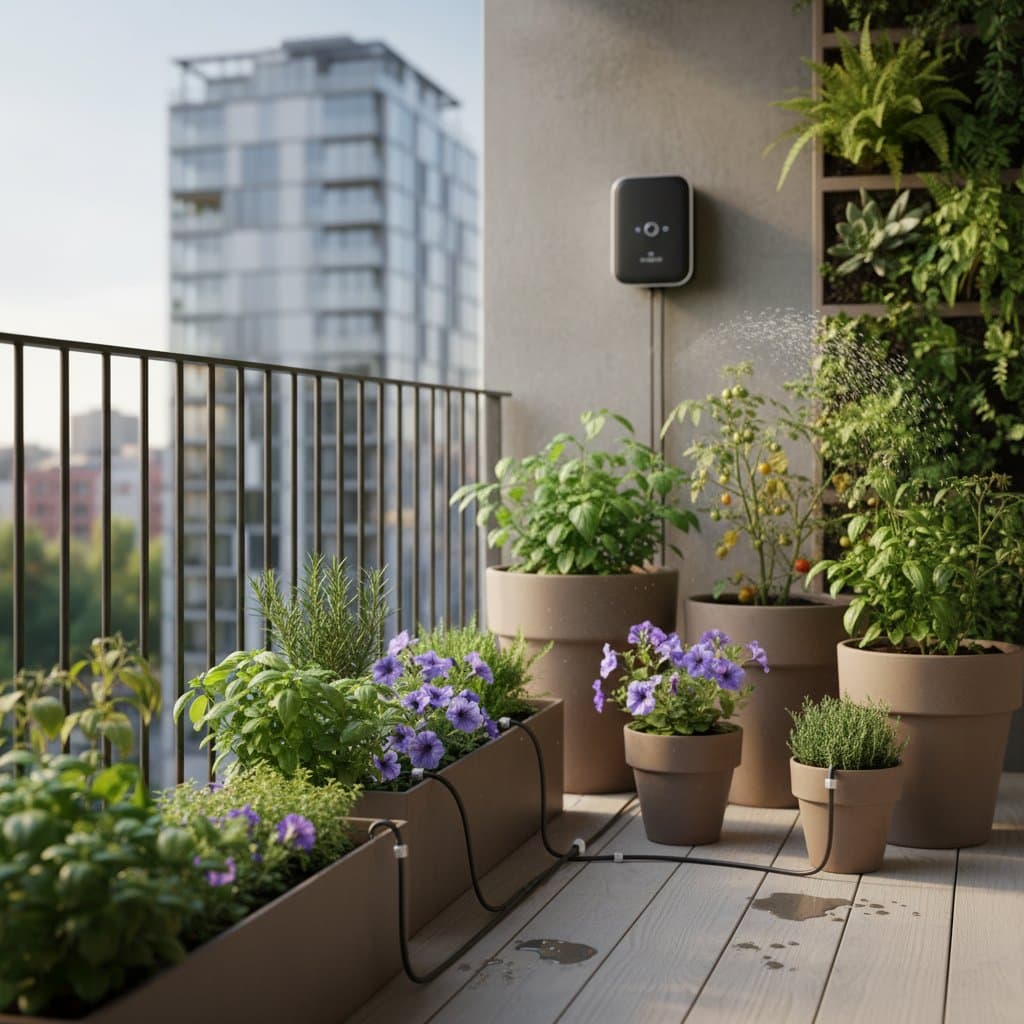
The core of a smart loop consists of flexible tubing, emitters that release water slowly into the soil, and a controller that regulates flow based on programmed schedules. Water sources can include a nearby faucet or hose connection, making installation straightforward for most users. By mimicking natural rainfall patterns, these loops prevent overwatering or underwatering, common pitfalls in balcony environments exposed to varying sunlight and wind.
Adopting this technology transforms routine maintenance into a background task. Gardeners reclaim hours previously spent with watering cans, allowing focus on enjoying their green spaces. In cities like New York, where balconies serve as vital extensions of living areas, such innovations enhance quality of life.
Benefits of Automating Balcony Watering
Time savings stand out as the primary advantage. Manual watering demands daily attention, especially during hot summers or travel periods. A smart loop operates independently, adjusting to weather via sensors in advanced models, which reduces plant stress and wilting risks.
Water conservation follows closely. Drip systems deliver moisture directly to roots, minimizing evaporation and runoff compared to sprinklers or hand-watering. This efficiency can cut usage by up to 50 percent, aligning with sustainable practices essential in water-conscious urban settings.
Plant health improves noticeably. Consistent hydration supports robust root development and blooming, even for finicky species like herbs or succulents. Reduced soil erosion from gentle drips preserves potting mix integrity, extending the lifespan of containers and plants alike.
Cost-effectiveness emerges over time. Initial investments yield returns through lower water bills and fewer plant replacements. For balcony enthusiasts, the peace of mind from a reliable system outweighs occasional tweaks, fostering a more enjoyable gardening experience.
Selecting the Right Smart Loop Kit
Assess your balcony's dimensions and plant arrangement before purchasing. Measure the total linear footage needed for tubing runs, typically 10 to 50 feet for standard setups. Count pots or planters to determine emitter quantity, aiming for one or two per container based on size and thirst level.
Evaluate controller options. Basic timers offer simple on-off cycles, while smart versions integrate with apps for remote adjustments and notifications. Battery-powered units suit balconies without outlets; solar models provide eco-friendly alternatives.
Consider water pressure from your source. Most kits handle standard household flows, but low-pressure adapters may be necessary for elevated balconies. Kits often include connectors, stakes, and filters to prevent clogs from city water minerals.
Budget plays a key role. Entry-level kits start at $40 for manual timers and basic tubing. Mid-range options around $70 add digital controls and adjustable emitters. Premium setups exceeding $100 feature weather integration and multiple zones for diverse plant needs.
Read user reviews for durability in outdoor conditions. Look for UV-resistant tubing and weatherproof controllers to withstand rain and sun exposure. Compatibility with existing pots or railings ensures seamless integration into your space.
Planning Your Installation
Sketch a layout to visualize tubing paths. Run lines along balcony edges or rails, securing with clips to avoid tripping hazards. Position emitters near plant bases for targeted delivery, avoiding foliage to prevent fungal issues.
Identify the water source. A balcony faucet works best; extend with a hose if needed. For indoor connections, ensure the line reaches without excessive length, which can reduce pressure.
Gather tools: scissors for cutting tubing, pliers for fittings, and a small wrench for connectors. Test components dry before adding water to confirm seals. Plan installation during mild weather to ease handling.
Account for plant varieties. Drought-tolerant species like lavender require less frequent cycles than thirsty ferns. Group similar plants to simplify zoning if your kit supports it.
Step-by-Step Installation Guide
Begin by attaching the main line to your water source. Use a pressure regulator if your faucet exceeds 30 PSI to protect delicate emitters. Connect the timer inline, setting initial cycles to short bursts for testing.
Lay out the tubing along your planned route. Cut sections to fit, inserting T-junctions or elbows for branches to individual pots. Punch holes for emitters using the kit's tool, then snap them in place.
Secure the loop with stakes or ties to keep it stable against wind. Place emitters at soil level, adjusting flow rates: low for small pots, higher for larger ones. Add a filter at the inlet to catch debris.
Fill pots to capacity and turn on the system. Observe for 10 minutes, checking for leaks at joints. Adjust emitter positions if water pools unevenly.
Program the controller. Start with daily watering of 10-15 minutes in the morning, modifying based on season and rainfall. Advanced apps allow soil moisture monitoring for fine-tuning.
Troubleshooting Common Issues
Uneven water distribution often stems from clogs or kinks. Flush the entire system by disconnecting the end cap and running water for one to two minutes. If drippers remain blocked, replace them with extras from the kit; soak in vinegar overnight for mineral removal.
Soggy soil indicates overwatering. Halve the emitter flow rate or shorten cycle times. Relocate affected pots to areas with more direct sun to accelerate evaporation, or improve drainage with gravel layers at pot bottoms.
Low pressure might result from long tubing runs or faulty regulators. Shorten lines where possible or add a booster pump for distant sources. Inspect the faucet aerator for restrictions.
Leaks at connections require tightening fittings or replacing worn seals. Dry the area, apply plumber's tape to threads, and reconnect firmly. Persistent issues signal incompatible parts; consult kit instructions for alternatives.
Controller malfunctions, such as failure to start, involve battery checks or resets. For app-linked devices, verify Wi-Fi signal strength on the balcony. Power cycle the unit to resolve glitches.
Ongoing Maintenance Practices
Monthly inspections keep the system performing optimally. Examine tubing for cracks, UV damage, or sediment buildup, especially in hard water areas. Clean emitters gently with a soft brush and mild soap solution.
Seasonal adjustments align with plant cycles. Increase frequency during growth spurts in spring; reduce in dormant winter periods. Monitor for pests that might chew lines, addressing with natural repellents.
Winter preparation prevents freeze damage. Disconnect the controller, open all valves, and blow air through tubing to drain residual water. Store components indoors, coiled loosely to avoid kinks.
Annual deep cleans involve disassembling and soaking parts in a diluted bleach solution. Rinse thoroughly before reuse. This routine extends equipment life beyond three years.
Track performance with a journal noting cycle changes and plant responses. This data refines schedules, ensuring long-term efficiency.
Cost Considerations and Time Investment
Basic kits range from $40 to $60, covering essentials like 20 feet of tubing and four emitters. Enhanced models with Bluetooth control climb to $80-$100, including extras like rain sensors.
Installation typically requires one hour for straightforward setups. Complex layouts with multiple zones may take two hours. Factor in minimal ongoing time: five minutes monthly for checks.
Long-term savings offset upfront costs. Reduced water use lowers utility bills, while healthier plants cut replacement expenses. For urban dwellers, the investment pays dividends in convenience.
Professional Assistance When Needed
Certain scenarios demand expert input. If the water source exceeds 15 feet from the balcony, or involves indoor plumbing modifications, engage a licensed plumber. They ensure compliance with building codes and safe installations.
Backflow preventers protect potable water supplies from contamination. Professionals install these devices correctly, avoiding fines or health risks. Discuss zoning for multi-level balconies.
For electrical integrations, like powered pumps, hire certified electricians. They assess outlet safety and weatherproofing, preventing hazards in exposed areas.
Implementing Your System
- Measure balcony dimensions and inventory pots to scale your needs.
- Select a kit aligned with your water access and automation preferences.
- Assemble and install components, testing thoroughly for functionality.
- Customize schedules to match plant requirements and local climate.
- Monitor initial runs, adjusting as plants respond.
With the system in place, observe steady progress in your greenery. Steady moisture fosters lush foliage and abundant yields, turning your balcony into a resilient urban retreat. Dedicate freed time to pruning or simply relaxing amid thriving plants.