
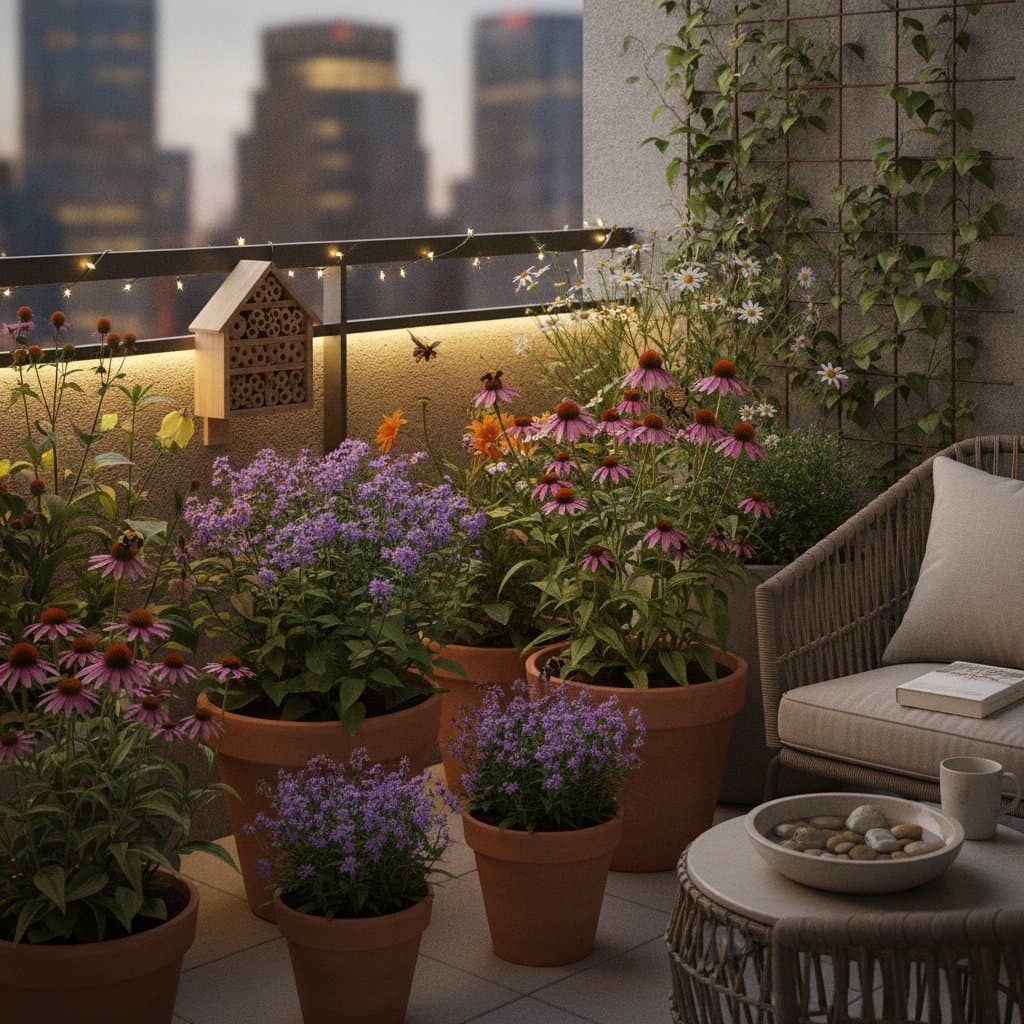
Tiny Balcony Gardens That Welcome Local Pollinators
If you have a small balcony in the city, you can still create a living patch that supports bees, butterflies, and other pollinators. A few square feet filled with the right plants can feed wildlife, brighten your view, and bring more life into your daily routine. The goal is simple. Turn an underused space into a micro garden that attracts pollinators safely and affordably.
You will learn how to choose plants, set up containers, and care for a balcony garden that keeps bees and butterflies returning. With simple steps, you can make a measurable impact from your own railing.
Overview
A pollinator garden is a collection of flowering plants that offer nectar and pollen to insects like bees, butterflies, and hoverflies. Even a small balcony can host these visitors if you provide color variety, bloom timing, and safe shelter.
You might think your space is too small or too shady, but many native plants thrive in containers. The key is to match plant choice to your sun exposure and use staggered flowering times so pollinators have food all season. A balcony garden also improves air quality, softens city noise, and gives you a spot to unwind.
Main benefits include the following:
- Supports local bee and butterfly populations
- Adds color and scent to your balcony
- Encourages mindful breaks outdoors
- Increases biodiversity in dense neighborhoods
Tools and Materials
Before you start, gather a few simple supplies. You do not need fancy gear, just good containers and healthy soil.
Materials checklist:
- 3 to 5 containers with drainage holes, each 10 to 14 inches (25 to 35 cm) wide
- Potting mix, about 1 cubic foot (28 liters) per container, labeled for outdoor use
- Native flowering plants or seeds, 5 to 7 total to start
- Watering can or hose attachment with gentle spray
- Plant labels for tracking bloom times
- Organic fertilizer for container plants
Optional items:
- Small trellis or railing clips for vines
- Bee bath or shallow dish with stones for water access
- Compost scoop or trowel
Steps
Follow these steps to set up your pollinator balcony garden safely and efficiently.
Step 1: Assess Sun and Space
Spend a day noting how much direct sunlight your balcony receives. Full sun is 6 hours or more. Partial sun is 3 to 5 hours. Shade is less than 3 hours. This will guide your plant selection. Bees and butterflies prefer sunny spots, so aim to place containers where they get the most light.
Step 2: Choose Native Plants
Pollinators recognize native flowers more easily than imported species. Choose plants adapted to your region climate and rainfall. For sunny balconies, try black-eyed Susan, purple coneflower, or bee balm. For partial shade, pick columbine, wild geranium, or foam flower.
Plan for at least three bloom periods. Early season options include crocus and wild lupine. Mid-season choices include milkweed and coreopsis. Late season options include goldenrod and aster.
Step 3: Prepare Containers
Fill each container three-quarters full with potting mix. Mix in one tablespoon of organic fertilizer per gallon of soil. Leave about one inch (2.5 cm) of space below the rim for watering. If your balcony is windy, choose heavier pots or add small stones at the bottom for weight. Place saucers under each container to catch runoff but empty them after rain to prevent mosquitoes.
Step 4: Arrange for Height and Color
Group plants by height for balance and ease of care. Tall plants like coneflower go at the back or railing edge. Medium plants like bee balm fill the center. Trailing plants like thyme or creeping sedum soften the front. Mix colors and flower shapes. Bees prefer blue, purple, and white blooms, while butterflies like red and orange. Variety keeps pollinators returning.
Step 5: Water and Feed Regularly
Check soil moisture with your finger. If the top inch feels dry, water gently until it drains from the bottom. In hot months, you might water every two days. Add liquid fertilizer once every three weeks. Use a watering can with a slow pour to avoid spills onto neighbors below.
Step 6: Add Shelter and Water
Pollinators need safe resting spots. Set up a small bee house or hang a bundle of hollow stems in a dry corner. Place a shallow dish with stones and fresh water nearby. Bees will perch on the stones to drink safely.
Step 7: Monitor and Adjust
Watch which blooms attract the most visitors. If one plant gets little attention, replace it with another native species. Keep notes on bloom timing and sunlight so you can improve next season.
Safety Tips
Avoid chemical pesticides or sprays. They harm bees and butterflies. Keep plants secure so pots cannot fall in high winds. Use railing brackets or weighted bases. Wear gloves when moving heavy containers or handling soil. If you have allergies, keep antihistamine tablets nearby when gardening.
Troubleshooting
Plants look weak or have yellow leaves. Check drainage holes. Waterlogged soil suffocates roots. Repot with fresh mix and ensure air flow.
Few pollinators visit. Add more color contrast or extend bloom variety. Bees often need early and late flowers to stay loyal to a site.
Soil dries too fast. Add mulch, about one inch thick, made of shredded bark or coconut fiber. It slows evaporation and stabilizes root temperature.
Maintenance and Storage
Keep a small brush or cloth to wipe dust from leaves weekly. Trim dead blooms to encourage new growth. Once a plant finishes its season, cut stems back to two inches (5 cm). Store unused soil in a sealed bucket to keep pests out. In cold months, group containers close to the wall and wrap them in burlap or an old blanket to protect roots from freezing.
Budget and Time
Starting a balcony pollinator garden costs roughly 60 to 120 dollars depending on container quality and plant size. You can reduce costs by using repurposed buckets or crates with drilled holes. Setup takes about two to three hours on your first day, plus 10 minutes a day for watering and observation. Once established, the garden maintains itself with minimal effort.
Seasonal Reminders
Early spring calls for replacing old soil and checking for cracks in containers. Summer requires watering deeply and deadheading faded flowers twice a week. Fall means leaving some seed heads for birds and storing delicate pots indoors. Winter is the time to clean tools and plan next year plant list.
When to Call a Pro
Call a professional gardener or local extension service if you notice mold, pest infestations, or structural damage to your balcony. They can inspect for safe load limits and suggest pest-safe treatments. Ask about integrated pest management methods that rely on beneficial insects instead of chemicals.
Begin Your Garden Today
You can start building your pollinator balcony today with three simple actions. Pick three native flowering plants that match your sunlight level. Set up sturdy containers with drainage and fresh potting mix. Add a small bee bath or bundle of stems for shelter. Within weeks, you will notice bees circling your blooms and butterflies resting on petals. Each visit shows your effort matters. Your balcony becomes more than a view. It becomes a living part of your city ecosystem.